


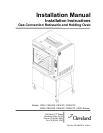


Installation Manual
Rotisserie Oven 4
Note: Instructions for assembling the oven to
the optional CR-334 warming cabinet are in a
separate guide, shipped with that unit.
Before beginning to assemble the 2 components,
inspect the equipment for damage. Do not install
damaged equipment.
Remove all tape and protective film from the oven
and the stand.
Find – and set aside – all packaged components,
such as the installation/Drain kit, rotisserie spits,
baskets, tools, etc. Locate the Installation/Drain Kit
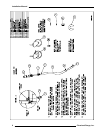
(P/N 107442) and unpack all parts. (Drawing
260ANN has a list of all drain kit parts.)
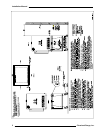
Installing the Drain Kit
(If not pre-installed, see dwg. 260ANN)
The oven is equipped at the factory with an elbow
on the drain pan. It is angled downward and
toward the rear, and is sealed against leaks.
During installation of the drain kit, be careful not to
break this seal. When assembling the drain kit
components, use a suitable sealant on all threaded
joints.
Install the 1-by-4 inch pipe nipple (item #3) to the
drain pan elbow.
Apply a bead of RTV adhesive/sealant around the
top surface perimeter of the drain blockoff plate
(item #2), and slide over the nipple. Position the
plate to block the opening between the stand and
the interior of the oven, and adhere it to the base.
This blockoff is required to maintain sanitary
certification.
Install the 4 casters to each leg of the stand – put
the 2 locking casters at the front of the unit. (After
the assembly is in place, caster spacers will need
to be installed to level the unit.
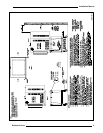
With a lift truck, or other safe means, lift the oven
onto the stand. Position the oven so that the
mounting holes in the stand and the oven line up.
(The oven overlaps the stand at the sides and rear
by 1/8-inch and at the front by 1-3/4-inch.)
Bolt the 2 units together with the 3/8-inch hardware
provided. Insert the hardware from below, through
the stand. Thread the bolts into the weldnuts in
the bottom of the oven and tighten.
Install the hose barb fitting (item #5) into the drain
valve (item #4). Next, install the drain valve onto
the nipple. Position the valve for easy operator
access from the front of the stand. Make sure it
can be opened and closed without obstruction.
Assemble the drain tube (item #8) and the hose,
using the double wire hose clamp (item #6). Then
connect the hose to the hose barb, using the other
hose clamp.
Some CBS-32 stands will be shipped with 1 or 2
optional side panels. Install these if supplied.
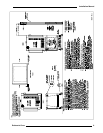
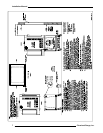
Assembling the Oven to Stand
(If not pre-assembled, see dwgs. 260AMT & 260ANN)