


12
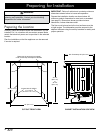
Installation Instructions
WARNING
To ensure a safe and proper installation, the following •
checklist should be completed by the installer to
ensure that no part of the installation has been
overlooked and the unit is working properly.
Proper installation is the responsibility of the •
homeowner. The importance of proper installation of
your Dacor dishwasher cannot be overemphasized.
Pre-verification Check List
Confirm that the main power supply (at the circuit □
breaker panel or fuse box) is off.
Remove all packing material from inside the
□
dishwasher.
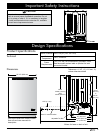
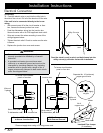
Check the orientation of the bottom door seal. The seal □
“bulb” should be facing into the tank. If it is oriented
towards the exterior of the door, open the dishwasher
door fully and orientate the door seal so that it is facing
into the tank.
Familiarize yourself with operation of the dishwasher by
□
reading the use & care manual.
Remove any protective film, if present from the control □
panel, door panel, etc.
Verify that all wiring is secure and is not being pinched □
or in contact with door springs or any other dishwasher
components.
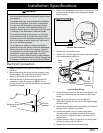
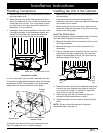
Verify that the dishwasher is level by pulling the
□
lower rack half way out. Let go of the rack and make
sure it does not roll in or out. If it does, re-level the
dishwasher.
Add two quarts of water to the bottom of the
□
dishwasher to lubricate the pump seal.
Turn on the water supply and check for plumbing leaks.
□
Tighten connections if necessary.
Verify that the door springs do not come in contact with □
any dishwasher components.
Verify the hot water temperature by turning on the □
hot water faucet at the sink. The water going to the
dishwasher must be between 120ºF and 150ºF.
Wet Test Check List
Plug in the power cord if the dishwasher is equipped □
with one. Turn on the main power supply.
Program the dishwasher to run a short wash. See the □
use and care manual for specific operating instructions.
Verifying Proper Operation
Close and latch the door. □
You should hear the dishwasher drain and then begin □
to fill with water. Wait approximately two (2) minutes,
then carefully open the door to verify water is filling the
dishwasher tank. If there is water present, close the
door and continue the process. Should the water not
fill the tank or the pump is not running, immediately
push the START/STOP button to stop the dishwasher.
Verify that the water supply valve is turned on, power is
connected, and that main power supply is on.
Check for leaks under the dishwasher. If any leaks
□
are found, immediately turn off the main power supply,
tighten all connections and restore the power.
Check for leaks around the door. A leak around the
□
door could be caused by the dishwasher door rubbing
or hitting against adjacent cabinets. Reposition the
dishwasher if necessary.
The dishwasher will drain after the first fill. Check the
□
drain line for leaks. If leaks are found, turn off the
power supply immediately, tighten all connections and
restore the power.
Open the dishwasher door and verify that most of the
□
water has drained. If not, verify that the disposer plug
has been removed and/or the air gap is not plugged.
Run the dishwasher through another fill and drain □
cycle. Verify that there are no leaks.
If the dishwasher does not operate correctly, see the □
instructions below.
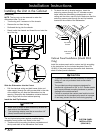
If the fill, wash and drain cycles operate properly,
□
reinstall the toe kick. Adjust it so that the bottom of the
chassis and the legs below the door are completely
covered. If the toe kick does not cover the chassis and
legs completely, install the included extended toe kick.
If the dishwasher fails to operate properly:
Verify that power is supplied to the dishwasher.•
Check the electrical connections to ensure that the •
installation has been completed correctly.
For additional start up or drain problems check •
all installation steps to verify they are correct and
complete.
Repeat the above test.•
If the appliance still does not work, contact the Dacor •
Customer Service Team at (800) 793-0093.
Do not attempt to repair the appliance yourself. Dacor
is not responsible for service required to correct a faulty
installation.