


Installation
Page 11Page 18
Using Your Dishwasher
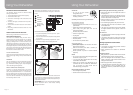
STARTING A WASHING PROGRAM
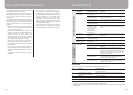
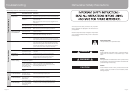
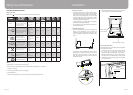
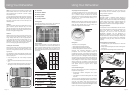
Wash Cycle Table
NOTE: Star ( ) means the need to fill rinse into the Rinse Aid Dispenser.
12
Detergent
pre/main
Cycle Selection
Information
Program
Running
time
(Hrs/Mins)
Water
(L)
2:30
Energy
(Kwh)
1.2
Rinse
Aid
3-in-1
5/25g
5/25g
3in1
For normally soiled loads,
such as pots, plates,glasses
and lightly soiled pans.
standard daily cycle.
Pre-wash(50°C)
Pre-wash
Wash (65°C)
Rinse
Rinse
Rinse (55°C)
Drying
Pre-wash(50°C)
Wash (50°C)
Rinse
Rinse (65°C)
Drying
Wash (40°C)
Rinse
Rinse (45°C)
20g.
/
Pre-wash(50°C)
wash(50°C)
rinse(70°C)
drying
1:30
1:10
30
1:20
1.2
1.4
0.45
0.8
22
16
5/25g
Rinse
Rinse
Rinse (52 )
Drying
Wash (55°C)
°C
1:05 0.87 11.8
8
12
Description
of Cycle
Wash (40°C)
Rinse
Rinse (70°C)
Drying
/
8
4
0.01
Pre-wash
Heavy
Normal
(AS/NZS 2007. 1 )
Intensive
Rinse
Rapid
Soak
For the heaviest soiled loads,
such as pots,pans,casserole
dishes and dishes that have
been sitting with dried food
on them for a while.
For heavy soiled loads,
such as pots, plates,
glasses and lightly soiled
pans. standard daily cycle.
For normal soiled loads,
such as plates, glasses,
bowls and lightly soiled
pans.
For dishes that need to be
rinsed and dried only.
A shorter wash for lightly
soiled loads that do not
need drying.
To rinse dishes that you
plan to wash later that day.
NOTE:
* AS/NZS 2007.1: This program is the test cycle.
The information for comparability test in accordance with AS/NZS 2007.1, as follows:
Capacity: 12 setting
Ÿ
Position Upper basket: In position 1 (Page 15)
Ÿ
Rinse aid setting: 3
Ÿ
Open the door slightly 50mm to assist in drying of the dishes after every wash
Ÿ
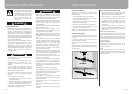
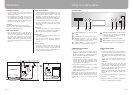
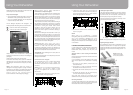
Aquasafe Connection
The Aquasafe System is a safety valve system,
Ÿ
preventing you from water leaks. If the water inlet
hose starts to leak during a wash cycle, the safety
valve cuts off the running water. Do not immerse
the water inlet hose or the safety valve in water,
because the electrical cable for the safety valve is in
the double-walled water inlet hose.
If water inlet hose or the safety valve is damaged,
Ÿ
remove the main plug immediately.
Do not enlarge or shorten the inlet hose because it
Ÿ
contains electric parts.
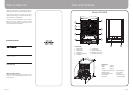
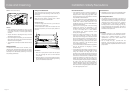
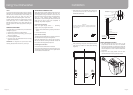
Levelling the Dishwasher
Once the appliance is positioned for levelling, the
Ÿ
height of the dishwasher may be altered via
adjustment of the screwing level of the feet. In any
case, the appliance should not be inclined more
than 2 °.
The rear feet can be adjusted from the front of the
Ÿ
dishwasher by turning the screws on the left and
right hand side of the cabinet. To adjust the front
feet, use a wrench and turn the front feet until the
dishwasher is level.
Place level on door and rack track inside the tub as
Ÿ
shown to check that the dishwasher is level.
Check level side to side.
Check level
Front to Back.
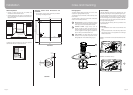
Securing the Dishwasher
The dishwasher must be secured in place using either
of the following methods:
Normal work surface - secure to the work surface
Ÿ
by using two woodscrews ensuring the
dishwasher weight is not being hit by the surface.
Marble or granite work top - secure the bracket to
Ÿ
the side panel of the dishwasher and secure the
dishwasher to the furniture housing. Put the rubber
cap over the screw.
Rubber Cover
Screw