


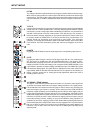


Congratulations!
You will find out that purchasing a MP7 Entertainment System was an excellent decision.
The design of the MP7 is based on decades of experience, research and development as well as a steadfast
manufacturer-customer-relationship in the professional audio market. With the MP7 you own a power mixer that offers
a wide range of functionality in a truly compact frame. All the troubling experience with cabling and matching mixers,
amplifiers, FX-units and equalizers now belongs to history. The mixer’s ergonomic layout and clearly structured
controls allow instant access at all times. The MP7 additionally provides the possibility for connecting a litlite to
compensate for poor lighting in a live mixing environment. Recessed carrying handles in both side panels and an
extremely sturdy transport coverlid protecting the controls ensure easy and safe transportation. Besides, if you want
to include your MP7 in a 19" rack system, the only thing you have to do is to exchange the side panels for metal rack
ears. Its powerful 2x300W/4ohms power amp, a huge amount of functions, high dynamic range, low-noise design
and its 18-bit Dual-Stereo FX-section, the MP7 is best equipped for universal use.
The MP7 is going to fulfill all your expectations that you can possibly demand of an Entertainment System.
Use this owner’s manual as a guide when exploring the capabilities of your MP7. The vast amount of integrated
functions is all explained systematically and point-by-point. Moreover, you will find some useful tips on how to
overcome general difficulties during live-performance applications.
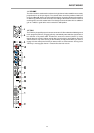
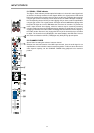
Unpacking and Warranty
Open the packaging and carefully take out the MP7. Detach the protective foil covering the FX-unit display. In addition
to this owner’s manual you will find the mains cord and the warranty card. Please make sure that the warranty
registration form is filled out correctly. You will be able to apply for warranty claims only when this form has been
completed. We grant 36 months of warranty, starting with the date of the original purchase. Therefore we ask you to
also keep the original certificate of purchase, stating the date of purchase. Experience has shown that keeping the
original packing as well as carefully storing all documents accompanying the appliance generally increases the price
when reselling the device.
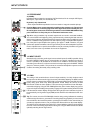
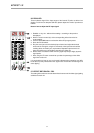
Installation and Connections
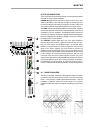
Always install the MP7 on an even surface to allow for sufficient airflow during operation. The device is equipped with
an electronically controlled fan to protect the power amplifier section against thermal overload. The ventilation direction
is Front-to-Rear. Fresh, cold air enters the mixer at its front side and warm air leaves the appliance through the
ventilation louvers in the rear panel. Do not cover the frontal or the rear ventilation louvers, since otherwise, the MP7
would automatically enter protect mode, preventing damage through thermal overload. When protect mode is
engaged, the device is not going to be damaged. Nevertheless, regular operation is not possible during this period
of time. In case you have decided to install the MP7 in a 19" rack system, make sure to leave at least 2RU of room
above and at least 1RU of empty space below the appliance. Of course, you can cover the resulting gaps in the rack
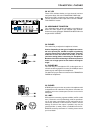
system using optionally available blinds with ventilation louvers. Before establishing the mains connection, please
make sure that the appliance matches the voltage and frequency of your local mains supply. Mind the label next to
the mains switch stating the operation voltage your MP7 is factory-preset to. When switching the MP7’s power on,
the internal fan will run for approximately 2 seconds at full speed. This is to provide you with an acoustic signal that
the mixer is ready for operation. Additionally, any dust particles that might have gotten into the enclosure are blown
out. The SPEAKER OUTPUTS on the rear panel of the MP7 are provided through professional standard SPEAKON
high-performance connectors, which offer absolute secure connection. The pin-assignment of these sockets is 1+
(hot) and 1- (cold).
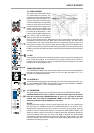
CONTENTS
Introduction. . . . . . . . . . . . . . . . . . . . . . . . . . . . . . . . . . . . . . . . 23
Input/Mono . . . . . . . . . . . . . . . . . . . . . . . . . . . . . . . . . . . . . . . . 24
Input/Stereo . . . . . . . . . . . . . . . . . . . . . . . . . . . . . . . . . . . . . . . 28
Effect . . . . . . . . . . . . . . . . . . . . . . . . . . . . . . . . . . . . . . . . . . . . 31
Transition/Phones. . . . . . . . . . . . . . . . . . . . . . . . . . . . . . . . . . . 33
Master . . . . . . . . . . . . . . . . . . . . . . . . . . . . . . . . . . . . . . . . . . . 34
Rear panel . . . . . . . . . . . . . . . . . . . . . . . . . . . . . . . . . . . . . . . . 37
Standard installation . . . . . . . . . . . . . . . . . . . . . . . . . . . . . . . . 38
Specifications . . . . . . . . . . . . . . . . . . . . . . . . . . . . . . . . . . . . . . 62
Block diagram. . . . . . . . . . . . . . . . . . . . . . . . . . . . . . . . . . . . . . 63
Dimensions. . . . . . . . . . . . . . . . . . . . . . . . . . . . . . . . . . . . . . . . 64
Warranty. . . . . . . . . . . . . . . . . . . . . . . . . . . . . . . . . . . . . . . . . . 68
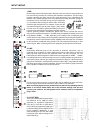
DESCRIPTION
23