


– 12 –
FORM 34523 (July 2000) PRINTED IN U.S.A.
PL-41383-1
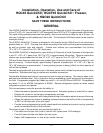
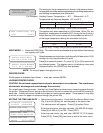
CONDENSATE LOOP
CONDENSER COIL
EVAPORATOR
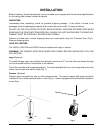
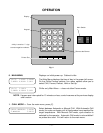
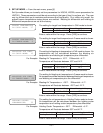
Buzzer Loudness
Adjustment Screw
Service Switch
Buzzer
PL-52202
MAINTENANCE
CLEANING
Wash, rinse, and sanitize the product probes
before and after use as you would any food-
contact utensil that measures temperature.
Chiller surfaces of stainless steel should be
wiped clean with a damp cloth or mild cleaning
solution. DO NOT flush with running water.
Avoid the use of solvents around plastic or
painted areas; clean these with a damp cloth
moistened with a solution of mild detergent and
warm water. Clean hinge hardware with a
chrome cleaner. Use a solution of warm water
and baking soda to clean the gasket; then wipe
with a soft cloth. Hinges may require occasional
lubrication of the plastic cam. Do not use the
top of the chiller for storage.
CONDENSER COIL
WARNING: DISCONNECT ELECTRICAL POWER SUPPLY BEFORE CLEANING ANY PARTS OF
THE UNIT.
The lower front compressor cover is attached with Velcro. Pull to remove.
Check the condenser coil weekly. Air must be able to freely circulate through the condenser. This
surface must be kept free of dirt and grease for proper system operation. Carefully clean dirt and lint
from the condenser coil using a vacuum cleaner, whisk broom, or soft brush; do not use a wire brush.
CAUTION: Do not damage the condenser coil fins. Replace lower front compressor cover.
Reconnect electrical power supply.
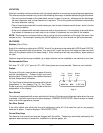
EVAPORATOR COIL, CONDENSATE LOOP, AND CONDENSATE REMOVAL PAN
WARNING: DISCONNECT ELECTRICAL POWER SUPPLY BEFORE CLEANING ANY PARTS OF
THE UNIT.
When needed, these components can be flushed with fresh water by a qualified service technician.
This should be part of any routine maintenance program and can prolong the life of the equipment.
Condensate removal is provided at the lower right portion of the
equipment cabinet and does not need a drain. Periodic cleaning
of the condensate removal pan (Fig. 6) may be needed. To
access the condensate removal pan, remove the lower front
compressor cover which is attached with Velcro. Pull to
remove. Clean the condensate removal pan by wiping with a
clean damp cloth or sponge, using care with the condensate
loop inside. Replace compressor cover. Reconnect electrical
power supply.
MAINTENANCE PROGRAM
Fig. 6
For additional information or to discuss a maintenance program, contact your local Hobart authorized
refrigeration service company.
Fig. 5