


ED/DF2XX 30” CCM1530 Nordic Style Lid Kit Installation Instructions
© 2007, IMI Cornelius Inc. - 1 - Publication Number: 620204719INS
INSTALLATION INSTRUCTIONS
ED/DF2XX 30” CCM1530 NORDIC SS STYLE LID KIT
This Nordic style kit applies to the Cornelius 30” Wide CCM1530 Nordic ice maker.
CAUTION: Disconnect electrical power to the dispenser before proceeding with the icemaker
adapter kit installation.
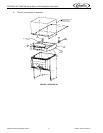
1. Position the icemaker adapter lid (item 1), flush with the rear of the cabinet, on the dispenser.
2. Seal the icemaker base to the adapter lid as follows:
A. Locate the icemaker 2 inches from the rear and flush with the sides of the lid. Run a bead of RTV
inside the perimeter of the icemaker base so that the base will set on the RTV.
B. Set the icemaker onto the lid. Note: If installing the icemaker from the front of the dispenser, use a
piece of 1” PVC pipe or larger as a “roller” to slide the icemaker over the front mounting bracket of
the manual fill cover.
C. Wipe away any excess RTV.
3. With the icemaker installed on top of the adapter lid, drill .147 diameter holes (# 26 drill) into the dis-
penser cabinet using the slotted holes in the side flanges of the lid as templates. Be careful not to
drill into the ice storage hopper. Use of a drill stop (1/4 in.) is recommended. Secure the lid to the
cabinet with (4) # 10 sheet metal screws (item 6).
4. Drill .147 diameter holes into the icemaker cabinet and adapter lid using the icemaker mounting
brackets (item 3) as templates. Be careful not to drill into any icemaker component (con-
denser, tubing, etc.). Secure the mounting brackets to the icemaker and adapter lid with the # 10
sheet metal screws (item 6) provided in the kit.
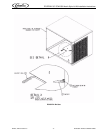
5. Install the wire form bracket, supplied with the bin stat kit (item 4), through the 5/8” diameter hole in
the bottom of the ice maker. Wrap the eye of the wireform over the stud near the hole to the end of
the wireform bracket and wrap the tube around the end of the bracket several times, insuring the
tube is secure.
NOTE: The bin stat must not interfere with the agitator rotation or in the path of ice falling from
the icemaker. If it interferes with the agitator or in the path of ice, bend the bracket out of the way.
6. Check that the automatic agitation timer, located in the dispenser’s electrical control box, is set for
automatic fill cube ice. The control box is located behind the merchandiser. Remove the merchan-
diser by lifting up on the sides to disengage the mounting “hooks” from the cabinet slots and rotate
it forward. Refer to the label in the control box for setting agitation times.
7. Install the manual fill cover (item 2) on the adapter lid (item 1). Insert the hinge pins into the pivot
brackets on the adapter lid with the cover open. Check that cover opens and closes correctly.
Item
No.
Part No. Name Qty.
1 620046139 Icemaker Adapter Lid 1
2 620050521 Manual Fill Cover 1
3 620051215 Icemaker Mounting Bracket 2
5 50904 RTV Sealant 3 oz. Tube 1
6 620701601 # 10 x 1/2” Sheet Metal Screw 8
7 620204719INS Installation Instructions 1
8 630500109 Bin Stat 1
Release Date: October 5, 2007 www.cornelius.com Revision: A