


7 185211000
INSTALLATION
This section covers unpacking and inspection, identification of LOOSE-SHIPPED PARTS, selecting location,
installing Unit, preparing Unit for operation, and Unit operation.
UNPACKING AND INSPECTION
(see Figure NO TAG)
NOTE: The Unit was thoroughly inspected before leaving the factory and the carrier has accepted and
signed for it. Any damage or irregularities should be noted at time of delivery (or not later than 15-days
from date of delivery) and immediately reported to the delivering carrier. Request a written inspection
report from Claims Inspector to substantiate any necessary claim. File claim with the delivering carrier,
not with IMI Cornelius Inc.
1. After Unit has been removed from shipping carton, remove shipping tape and other packing material.
Inspect for shipping damage and follow procedure in preceding NOTE if damage is evident.
2. Unpack LOOSE-SHIPPED PARTS. Make sure all items listed in Table 2 are present and in good condition.
Table 2. Loose-Shipped Parts
Item
No. Part No. Name
Qty.
4fl 5fl
1 176193000 Adapter Fitting 7/16 X20 (2) see Note 1 4 5
2 151741039 Knob, Dispensing Valve (see Note 2) 4 5
3 186573039 Drip Tray 1 1
4 186642000 Cup Rest 1 1
5 151664702
151664714
Plaque, 5-inch (see Note 2)
Plaque, 5-inch (see Note 3)
2 2
2 2
6 317904702 Decal Kit, Dispensing Valves Knobs (see Note 4) 1 1
6 317904714 Decal Kit, Dispensing Valves Knobs (see Note 5) 1 1
6 317904720 Decal Kit, Dispensing Valves Knobs (see Note 6) 1 1
7 319941000 Screw, Thread Rolling, Hex Washer Hd, No. 8-32 by
3/8 in. Long
4 4
Note 1: Models 2849949020, 2849949690, 2849959020, 2849959690, and 4949959020.
Note 2: Models 2849949020 and 2849959020.
Note 3: Models 2849949690, 2849959690, and 4949959020.
Note 4: Models 2849949020 and 2849959020.
Note 5: Models 2949949690 and 2849959690.
Note 6: Models 2849949200, 2849959200, and 4949959200.
INSTALLING HANDLE ON UNIT
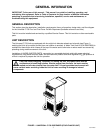
The Unit (see Figure 1) was shipped from the Factory with the handle pushed into the cabinet and temporarily
fastened with two screws. Proceed as follows to properly position and permanently fasten the handle to the
Unit.
1. Pull release latch on front of the top cover, then lift hinged cover up into open position.