www.keatingofchicago.com 1-800-KEATING
SERVICE INSTRUCTIONS
THERMOSTAT REPLACEMENT KIT (PART #057138)
MOUNTING AND WIRING INSTRUCTIONS
For Top-Side™ Cooker
Part No. 057095 Page 1 TopSideTherm 05/06
New Thermostat Mounting and Wiring Instructions
1. After removing the old thermostat, drill four larger holes for
mounting new housing (See Figure A). After drilling holes,
remove any metal filings from inside the unit.
2. Feed the female ends of the four new wires from the inside
to the outside of the unit through the old thermostat’s
mounting hole.
3. Connect the male ends of the four new wires to the female
ends of the wires that came off the old thermostat (L1, L2,
COM. and N.O.).
4. Feed the new sensor wire through the old thermostat’s
mounting hole.
5. Remove the two spade connectors that are attached to
the unit thermostat’s sensor wire.
6. Strip 3/8” of insulation from each of the four ends of the
thermostat’s sensor wires.
7. Place shrink tubing on both leads of the thermostat’s
sensor wire.
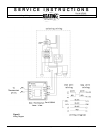
8. Attach the two pairs of thermostat wires using butt
connectors (See Figure C wiring diagram on reverse).
9. Shrink the tubing over the butt connectors on the
thermostat’s sensor wire.
10. Mount new housing to the control panel.
11. Connect all six wires to the new thermostat (See Figure C
wiring diagram on reverse).
12. Place the new thermostat in the housing and tighten the
four screws (See Figure B).
New thermostat Operating Instructions
Operating
When the thermostat is powered up, the display will show
the set operating temperature. To change the operating
temperature, push and hold the “PUSH TO SET” button
and turn the adjustment knob until the desired temperature
is displayed. Release the button to lock in the setting.
Temperature offset
To change the offeset, power off the unit. Push and hold
the “PUSH TO SET” button, re-apply power to the unit
while still holding the button down. Turn the adjustment
knob to the desired amount of offset, release the button to
lock in the setting.
Adjust the setting to a positive number if the cooker’s
temperature is higher than the set temperature. Adjust the
setting to a negative number if the cooker’s temperature is
lower than the set temperature.
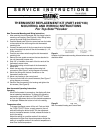
Figure A:
Location of old thermostat mounting hole and where new holes
should be drilled.
Figure B:
New Thermostat Housing and Control Panel
Part # 057095


