


10
Questions? Call The Kenmore Water Line 1-800-426-9345 or visit KenmoreWater.com
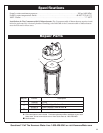
Filter Cartridge
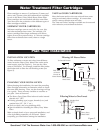
FILTER CARTRIDGE LIFE
Several variables determine how long a cartridge will
last. These include:
How much water you use.
How much sediment, taste and/or odor, or other
unwanted substance, is in the water.
Use the following information as a guide. However, no
matter which type of cartridge you are using, you will
know it is time to replace it when you first notice the
return of the unwanted substance in your water. Filter
cartridges are available from your local Sears store and
www.sears.com.
The filter cartridges require replacement 3 or 4 times a
year when used for whole house filtering. Average car-
tridge life when filtering water to one faucet is 6 months
or more. This average time varies depending on the type
of cartridge and water conditions.
SEDIMENT CARTRIDGES: Filtering sediments, you
will know it's time to replace the cartridge when water
pressure drops at house faucets.
TASTE & ODOR CARTRIDGES: Filtering taste and
odor, you will know it's time to replace the cartridge
when the taste and odor returns. If the cartridge is also
for sediment removal, you could notice a pressure drop
before the return of taste and odor.
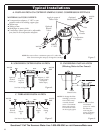
FILTER CARTRIDGE INSTALLATION/
REPLACEMENT
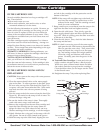
CAUTION: Never remove the sump with water pressure
in the filter.
1. Close the nearest shutoff valve on the water supply
pipe to the filter. To relieve pressure in the filter, press
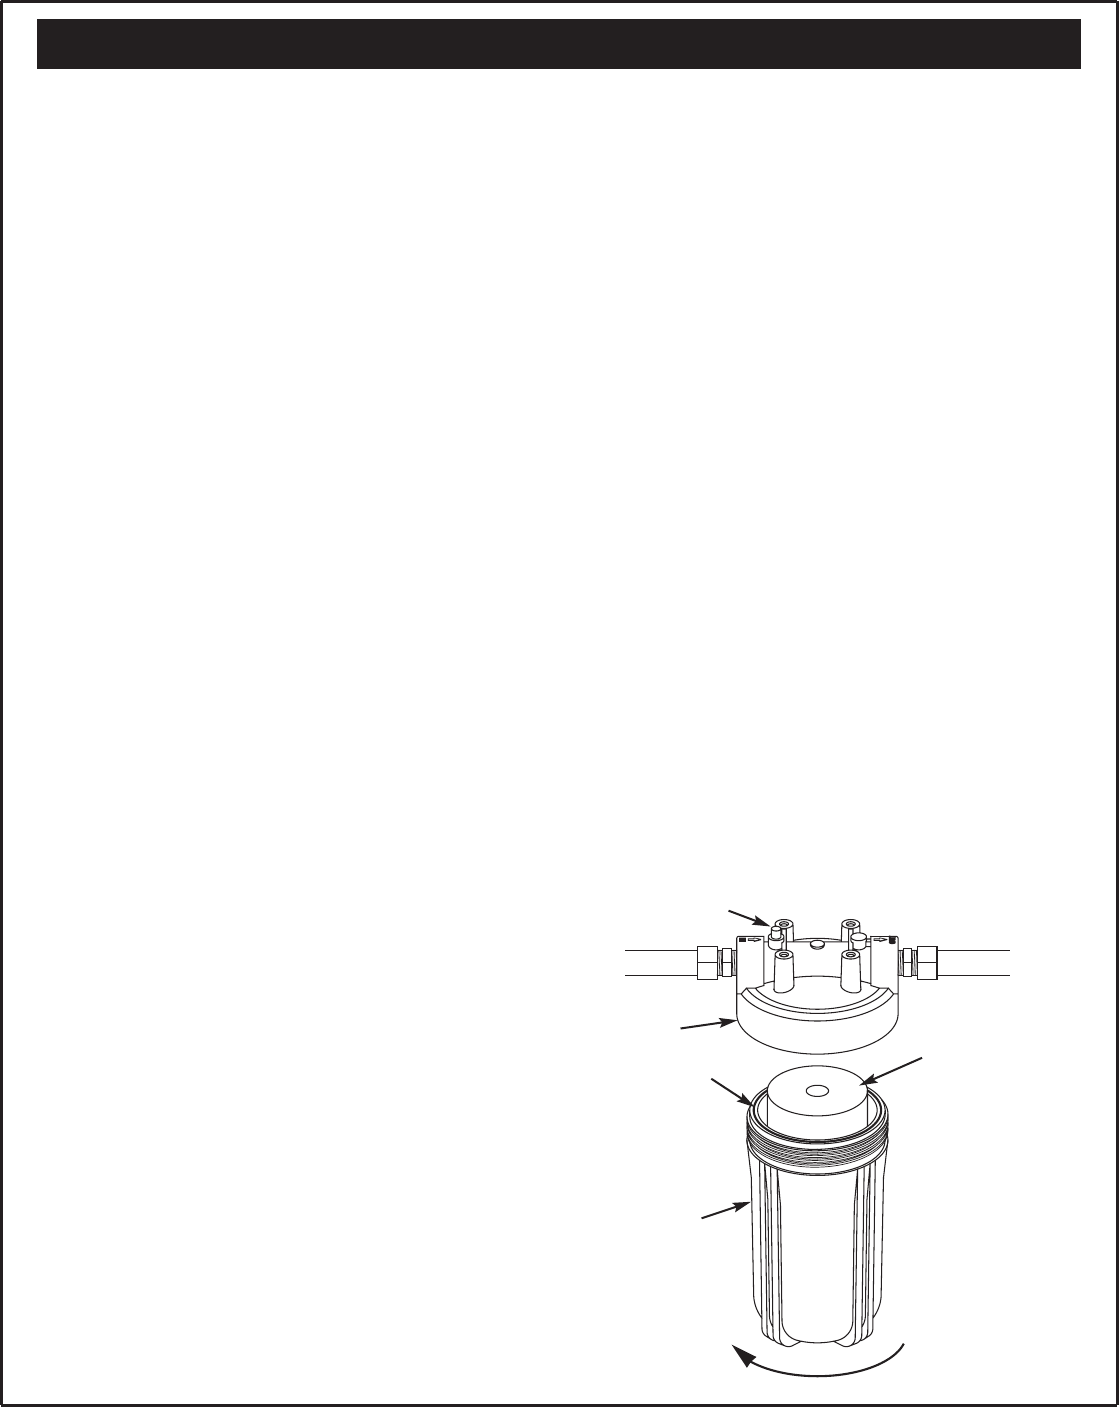
the vent valve on top of the filter head (See Figure 14)
or open a cold water faucet after the filter. Some water
may leak out of the vent valve as pressure is being
relieved.
2. Turn the sump to the left to remove from the head (See
Figure 14). Be careful, as the sump is full of water. Do
not lose the large o-ring seal.
3. Be sure the inside of the sump is clean. Thoroughly
wash with warm, soapy water and rinse.
4. Remove the wrapper from the new filter cartridge and
insert the filter cartridge into the sump. Some car-
tridges fit either way, while others fit only one way.
Observe markings on the cartridge, or on the wrapper.
5. Lightly lubricate the o-ring seal, in the sump, with sili-
cone grease. Be sure it is fully seated in the groove.
6. Hold the sump up to the filter head, aligning the cen-
Figure 14
ter hole in the cartridge with the protrusion on the
bottom of the head.
NOTE: If the sump will not tighten up to the head, you
may have the cartridge in upside down or not
centered in the sump. Take the cartridge out and
check for correct orientation.
7. Being careful not to cross-thread, turn the sump to the
right onto the filter head and tighten securely.
8. Open the sink cold faucet. Then, slowly open the
water supply shutoff valve and allow the filter hous-
ing to fill. While it is filling, press the filter vent valve
to release air in the filter.
9. Close the sink faucet. Then, check for leaks between
the sump and the head.
NOTE: If a leak is occurring, turn off the water supply
and open the sink cold faucet to depressurize the
filter (or press the vent valve). Then, remove the
sump and check the o-ring for cuts, flat spots,
etc., and sealing surfaces for foreign material.
Clean the o-ring and lubricate with silicone
grease. Carefully press into the groove in the
sump.
10. Taste and Odor Cartridges: A taste and odor car-
tridge contains activated carbon, a black powder.
When new, open a filtered water faucet and allow
fine carbon particles to purge from the cartridge.
Close the faucet when you no longer see the “fines”
in the filtered water.
11. Retighten the sump 7 days after replacing filter.
Turn to the left
to remove
O-ring Seal
Head
Vent Valve
Filter
Cartridge
Sump