


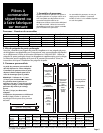

To get the most efficient use
from your new built-in
refrigerator, read your
KitchenAid Use and Care Guide.
Keep Installation Instructions
and Guide close to built-in
refrigerator for easy reference.
Part No. 2006137 Rev. A
© 1999 KitchenAid.
® Registered Trademark/Trademark of
KitchenAid U.S.A., KitchenAid
Canada licensee in Canada
Prepared by KitchenAid, Benton Harbor, Michigan 49022
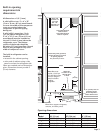
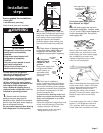
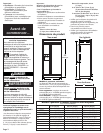
19. Open refrigerator doors and
remove protective film from door
frame. Recheck water connections at
bottom of refrigerator for leaks.
Attach bottom grille to cabinet with
two screws. Install shelves and bins in
refrigerator and freezer compartments.
20. Set refrigerator and freezer
compartment controls to the midpoint
between “COLD” and “COLDEST.”
Check that the compressor is operating
properly and that all five lights are
working.
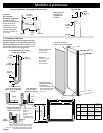
screws
bottom grille
HOME APPLIANCES
Printed in U.S.A.
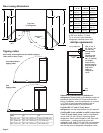
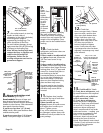
remove 2
screws
top grille decorative
panel
grille panel
cabinet
side trim
cabinet
side trim
louver
assembly
grille panel
screws
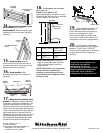
15. Panel models: Remove
screws and side trim from one side of
the decorative panel. Insert your panel.
Reattach side trim and screws.
16. Panel models: Slide
decorative panel down to reattach to
top grille.
17. Wraparound stainless steel
models: If additional ceiling clearance is
required for tipping the refrigerator, the
top grille and cabinet side trim can be
removed. Slide the louver assembly up to
remove from the top grille. Remove two
screws from the grille panel and slide the
grille panel down to remove from the
refrigerator. Remove the screws (six each
side) attaching the cabinet side trim to
the refrigerator. Reassemble after dolly
has been removed from refrigerator.
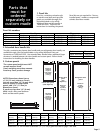
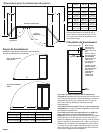
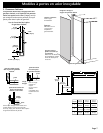
18. If side panels are not used,
go to Step 19.
If built-in area depth is 25"
(63.5 cm) or more, side panels can be
installed inside the side trim or attached
to the outside of the side trim.
• Inside side trim piece: Slide front
edge of routed side panel into trim
piece. Nail rear edge of panel to
support board.
NOTE: KitchenAid is not responsible
for the removal or addition of
molding or decorative panels that
would prevent the refrigerator from
being serviced.
A
B
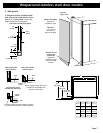
Panel Wraparound
models (shown) stainless steel
door models
24" 23"
(61 cm) (58.4 cm)
24-5/8" 23-3/8"
(62.5 cm max.) (59.4 cm)
side panel
side trim
support board
rear wall
door
Top view
B
A
®
14. Wraparound stainless steel
door models: go to step 17.
Panel models: Slide decorative panel
assembly up to remove from top grille
assembly.
top grille
assembly
decorative panel
assembly