


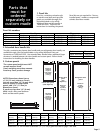


Electrical &
water supply
requirements
A 120-volt, 60-Hz, AC-only, 15- or 20-
ampere, fused, electrical supply is
required. A time-delay fuse or circuit
breaker is recommended. It is
recommended that a separate circuit
serving only this appliance be provided.
This appliance is equipped with a power
supply cord having a 3-prong ground
plug. To minimize possible shock hazard,
the cord must be plugged into a mating
3-prong, ground-type outlet, grounded
in accordance with the National
Electrical Code, ANSI/NFPA 70 — latest
edition* or Canadian Electrical Code,
C22.1-1982 and C22.2 No. 01982 (or
latest edition)**, and all local codes and
ordinances.
Copies of the standard listed may be
obtained from:
* National Fire Protection Association
Batterymarch Park
Quincy, Massachusetts 02269
** Canadian Standard Association
178 Rexdale Boulevard
Etobicoke, Ontario M9W 1R3
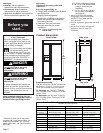
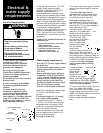
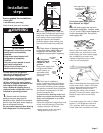
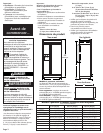
Electrical requirements
ground
prong
power supply
cord
retainer
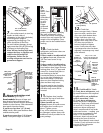
Water supply requirements
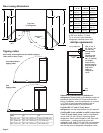
Use only 1/4" (6 mm) copper tubing
for water line.
Do Not install copper tubing in area
where temperatures drop below
32°F (0°C).
Before attaching copper tubing to
refrigerator, flush at least 2 quarts
(1.9 L) of water through the copper
tubing and into a bucket to get rid
of any particles in the water line.
Do Not overtighten clamp or sleeve.
This will crush copper tubing.
Check for leaks around saddle valve.
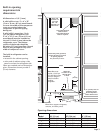
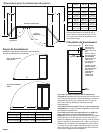
3. Turn OFF main water supply. Turn ON
nearest faucet long enough to clear line
of water.
4. Vertical cold water line: Use
grounded electric drill or hand drill to
drill 3/16" (4.5 mm) hole in an easily
accessible location in water line.
Horizontal cold water line: Use
grounded electric drill or hand drill to
drill 3/16" (4.5 mm) hole in the top of
the water line. This will keep sediment
from collecting in valve.
5. Position washer over hole in
water line. Turn saddle valve
handle clockwise to expose
piercing lance a maximum of
3/16" (4.5 mm). Align
piercing lance over hole in
water line. Place both
halves of saddle valve
bracket against water
line. Turn saddle
valve handle
clockwise until piercing lance
enters hole in water line and is
firmly seated. The saddle valve is not in
the closed position. Tighten packing nut.
Evenly and firmly tighten bracket screws
so washer will make a water-tight
connection. Do Not overtighten
screws; copper tubing could be
crushed.
6. Check that both
ends of copper
tubing are cut
square. Slide
compression nut
and sleeve onto copper
tubing. Insert end of copper tubing
completely into valve outlet. Tighten
compression nut to outlet with adjustable
wrench. Do Not overtighten.
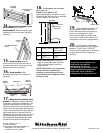
7. Turn on main water supply. Check for
leaks. Turn saddle valve handle
counterclockwise and run water through
copper tubing and into a bucket. Turn
saddle valve handle clockwise to shut off
water to copper tubing.
8. Route copper tubing to refrigerator
area.
compression nut
sleeve
Page 8
3-prong ground-type
outlet
3-prong
ground plug
If codes permit and a separate
ground wire is used, it is
recommended that a qualified
electrician determine that the
ground path is adequate.
Do not ground to gas pipe.
Check with a qualified electrician if
you are not sure the appliance is
properly grounded.
Do not have a fuse in the neutral or
ground circuit.
It is the customer’s responsibility:
To contact a qualified electrical
installer.
To assure that the electrical
installation is adequate and in
conformance with the National
Electrical Code, ANSI/NFPA 70 —
latest edition* or Canadian Electrical
Code, C22.1-1982 and C22.2 No.
01982 (or latest edition)**, and all
local codes and ordinances.
WARNING
Electrical Shock Hazard
Plug into a grounded 3-prong
outlet.
Do not remove ground prong.
Do not use an adapter.
Do not use an extension cord.
Failure to follow these
instructions can result in death,
fire, or electrical shock.
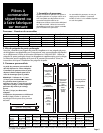
Water line to refrigerator must provide
15-100 psi (103-690 kPa) water
pressure.
To calculate length of 1/4" (6 mm)
O.D. copper tubing needed:
1. Locate a vertical 1/2" (1.2 cm) to
1-1/4" (3.2 cm) COLD water line near
refrigerator area. A horizontal COLD
water line can be used if directions in
Step 4 are carefully followed.
2. Measure distance from cold water
line to refrigerator area. Add 24" (61
cm) to this measurement.
To rough in water line: