


10
Remove the Door Panels
NOTE: When removing and replacing decorator panels, only the
handle is removed. All other trim pieces remain attached to the
doors.
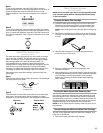
1. Remove the refrigerator and freezer handles:
■ Using a Phillips screwdriver, remove the screws that hold
each handle in place.
■ Lift off handle. Make sure you keep screws for reattaching
handles.
2. Remove the door panels:
■ Open refrigerator or freezer door.
■ Slide out decorator panel and filler board.
■ Repeat process for other panels and filler boards.
■ Store panel and filler boards to prevent scratching.
Replace the Door Panels
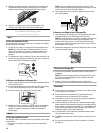
1. Replace the refrigerator or freezer door panels:
■ Open refrigerator or freezer door.
■ Slide the ¹⁄₈" (3.18 mm) decorator panel into place behind
the side trim.
■ Push the filler board into place behind the decorator
panel.
■ Repeat process for other panels and filler boards.
2. Attach the handles:
NOTE: Freezer door handle is notched to fit around the
dispenser panel.
■ Align the top of the refrigerator or freezer handle flush
with the top trim. Fasten the handle to the refrigerator or
freezer door with the screws, using a Phillips screwdriver.
■ Repeat the process for the other handle.
Care for Decorator Panels
1. Clean panels with an anti-static cleaner (available in
electronics or computer departments) or mild soap and water
with a clean, soft, damp cloth.
2. Rinse panels thoroughly and blot dry using a dry, soft cloth or
chamois.
NOTE: Do not use paper towels or cleaners which contain
solvents such as ammonia. They can damage the surface of
the panels.
3. If small scratches should appear on the panels, they may be
filled using an automotive paste wax (not a cleaner/wax
combination). Apply wax sparingly and buff lightly with a
clean, soft cloth using a circular motion.
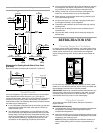
Install Custom Wood Panels
If you plan to install custom wood decorator panels, you will need
to create the panels yourself or consult your cabinetmaker or
carpenter. See dimensional drawings for wood panel inserts.
Flat panels:
You can create a custom flat panel a maximum of ¹⁄₄" (6.35 mm)
thick to replace your decorator panels. Flat wood panels less
than ¹⁄₄" (6.35 mm) thick are not recommended.
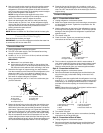
Raised panels:
A raised panel design can be created by screwing or gluing wood
panels to ¹⁄₄" (6.35 mm) backing or by using ³⁄₄" (19.05 mm) stock
with routed edges.
Weight requirements for raised panel inserts:
■ Refrigerator door panel should not exceed 25 lbs
(9.98 kg).
■ Freezer door panels should not exceed 18 lbs (6.80 kg)
combined weight.
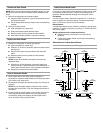
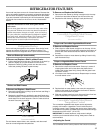
Dimensions for Custom Wood Panels:
22 cu. ft Freezer and Refrigerator door
18
5
/32"
(46.1 cm)
TOP VIEWTOP VIEW
3
/
4
" min.
(19.05 mm min.)
3
1
/
4
"
(82.55 mm min.)
3
/
4
"
(19.05 mm)
12
7
/16"
(31.6 cm)
28
5
/64"
(71.3 cm)
1
/4"
(6.35 mm)
1
/4"
(6.35 mm)
1
/4"
(6.35 mm)
1
/4"
(6.35 mm)
5
/16"
(7.93 mm)
5
/16"
(7.93 mm)
5
/16"
(7.93 mm)
5
/16"
(7.93 mm)
60
11
/16"
(154.2 cm)
19
15
/16"
(50.7 cm)
1
/
4
"
(6.35 mm)
3
1
/
4
"
(82.55 mm min.)
3
/
4
" min.
(19.05 mm min.)
3
/
4
"
(19.05 mm)
1
/
4
"
(6.35 mm)
12
7
/16"
(31.6 cm)