


8
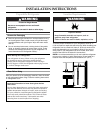
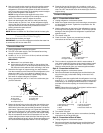
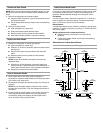
3. Use a hex-head socket wrench to adjust the leveling screws.
Turn the leveling screw to the right to raise that side of the
refrigerator or turn the leveling screw to the left to lower that
side. It may take several turns of the leveling screws to adjust
the tilt of the refrigerator. See Graphic 7.
NOTE: Having someone push against the top of the
refrigerator takes some weight off the leveling screws and
rollers. This makes it easier to adjust the screws.
4. Open both doors again and check to make sure that they
close as easily as you like. If not, tilt the refrigerator slightly
more to the rear by turning both leveling screws to the right. It
may take several more turns, and you should turn both
leveling screws the same amount.
5. Replace the base grille.
NOTE: Be sure to refasten the Tech Sheet behind the base grille.
Connect the Water Supply
Read all directions before you begin.
IMPORTANT: If you turn the refrigerator on before the water line
is connected, turn the ice maker OFF.
Connect to Water Line
1. Unplug refrigerator or disconnect power.
2. Turn OFF main water supply. Turn ON nearest faucet long
enough to clear line of water.
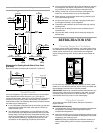
3. Locate a ½" to 1¹⁄₄" (1.25 cm to 3.18 cm) vertical cold water
pipe near the refrigerator.
IMPORTANT:
■ Make sure it is a cold water pipe.
■ Horizontal pipe will work, but drill on the top side of the
pipe, not the bottom. This will help keep water away from
the drill and normal sediment from collecting in the valve.
4. Determine the length of copper tubing you need. Measure
from the connection on the lower left rear of refrigerator to the
water pipe. Add 7 ft (2.1 m) to allow for cleaning. Use ¹⁄₄"
(6.35 mm) O.D. (outside diameter) copper tubing. Be sure
both ends of copper tubing are cut square.
5. Using a grounded drill, drill a ¹⁄₄" hole in the cold water pipe
you have selected.
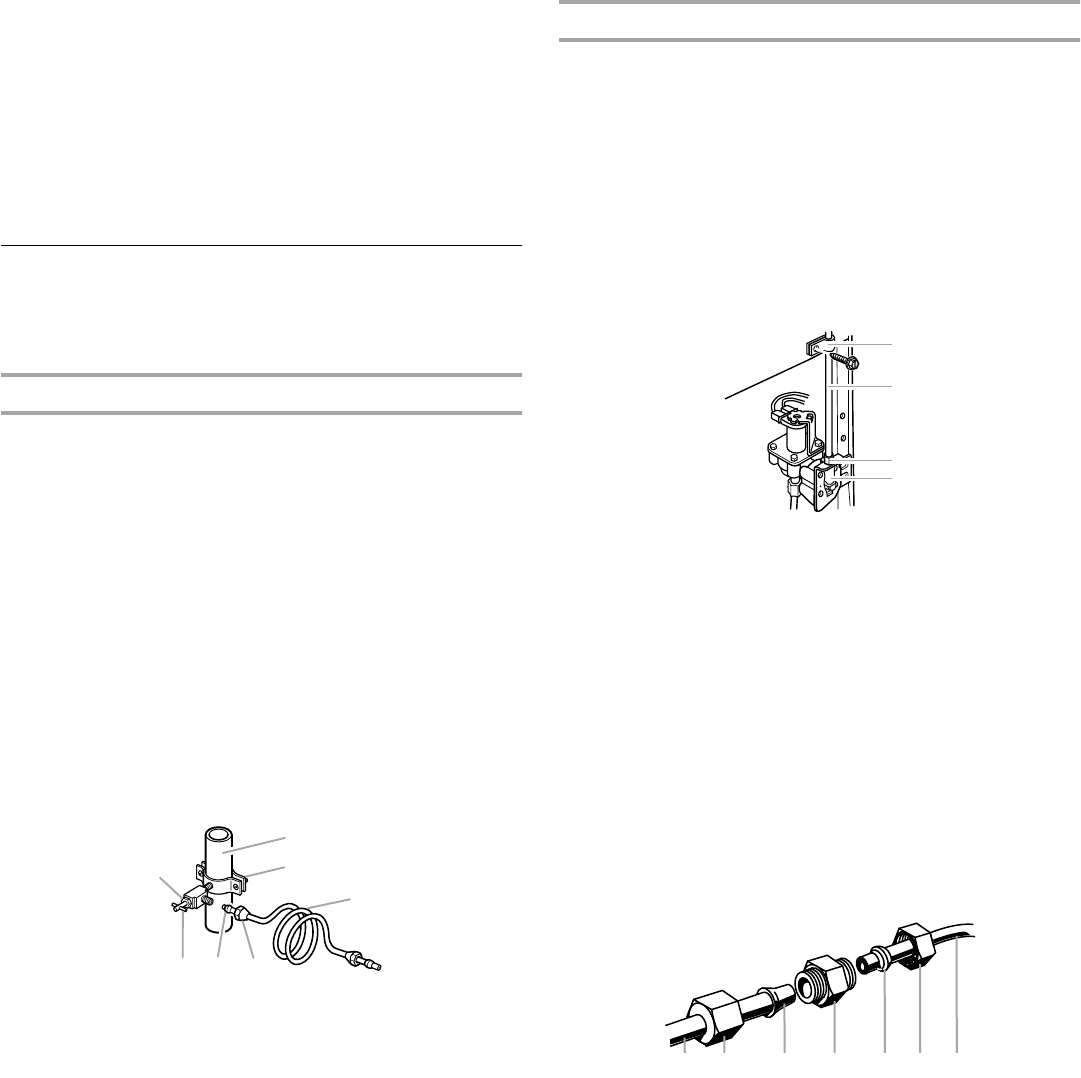
6. Fasten the shutoff valve to the cold water pipe with the pipe
clamp. Be sure the outlet end is solidly in the ¹⁄₄" (6.35 mm)
drilled hole in the water pipe and that the washer is under the
pipe clamp. Tighten the packing nut. Tighten the pipe clamp
screws slowly and evenly so the washer makes a watertight
seal. Do not overtighten or you may crush the copper tubing.
7. Slip the compression sleeve and compression nut onto the
copper tubing as shown. Insert the end of the tubing into the
outlet end squarely as far as it will go. Screw compression nut
onto outlet end with adjustable wrench. Do not overtighten.
8. Place the free end of the tubing in a container or sink, and
turn ON the main water supply. Flush the tubing until water is
clear. Turn OFF the shutoff valve on the water pipe. Coil the
copper tubing.
Connect to Refrigerator
Style 1 - Connection to Water Valve
1. Unplug refrigerator or disconnect power.
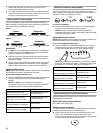
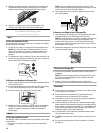
2. Attach the copper tube to the valve inlet using a compression
nut and sleeve as shown. Tighten the compression nut. Do
not overtighten.
3. Use the tube clamp on the back of the refrigerator to secure
the tubing to the refrigerator as shown. This will help prevent
damage to the tubing when the refrigerator is pushed back
against the wall.
4. Turn shutoff valve ON.
5. Check for leaks. Tighten any connections (including
connections at the valve) or nuts that leak.
6. The ice maker is equipped with a built-in water strainer. If
your water conditions require a second water strainer, install
it in the ¹⁄₄" (6.35 mm) water line at either tube connection.
Obtain a water strainer from your nearest appliance dealer.
Style 2 - Connection to Water Line
1. Unplug refrigerator or disconnect power.
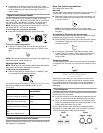
2. Remove and discard the shipping tape and the black nylon
plug from the gray, coiled water tubing on the rear of the
refrigerator.
3. If the gray water tube supplied with the refrigerator is not long
enough, a ¹⁄₄" x ¹⁄₄" coupling is needed in order to connect the
water tubing to an existing household water line. Thread the
provided nut onto the coupling on the end of the copper
tubing.
NOTE: Tighten the nut by hand. Then tighten it with a wrench
two more turns. Do not overtighten.
4. Turn shutoff valve ON.
5. Check for leaks. Tighten any nuts or connections (including
connections at the valve) that leak.
Style 3 - Connection to Shut-off Valve
1. Unplug refrigerator or disconnect power.
2. Remove and discard the shipping tape and the black nylon
plug from the gray, coiled water tubing on the rear of the
refrigerator.
A.Cold water pipe
B. Pipe clamp
C.Copper tubing
D.Compression nut
E.Compression sleeve
F. Shutoff valve
G.Packing nut
A
B
C
DEF
G
A.Tube clamp
B.Copper tubing
C. Compression nut
D.Valve inlet
A.Refrigerator water tubing
B.Nut (provided)
C.Bulb
D.Coupling (provided)
E.Ferrule (purchased)
F. Nut (purchased)
G.Household water line
A
B
C
D
A B C D E F G