


12
1. Unplug refrigerator or disconnect power.
2. Hand wash, rinse, and dry removable parts and interior
surfaces thoroughly. Use a clean sponge or soft cloth and a
mild detergent in warm water.
3. Wash stainless steel and painted metal exteriors with a clean
sponge or soft cloth and a mild detergent in warm water.
■ To keep your stainless steel refrigerator looking like new
and to remove minor scuffs or marks, it is suggested that
you use the manufacturer’s approved Stainless Steel
Cleaner and Polish, Part Number 4396920. To order the
cleaner, call 1-800-422-1230 U.S.A. or 1-800-807-6777
Canada.
IMPORTANT: This cleaner is for stainless steel parts only!
Do not allow the Stainless Steel Cleaner and Polish to come
into contact with any plastic parts such as the trim pieces,
dispenser covers or door gaskets. If unintentional contact
does occur, clean plastic part with a sponge and mild
detergent in warm water. Dry thoroughly with a soft cloth.
4. There is no need for routine condenser cleaning in normal
home operating environments. If the environment is
particularly greasy or dusty, or there is significant pet traffic in
the home, the condenser should be cleaned every 2 to
3
months to ensure maximum efficiency.
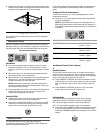
If you need to clean the condenser:
■ Remove the base grille.
■ Use a vacuum cleaner with a soft brush to clean the grille,
the open areas behind the grille and the front surface area
of the condenser.
■ Replace the base grille when finished.
5. Plug in refrigerator or reconnect power.
Changing the Light Bulbs
IMPORTANT: Depending on your model, the light bulbs in your
new refrigerator may use LED technology. If your model uses LED
lighting and the lights do not illuminate when the refrigerator and/
or freezer door is opened, call for assistance or service. See
Warranty for phone numbers.
Refrigerator Compartment Light
1. Unplug the refrigerator or disconnect power.
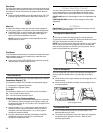
2. Slide the light shield toward the back of the compartment to
release it from the light assembly.
3. Remove the burned-out bulb and replace it with an appliance
bulb no greater than 40
watts.
LED Technology Models Only:
■ To replace the LED bulb with an LED bulb, order part
number W10565137 (3.6 watts).
NOTE: Some LED replacement bulbs are not
recommended for wet/damp environments. The
refrigerator and freezer compartments are considered to
be wet/damp environments. If using a brand of LED bulb
other than the Whirlpool recommended LED bulb, before
installation, read and follow all instructions on the LED
packaging.
■ To replace the LED bulb with an incandescent bulb, use
only incandescent bulbs for household appliances with a
maximum of 40 watts.
4. Replace the light shield by inserting the tabs on the shield
into the liner holes on each side of light assembly. Slide the
shield toward the front until it locks into place.
NOTE: To avoid damaging the light shield, do not force the
shield beyond the locking point.
5. Plug in refrigerator or reconnect power.
Freezer Compartment Light
1. Unplug refrigerator or disconnect power.
2. Remove the burned-out bulb and replace it with an appliance
bulb no greater than 40
watts.
LED Technology Models Only:
■ To replace the LED bulb with an LED bulb, order part
number W10565137 (3.6 watts).
NOTE: Some LED replacement bulbs are not
recommended for wet/damp environments. The
refrigerator and freezer compartments are considered to
be wet/damp environments. If using a brand of LED bulb
other than the Whirlpool recommended LED bulb, before
installation, read and follow all instructions on the LED
packaging.
■ To replace the LED bulb with an incandescent bulb, use
only incandescent bulbs for household appliances with a
maximum of 40 watts.
3. Plug in refrigerator or reconnect power.
Vacation and Moving Care
Vacations
If You Choose to Leave the Refrigerator On While You’re
Away:
1. Use up any perishables and freeze other items.
2. If your refrigerator has an automatic ice maker, and is
connected to the household water supply, turn off the water
supply to the refrigerator. Property damage can occur if the
water supply is not turned off.
3. If you have an automatic ice maker, turn off the ice maker.
NOTE: Depending on your model, raise the wire shutoff arm
to OFF (up) position, or press the switch to OFF.
4. Empty the ice bin.
If You Choose to Turn Off the Refrigerator Before You
Leave:
1. Remove all food from the refrigerator.
2. If your refrigerator has an automatic ice maker:
■ Turn off the water supply to the ice maker at least one day
ahead of time.
■ When the last load of ice drops, raise the wire shutoff arm
to the OFF (up) position or press the switch to OFF,
depending on your model.
3. Turn off the Temperature control(s). See “Using the
Control(s).”
4. Clean refrigerator, wipe it, and dry well.
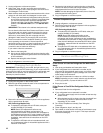
5. Tape rubber or wood blocks to the tops of both doors to prop
them open far enough for air to get in. This stops odor and
mold from building up.