


8
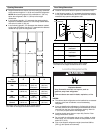
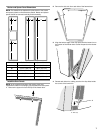
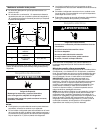
5. With the side trims properly seated in the lower trim, slide
each trim into the door panel groove.
6. Align the upper trim with the trim clips at the top of each side
trim.
7. Slide the upper trim into the door panel groove by applying
firm downward pressure. Be sure that the grooves on the
upper trim are properly aligned with the rivets on the door
panel.
8. When fully seated, the upper trim should be nearly flush with
the top of the freezer door, completely covering both side trim
clips.
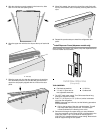
9. Repeat the previous steps to install the refrigerator door
panel.
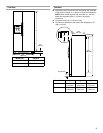
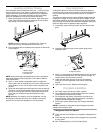
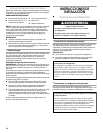
Install Dispenser Frame (dispenser models only)
After installing the custom door panels, snap the dispenser frame
onto the freezer door as shown.
Install New Water Line
(if required)
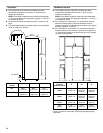
TOOLS NEEDED:
1. Turn OFF main water supply. Turn ON nearest faucet long
enough to clear line of water.
2. Find a
¹⁄₂" (12.70 mm) to 1¹⁄₄" (3.18 cm) vertical cold water
pipe near the refrigerator.
NOTE: Horizontal pipe will work, but the following procedure
must be followed:
■ Drill on the top side of the pipe, not the bottom. This will
help keep water away from the drill. This also keeps
normal sediment from collecting in the valve.
3. Determine the length of copper tubing you need. Measure
from the connection on the lower left rear of refrigerator to the
water pipe. Add 7 ft (2.1 m) to allow for cleaning. Use ¹⁄₄"
(6.35 mm) O.D. (outside diameter) copper tubing. Be sure both
ends of copper tubing are cut square.
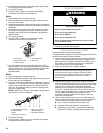
A. Trim clip
A
■ Flat-blade screwdriver
■ ⁷⁄₁₆" and ¹⁄₂" Open-end or
two adjustable wrenches
■ ¹⁄₄" Drill bit
■ Cordless drill