


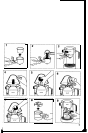

To insert the filter holder, line up the arrow
located on the thumb guard of the filter
holder with the arrow on the left side of the
machine.
Raise the filter holder up into brewing head
and turn the filter holder firmly to the right,
until it can go no further.
The arrow on the filter holder should be as
far right in the lock range as possible. If the
arrow is not at least in the middle of the lock
range, do not operate the machine.
Rather, remove the filter holder and reinsert
it as described above until the arrow is
within the lock range
(see
figure
3).
Once the filter holder is properly in place, it
should never be moved or attempted to be
removed while the “Espresso Bravo Plus” is
in operation and under pressure.
4. Open the hinged lid
(see
figure
4).
Unscrew the boiler cap by turning it
counter clockwise
(see
figure
5).
5. Using the glass carafe, fill the boiler
container with fresh, cold water
(see figure 61.
A
CAUTION:
Never fill the boiler while your
“Espresso Bravo Plus” is in the
u
p
y
or
”
@?I
”
position.
ft
should
only be in the
‘0”
OFF position.
Never fill the water past the top of the
metal band on the glass carafe.
NOTE:
You may want to add a little extra water
(approx.
l/4
cup) to compensate for
evaporation and absorption during the
brewing process.
However, do not fill past the top of the
metal band on the glass carafe.
The glass carafe
(e)
has markings on it for
2 cups and 4 cups of espresso and
steaming:
-
2 cups of water yields 2 cups of espresso.
-
3 cups of water yields 2 cups of espresso,
plus steam for frothing milk for
cappuccino.
-
4 cups of water yields 4 cups of espresso.
10
-
5 cups of water yields 4 cups of espresso,
plus steam for frothing milk for
cappuccino.
(=
upper rim of metal band on
glass carafe)
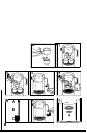
6. Place the boiler cap securely on the
machine and turn it clockwise until it is
secure (see figure 7).
7. Place the carafe lid
(dj
on the carafe
(e)
so that the lid opening points toward the
pouring spout of the carafe (see figure
8).
8. Place carafe under the filter holder. Make
sure that the nozzle in the filter holder
points through the opening of the carafe
lid (see figure
9).
ATTENTION:
Make sure that the overflow grid
(fj
is in
place.
9.
To make espresso directly into one or
two cups, clip the cup adapter
(hj
onto
the filter holder before brewing
(see figure 10).
Place cups directly under the two spouts
(see figure 11).
10. Now you are ready to make espresso.
Simply turn the selector switch to the
”
Q
”
position (see figure 12).
The ON/OFF indicator light ljj will
illuminate.
11. After approximately 2 minutes the water
will have reached the proper
temperature.
The water will automatically pass
through the coffee grinds, producing
espresso in the glass carafe or in the
cups, whichever you selected.
12. Initially. the coffee will drip very slowly.
If, after 4 minutes, no water passes
through the coffee grinds, turn Off the
machine, release pressure by following
the instructions under CAUTION-
PRESSURE listed below, then remove
the filter holder, empty coffee grinds and
start from the beginning.
ATTENTION:
Depending on the degree of finess of the
coffee ground it can occur that the brewing
process will be interrupted once.