


13
ENGLISH
INSTALL THE RANGE
ANTI-TIP DEVICE INSTALLATION
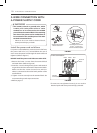
Tip - Over Hazard
A child or adult can tip the range and be
killed. Verify the anti-tip bracket have been
installed. Ensure the anti-tip bracket is
enganged when the range is moved.
Do not operate the range without the anti-
tip bracket in place. Failure to follow these
instructions can result in death or serious
burns to children and adults.
WARNING
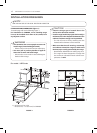
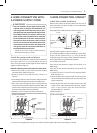
To check visually that leveling leg is inserted
into bracket, grasp the top rear edge of the
range and carefully attempt to tilt it forward.
bracket
Leveling
leg
Anti-tip
bracket
Wall plate
Screw must
enter wood
or concrete
1. Locate the bracket using the template
Anti-tip bracket are packaged with the template. The
instructions include necessary information to
complete the installation. Read and follow range
installation instruction sheet (template).
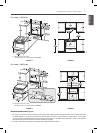
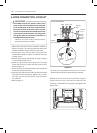
2. Level the range
Level the range by adjusting the leveling legs with a
wrench.
Leg
leveler
Raise
range
Lower
range
Use a level to check your adjustments. Place the level
diagonally on the oven rack, and check each direction
for level.
First check direction .
After check direction .
If the level doesn’t show
level on the rack, adjust
the leveling legs with a
wrench.
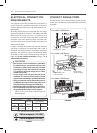
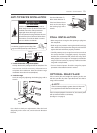
FINAL INSTALLATION
• Move range close enough to the opening to plug into
the receptacle.
• Slide range into position insuring that both back legs
slide under the anti-tip bracket. Range should sit flush
against the back wall when properly installed.
• Carefully attempt to tip range forward to insure that
the anti-tip bracket is engaged properly. If properly
installed, the anti-bracket will prevent the range from
being tipped. If the range can be tipped, reinstall the
range until the bracket is properly installed and the
range will not tip forward.
• Turn on electrical power. Check the range for proper
operation as described in owner’s manual.
OPTIONAL REAR FILLER
If the counter does not bridge the opening at the rear
wall the rear filler kit, that is provided with the slide in
range, will be needed.
If the countertop depth is greater than 25” there will
be a gap between the ller kit and the back wall.
NOTE
If the countertop depth is less than 24”, the control panel
will not sit ush with the countertop.
(See gure 1 on page 6)
level