


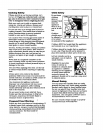
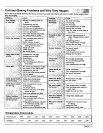


ELECTRONIC CLOCK AND OVEN CONTROL
The electronic clock and oven control on your
Maytag wall oven is used for the time-of-day
dock, timer, bake, broil, and programmed
operation functions. A beep will sound each
time a function pad is pressed.
The display on the con_-ol will flash when
power is first supplied to the wall oven or if
there is a power failure. Once the time-of-day
clock has been set (see Setting the Clock. page
6). the display will stop flashing.
The oven will automatically turn off if it is
left on for 12 hours.
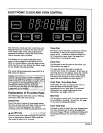
Explanation of Function Pads
The following pads are found on your Maytag
electronic clock and oven control:
Cancel Pad
Press this pad to cancel all operations except
the tlme-of-day clock and timer. If ypu are ever
unsure ff you've programmed the colntrol
correctly, press the CANCEL pad an_ start over.
and Pads .... _ _ "_ r
Press or press and hold these pads to enter the
time or temperature desired. These pads arc
also used to se1_ctHI or Lo broil.
Timer Pad
The timer can be set from 1 minute to 9 hours,
50 minutes. It will count down by seconds
(when set for I minute) or minutes (when set
for 2 minutes or more time). See page 6 for
instructions on setting the timer.
Clock Pad
Use this pad to set the tlme-of-day dock. For
instructions, see page 6.
You may also press this pad to recall the
current time of day. For example, if the timer is
counting down in the dlsplay, press the CLOCK
pad to return the current time to the display.
The timer will continue to count down and a
signal will sound when the time expires.
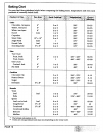
Cook Time / Oven Stop Pads
These pads are used to program the oven to
start and stop automatically, either
immediately or at a later time. For detailed
information on using Programmed Oven
Operations. see pages 14 to 15.
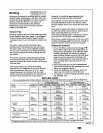
Broil Pad
Use this pad to select broil. Two heat selections
are available for broiling - Hi and Lo. See page
13 for more broiling information.
Oven Temp Pad
This pad is used to select the oven temperature.
The oven temperature is set by pressing this
pad and the • or • pad. Additional baklng and
roasting information can be found on pages 7
to 12.
PAGE 5