


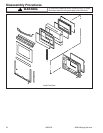
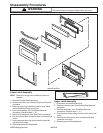

Testing Procedures
!
WARNING
To avoid risk of electrical shock, personal injury or death; disconnect power to oven before servicing, unless
testing requires power.
©2004 Maytag Services 16023416 21
Component Test Procedure Results
Electronic
range control
F1−1 –Upper Oven >650°F with door unlocked............................
.
F1−2 –Lower Oven >650°F with door unlocked............................
.
F1−3 –Upper Oven >950°F with door locked................................
.
F1−4 –Lower Oven >950°F with door locked................................
.
F1−7 –Membrane switch is not responding ..................................
.
F3−1 –Upper sensor is shorted at (< 100 Ω) or
open at (>5 K Ω) ..............................................................
.
F3−2 –Lower sensor is shorted at (< 100 Ω) or
open at (>5 K Ω) ..............................................................
.
Check actual upper oven temperature,
if > 650°F check sensor.
Check actual lower oven temperature,
if > 650°F check sensor.
Check actual upper oven temperature,
if > 950°F check sensor.
Check actual lower oven temperature,
if > 950°F check sensor.
Check membrane switch for connection or damage.
Check upper sensor, harness, and connections
Check upper sensor, harness, and connections
Engineering
Test Mode
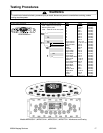
Press
BAKE
pad.
Enter 100°F using the number pads.
Immediately push and hold
BAKE
pad for appropriate oven
approximately 3 seconds.
This mode can also be entered by pressing the hidden pad
for 3 second located to the left of the lower oven light pad.
Used to view the actual oven temperature for both ovens at all
times, even when an oven function is active.
This mode will also display the current fault code for 5
seconds in the time digits.
Fault codes
accessed
through
Engineering
Test Mode
F0−0 –No fault.................................................................
F1−5 –Upper hardware failure within control....................
F1−6 –Lower hardware failure within control....................
F1−8 –Shorted key in membrane switch..........................
F1−9 –Internal communication errors within control.........
F1−A –Upper latch switches............................................
F1−B –Lower latch switches............................................
F1−C –Upper door switch................................................
F1−D –Lower door switch................................................
F1−E –Sensor input not calibrated ..................................
F1−H –EEPROM error.....................................................
F1−L –Temp in ovens are the same for long period ........
F1−N –Internal voltage on control not working.................
F9−1 –Upper lock switch is not correct............................
F9−2 –Upper unlock switch is not correct........................
F9−3 –Control does not see upper door lock...................
F9−
4 –Lower lock switch is not correct............................
F9−5 –Lower unlock switch is not correct........................
F9−6 – Control does not see lower door lock...................
EE –Control cannot read E-PROM. Unit will shut down.
Default from factory
Replace control
Replace control
Check membrane connection
Replace control
Check latch wire harness
Check latch wire harness
Check lock wire harness
Check lock wire harness
Verify sensor is operating properly
Replace control
Verify sensor is operating properly
Replace control
Check lock wire harness, and lock switch
Check lock wire harness, and lock switch
Check lock wire harness, and lock switch
Check lock wire harness, and lock switch
Check lock wire harness, and lock switch
Check lock wire harness, and lock switch
Disconnect power for 60 seconds. If EE reappears, replace ERC
Test Mode
This mode must be activated within the first 5 minutes of
power up.
Press BROIL and CANCEL pad for approximately 3 seconds.
If oven temperature is greater than 400°F, the Test Mode
cannot be activated or will abort if active.
Press and hold individual pads for 4 seconds to activate.
Display will have dashes in all segments to indicate the mode is
active.
Upper Bake: Energizes upper bake element
Lower Bake: Energizes lower bake element
Upper Broil: Energizes upper broil element
Convection Bake: Energizes convection fan
Upper Oven Light: Energizes upper oven light
Lower Oven Light: Energizes lower oven light
Upper Clean: Energizes upper motorized door lock
Lower Clean: Energizes lower motorized door lock
Stop Time: Energizes Beeper
Cook Time: Displays error codes
Timer 1: Energizes ROM version
Timer 2: Energizes EEPROM version
Keep Warm: Cooling Fan
Clock: All display segments light
If functions do not perform as specified, replace ERC
Oven
temperature
adjustment
Push
BAKE
pad.
Enter 550°F using the number pads.
Immediately push and hold
BAKE
pad for appropriate oven
approximately 3 seconds.
To decrease or increase oven temperature. Push
AUTO SET
pad until negative or positive numbers appear. Oven can be
adjusted from -35° to +35° (-37.2° to + 1.6° C). To avoid over
adjusting oven, move temperature -5° (2.7° C) each time.
Push
OVEN CANCEL
button.
While increasing or decreasing oven temperature, this does not
affect self-cleaning temperature.
Holds offset through power outage.