


Testing Procedures
!
WARNING
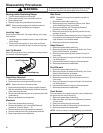
To avoid risk of electrical shock, personal injury or death; disconnect power to oven before servicing, unless
testing requires power.
18 16023416 ©2004 Maytag Services
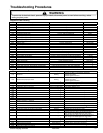
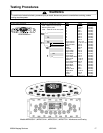
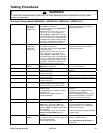
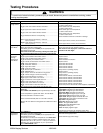
H2 Control Testing (Model MER6875A**)
Illustration Component Test Procedure Results
H2 Controlled
Oven temperature
adjustment
(Upper Oven)
Press
Upper Bake
pad.
Enter
550
on the digit-pad.
Immediately press and hold
Upper
Bake
pad for 3 seconds.
Adjust oven from -35° to +35° (-37.2° to
+ 1.6° C) in 5° F (2.7° C) increments by
pressing
Autoset
pad. To avoid over
adjusting the oven, move temperature 5°
F (2.7° C) each time. Wait 4 seconds for
the data entry timer to expire to accept
the change. Temperature adjustment is
retained even through a power failure.
While increasing or decreasing oven
temperature, this does not affect self-
cleaning temperature.
H2 Controlled
Oven temperature
adjustment
(Lower Oven)
Press
Lower Bake
pad.
Enter
550
on the digit-pad.
Immediately press and hold
Lower
Bake
pad for 3 seconds.
Adjust oven from -35° to +35° (-37.2° to
+ 1.6° C) in 5° F (2.7° C) increments by
pressing
Autoset
pad. To avoid over
adjusting the oven, move temperature 5°
F (2.7° C) each time. Wait 4 seconds for
the data entry timer to expire to accept
the change. Temperature adjustment is
retained even through a power failure.
While increasing or decreasing oven
temperature, this does not affect self-
cleaning temperature.
H2 Controlled
Temperature
display
Press and hold
Upper
Cancel
and
Upper
Bake
pads for 3 seconds.
This mode enables the user to indicate
°F or °C on the display.
H2 Controlled
Clock Display
Press and hold
Upper
Cancel
and
Clock
pads for 3 seconds.
Allows clock to be toggled On or OFF.
H2 Controlled
24 Hour Clock
Press and hold
Upper
Cancel
and
Favorite
pads for 3 seconds.
Allows the time on the clock to be
toggled from 12 hour or 24 hour display.
H2 Controlled
Factory Default
Press and hold
Upper
Cancel
and
Upper
Keep Warm
pads for 3 seconds.
Allows the clock to be reset to factory
settings.
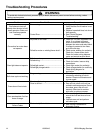
H2 Controlled
Twelve hour off Control automatically cancels cooking
operation and removes all relay drives
12 hours after the last pad touch.
See Sabbath mode to disable.
H2 Controlled
Sabbath Mode
Hold
Clock
pad for 3 to 5 seconds to
activate Sabbath mode.
Hold
Clock
pad
for 3 to 5 seconds to
disable Sabbath mode.
“SAbbAth” displays for 5 seconds, then
changes to “SAb” (displayed in Temp
area).
All pad inputs are disabled except
CANCEL and CLOCK pads.
This mode disables the normal 12 hour
shutoff to allow operation of the bake
mode for a maximum of 72 hours.
H2 Controlled
Beeper Volume
Hold
Upper Cancel
and
Delay
pads for
3 seconds to adjust beeper loudness
level.
Volume settings are Low, Medium and
High.
H2 Controlled
Child lock out
Press and hold
Upper Cancel
and
Cook
& Hold
pads for 3 seconds. “OFF” will
display where the temperature normally
appears. “LOCK” will display flashing
while door is locking.
To reactivate the control, press and hold
Cancel
and
Cook & Hold
pads for 3
seconds.
This is a safety feature that can be used
to prevent children from accidentally
programming the oven. It disables the
electronic oven control.
Child lockout features must be reset
after a power failure.
H2 Controlled
Diagnostic Code
Display
Press and hold
Upper Cancel
and
Autoset pads for 3 seconds.
See “Quick Test Mode.”
Cycle through the codes using the
number pads 1 through 5.
The last 5 diagnostic codes will be stored
in the non-volatile memory.
See “Description of Error Codes” for
explanation.