


7
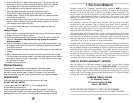
TEA AND COFFEE MEASUREMENT CHART
TO MAKE TEA COFFEE
3 Quarts 8-12 regular bags or 8 – 10 coffee scoops or
3 – 5 level Tbsp.of loose tea 16 – 20 level Tbsp.
2 Quarts 6-10 regular bags or 5 – 7 coffee scoops or
2 – 4 level Tbsp. of loose tea 10 – 14 level Tbsp.
1 Quart* 3 – 5 regular bags or 3 – 4 coffee scoops or
1 – 3 level Tbsp. of loose tea 6 – 8 level Tbsp.
*When brewing only 1 quart of tea, fill the water and ice levels to half the amount used for 2 quarts.
Helpful Hints
1. Use more or less tea or coffee to suit your taste. Additional tea bags
may be needed when using herbal tea.
2. If your ice supply is low, you can substitute with cold tap water.
After filling the water reservoir with the proper amount of water, refill the
pitcher with cold tap water a second time to the desired WATER level.
Refrigerate to chill.
3. Tea may turn cloudy as it chills due to the tannic acids found in tea.
Higher quality teas will contain more tannic acids than others.
Using less tea will reduce the cloudiness.
4.
For extra flavor, try adding several bags of herbal or flavored tea to your brew.
5. For excellent iced coffee, try dark roast coffee or any other flavored coffee.
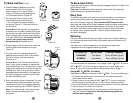
To Brew Iced Tea
1. Fill the pitcher with tap water to the desired
capacity as indicated by the 1, 2 and 3 quart
WATER levels marked on the pitcher.
Warning:To prevent injury from hot steam,
do not plug the unit in until water is in
the reservoir and the pitcher is in place.
2. Pour the water into the water reservoir (Figure A).
3. Place a MR. C FFEE
®
brand paper filter in the
steeping basket and add the desired amount of
tea bags or loose tea (Figure B). Please refer to
the chart above for recommended amounts of
tea or coffee. Sugar, lemon and other flavoring
can also be added at this time.They will dissolve
best if sprinkled over the top of the tea.
6
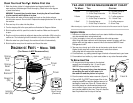
Clean Your Iced Tea P t
™
Before First Use
1. Wash the pitcher, pitcher lid, steeping basket and steeping basket lid with
warm water and mild detergent. Rinse thoroughly. (Please refer to the diagram
of parts listed below).
WARNING: To prevent injury from hot steam, do not plug the unit in until water
is in the reservoir and the pitcher is in place.
2. Fill the pitcher with water to the top water level mark on the pitcher and pour
into the water reservoir. Do not overfill. Replace the steeping basket and lid on top of
the machine.
3. Place one tray of ice cubes into the pitcher.
4. Turn the steeping dial to the open position as illustrated in Diagram A below.
5. Slide the pitcher with lid, spout first, under the machine. Make sure the spout lid
is open.
6. Plug the cord into an electrical outlet and depress the push button (ON) to turn the
machine on. The indicator light will illuminate to let you know the machine is ON.
7. When the water has cycled through, the machine will shut off automatically.
8. Slide the pitcher away from the machine and discard the water.
STEEPING
BASKET
LID
STEEPING
DIAL
WATER
RESERVOIR
PITCHER
SPOUT LID
IS OPEN
STEEPING
BASKET
PITCHER
LID
PUSHBUTTON
(ON)
I
NDICATOR
LIGHT (ON)
STEEPING DIAL IN
OPEN POSITION
(DIAGRAM A)
DIAGRAM OF
PARTS –
MODEL
TM3
(T
HIS
P
RODUCT
I
S
NOT D
ISHWASHER
S
AFE
)
FIGURE B
FIGURE A