


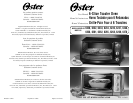

To Use the Bake Function
*
Select desired oven rack position. (See “Positioning Racks” Section)
Turn the temperature control knob to the desired temperature.
Turn the function selector knob to the BAKE setting. Both the top and bottom heater
elements will operate.
Turn the timer knob to the desired time. The timer can be set to STAY ON or for up to
60 minutes. At the end of the cooking time a bell signal sounds and the oven turns off
automatically. To set the timer for less than 15 minutes, turn the timer past the 15-minute
mark to engage timer switch; it can be set for cooking that will only require a few minutes.
Arrange food on the wire rack or in the baking pan.
When baking is completed, open door fully and remove food carefully.
When defrosting do not preheat oven. Turn Temperature Control to 250°F. Allow 15 to
20 minutes per side for meats or fish to defrost. Always cook food promptly after thawing.
To Use the Toast Function
*
Select desired oven rack position. (See “Positioning Racks” Section)
NOTE – No pre-heat period is required before toasting.
NOTE – Different types of bread require different settings. Lighter breads and waffles
require a lighter setting. Darker breads, muffins, and English muffins require a darker setting.
Turn the temperature control knob to the MAX temperature.
Turn the function selector knob to the TOAST setting. Both the top and bottom heater
elements will operate.
Turn the timer knob to the desired Toast setting. To set the timer, turn the timer past
the 15 minute mark to engage timer switch and set back to desired toast setting.
Arrange food on the wire rack.
When toasting is completed, open door fully and remove food carefully.
NOTE – The top heating elements will cycle ON and OFF to maintain the desired temperature.
TIP – For best toasting results, position the rack in the up position on the lower rack guide.
(See “Positioning Racks” Section)
WARNING: Cooked food can be very hot, especially pastry fillings. Handle with care.
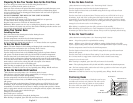
Positioning Racks
To accommodate a wide variety of foods the oven has two
reversible racks and two rack positions. The racks can be
inserted in the oven in the up position or down position.
The racks will fit into either of the rack guides inside of
the toaster oven.
(See Figure 5)
FIGURE 5
UP POSITION
2 RACK
GUIDE OPTIONS
DOWN POSITION
English-3
Preparing To Use Your Toaster Oven for the First Time
If you are using your toaster oven for the first time, please be sure to:
Remove any stickers from the surface of the oven.
Open oven door and remove all printed documents and paper from inside the toaster oven.
Clean the racks, tray, and pan with hot water, a small amount of dishwashing liquid
and a non-abrasive sponge or cleaning pad. Insert bottom rack over hooks on glass door
so rack moves with door.
DO NOT IMMERSE THE BODY OF THE UNIT IN WATER.
Dry the unit thoroughly before using.
Select a location for the toaster oven. The location should be in an open area
on a flat counter where the plug will reach an outlet.
Plug the toaster oven into a 120 Volt AC electrical outlet.
W
ARNING
:
When toaster oven is in use or cooling down, please be sure there is a 4-inch
clearance between the toaster oven and any other surface including cords. Be sure the cord
is not resting against the back of the toaster oven.
Using Your Toaster Oven
Preheating the Oven
Place oven racks into the desired position before heating the oven.
(See “Positioning Racks” Section)
Turn the temperature control knob to the desired temperature.
Turn the function selector knob to the desired setting.
Set the timer knob to desired time and allow 9 – 11 minutes for the oven to preheat.
To Use the Warm Function
NOTE: The warm function is for warming and keeping food warm after heating.
Select desired oven rack position.
(See “Positioning Racks” Section)
Turn the temperature control knob to the desired temperature.
Turn the function selector knob to the WARM setting. Only the top heater element
will operate. The heater elements will cycle ON and OFF to maintain temperature.
Turn the timer knob to the desired time. The timer can be set for up to 60 minutes.
At the end of the cooking time a bell signal sounds and the oven turns off automatically.
To set the timer for less than 15 minutes, turn the timer past the 15-minute mark to engage
timer switch; it can be set for cooking that will only require a few minutes.
Arrange food on the wire rack or in the baking pan.
When warming is completed, open door fully and remove food carefully.
WARNING: Cooked food can be very hot, especially pastry fillings. Handle with care.
To Use the Variable Broil Function
*
Select desired oven rack position.
(See “Positioning Racks” Section)
Close the door to the first notch, leaving approximately a 3-inch gap at the top.
This will insure adequate airflow during broiling.
Turn the temperature control knob to the desired temperature.
Turn the function selector knob to the BROIL setting. Only the top heater element
will operate.
Turn the timer knob to the desired time. The timer can be set to STAY ON or for up to
60 minutes. At the end of the cooking time a bell signal sounds and the oven turns off
automatically. To set the timer for less than 15 minutes, turn the timer past the 15-minute
mark to engage timer switch; it can be set for cooking that will only require a few minutes.
Place broil rack in oven pan to make broiler pan.
Arrange food on broiler pan.
Place broiler pan on oven rack.
Turn food over about halfway through the broiling time.
When broiling is completed, open door fully and remove food carefully.
English-4