1-3
1.3.2 Assembling Multi Fryer Systems
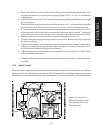
If you purchased a multi-fryer unit, it could be shipped in more than one piece. To assemble the unit
follow the instructions below.
a. Unpack the units and move them close together. Remove the front panels and both heat
shields from the fryers.
b. There are five joining strips to be attached to the units to make them into one system. These
strips are attached in the rear, front, upper front, and the forward and rear caster mount. Use
the screws supplied with your system to attach the strips. Secure them tightly to each unit.
c. Replace the heat shield and front panels to complete the system assembly.
1.4 INSTALLATION
Although it is possible for you to install and set up your new fryer, it is STRONGLY recommended
that you have it done by qualified professionals. The professionals that install your new fryer will know
the local building codes and ensure that your installation is safe.
WARNING
The fryer must be properly restrained to prevent movement or tipping. This
restraint must prevent the fryer from movements that would splash hot liquids
on personnel. This restraint may be any means (alcove installation, adequate
ties, or battery installation).
1.4.1 Installation Clearances
The fryer needs clearance around it for proper operation. Adequate clearances allow for servicing and
proper burner operation. The clearances shown below are for cooker installation in combustible and
non-combustible construction.
Combustible Non-Combustible
Construction Construction
Back 6" 0"
Sides 6" 0"
Floor - Combustible 6" 6"
1.4.2 Gas Connection
Your fryer will give you peak performance when the gas supply line is of sufficient size to provide the
correct gas flow. The gas line must be installed to meet the local building codes or National Fuel Gas
ENGLISH


