


- 8 -
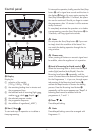
Confirm the programming of the timer with the
Start/Stop button ạ. The colon on the display Ạ
flashes and the programmed time starts to run. As
soon as the programme starts, the operating indi-
cator lamp Ấ glows.
When the baking process has been completed, ten
acoustic signals are sounded and the display Ạ
indicates 0:00.
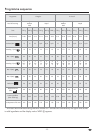
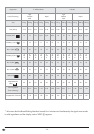
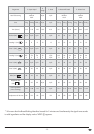
Example:
It is 8:00 a.m. and you would like to have fresh
bread in 7 hours and 30 minutes, in other words
at 3:30 p.m.
First of all select Programme 1 and then press the
arrow button ả until 7:30 appears in the display
Ạ, as the time period to be allowed for comple-
tion is one of 7 hours and 30 minutes.
Note: The timer function cannot be activated
with the Programme "Jam".
ƽ Note
With time delayed baking please do not use
perish-able ingredients such as milk, eggs, fruit,
yoghurt, onions etc.
Before baking
For a successful baking process, please consider
the following factors:
Ingredients
ƽ Note
Take the baking mould ¶ out of the housing befo-
re putting in the ingredients. Should ingredients
drop into the baking area, a fire may be caused
by them burning on the heating elements.
• Always place ingredients into the baking
mould ¶ in the sequence specified .
• All ingedients should be at room temperature,
to ensure an optimal rising result from the yeast.
• Ensure that you measure the ingredients precisely.
Even negligible deviations from the quantities
specified in the recipe may affect the baking
results.
ƽ Note
NEVER use quantities larger than those specified.
Too much dough could rise out of the baking
mould ¶ drop onto the hot heating elements and
cause a fire.
Baking bread
Preparation
Pay heed to the safety instructions in this manual.
Place the Bread Baking Machine on a level and
firm surface.
1. Pull the baking mould ¶ upwards and out of
the appliance.
2. Push the kneading paddles ² onto the drive
shafts in the baking mould ¶. Make sure they
are firmly in place.
3. Place the ingredients for your recipe into the
baking mould ¶ in the specified order. First
add the liquids, sugar and salt, then the flour,
adding the yeast as the last ingredient.
ƽ Note
Ensure that the yeast does not come into contact
with salt or fluids.
4. Place the baking mould ¶ back in the applian-
ce. Ensure that it engages correctly.
5. Close the appliance lid ᕢ.
6. Insert the power plug into the wall socket.
A signal tone sounds and in the display Ạ
appears the Programme number and the time-
duration for Programmme 1.
7. Select your programme with the Programme
select button Ầ. Each input is confirmed with
a signal tone.
8. If necessary, select the size of bread you want
to bake with the button ấ.