Temperature Control
Each oven has a separate temperature control dial and a separate
oven function selector. The controls can be set at any temperature
from 200° F (93.3° C) to 550° F (287.8° C). There are separate set-
tings for broiling and self-cleaning. Always be sure the controls are
in the OFF position when the ovens are not in use.
Interior Oven Light Control
The upper and lower ovens have interior oven lights that are con-
trolled by one switch on the control panel. Push the switch to turn
the interior oven lights on and off.
Two-Element Bake
Full power heat is radiated from
the bake element in the bottom
of the oven cavity and supple-
mental heat is radiated from the
broil element. This function is
recommended for single rack
baking. Many cookbooks contain
recipes to be cooked in the con-
ventional manner. Conventional
baking/roasting is particularly
suitable for dishes that require a
high temperature. Use this set-
ting for baking, roasting, and
casseroles.
TruConvec
TM
The rear element only operates
at full power. There is no direct
heat from the bottom or top ele-
ments. The motorized fan in the
rear of the oven circulates air in
the oven cavity for even heating.
Use this setting for foods that
require gentle cooking such as
pastries, souffles, yeast breads,
quick breads and cakes. Breads,
cookies, and other baked goods
come out evenly textured with
golden crusts. No special bake-
ware is required. Use this function for single rack baking, multiple rack baking,
roasting, and preparation of complete meals. This setting is also recommended
when baking large quantities of baked goods at one time.
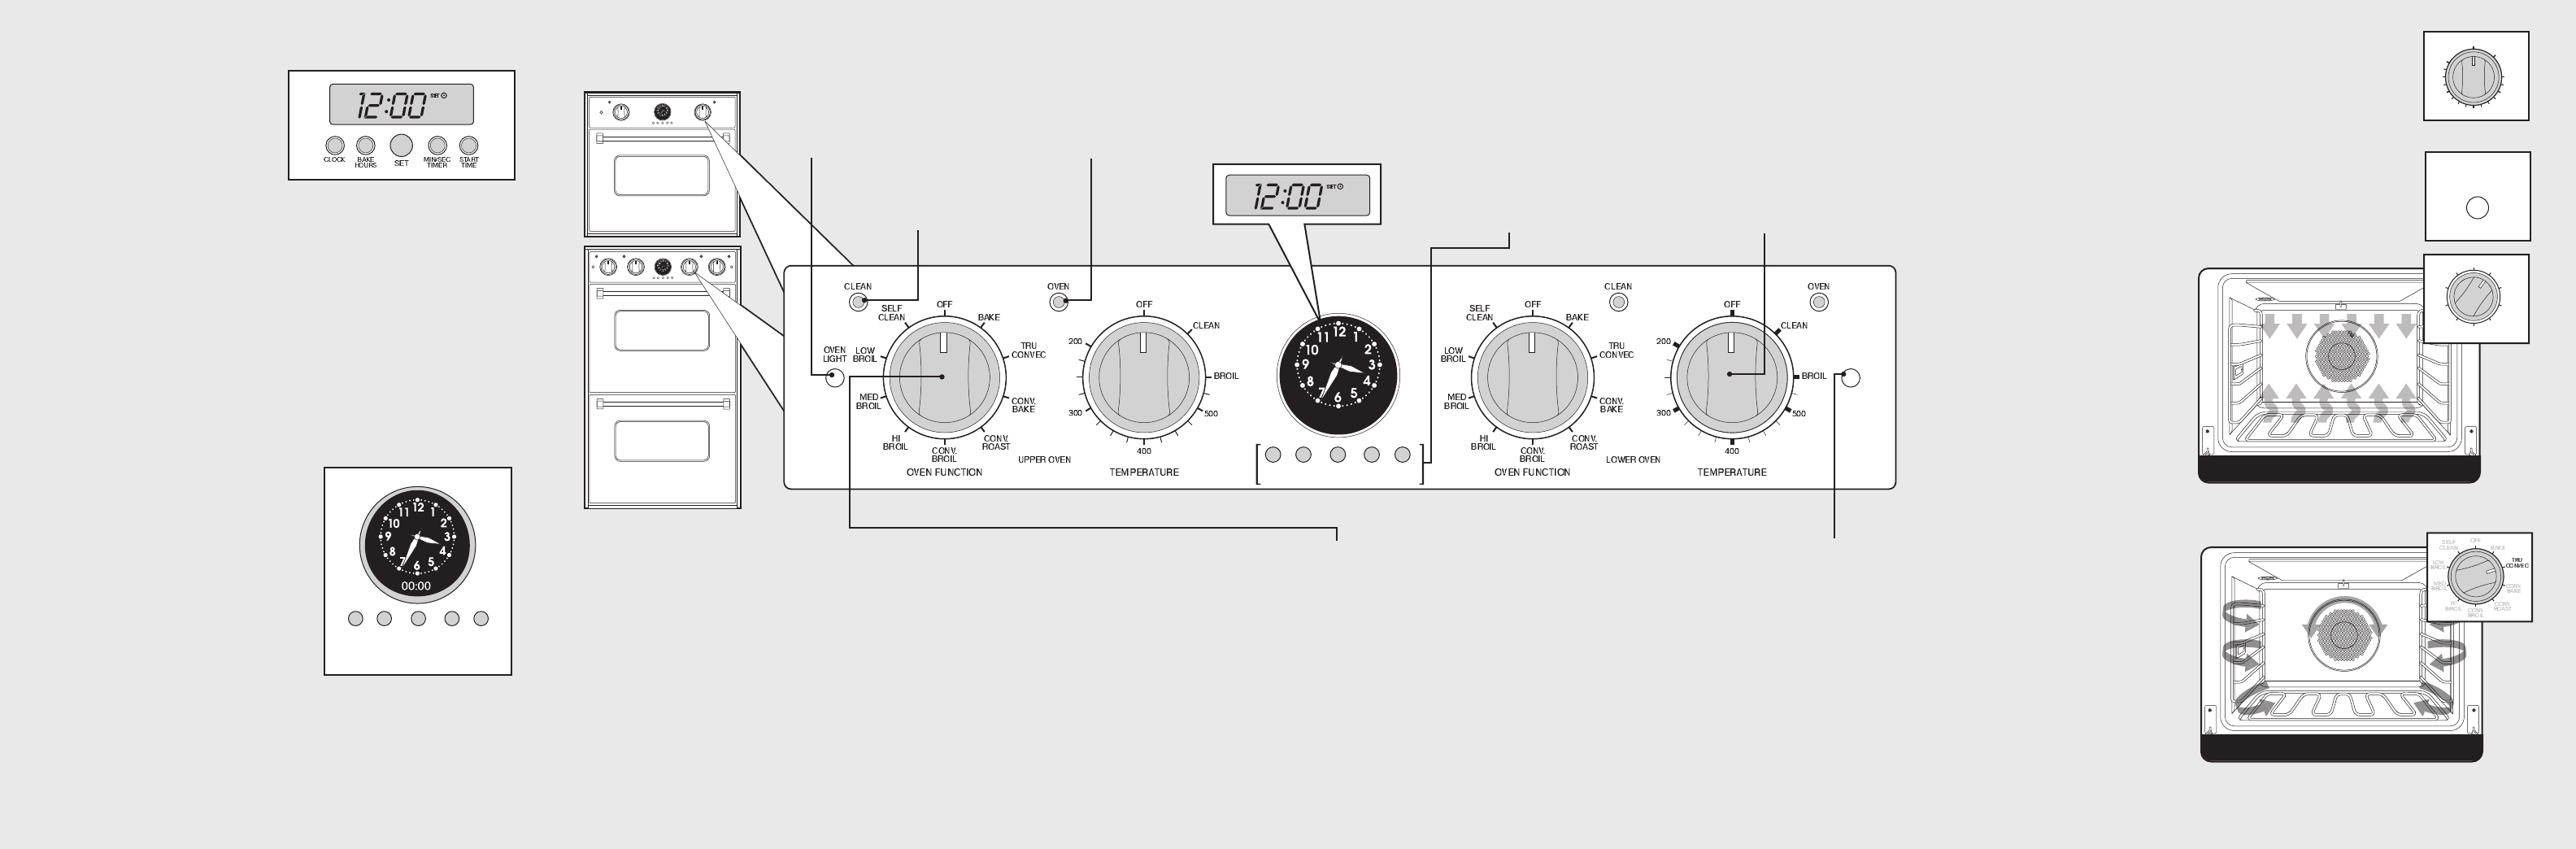
Oven Control Panel
Off/On
Indicator Light
Temperature Control
Each oven has a separate temperature
control dial. The controls can be set at
any temperature from 200˚ F to 550˚ F.
There are separate settings for broiling
and self-cleaning.
Interior
Oven Light
Indicator
Oven Function Selector
Bake
Conventional, single rack baking (breads,
cakes, cookies, pastry, pies, entrees,
vegetables)
Convection Bake
Multi-rack baking for heavier or frozen
foods (e.g., 4 frozen pies, pizzas, entrees,
vegetables)
TruConvec
TM
Multi-rack baking for breads, cakes,
cookies (up to 6 racks of cookies
at once)
High-Broil
Dark meats at 1” thickness or less where rare
or medium doneness is desired
Medium-Broil
White meats such as chicken or meats
greater than 1” thick that would be
over-browned in high broil
Low-Broil
Delicate broiling such as meringue
Convection Broil
Thicker meats, faster than regular broil &
with less smoke generation
Convection Roast
Whole turkeys, whole chickens, hams, etc.
Self-Clean
A pyrolytic self-cleaning cycle where the
oven reaches elevated
temperatures in order to burn
off soils and deposits
Self-Clean
Indicator Light
Electronic Timing Center
The Electronic Timing Center
is used to program and control
all timing functions.
IMPORTANT–The Time-of-day
must be set before any other
program can be used.
bake
hours
timer
start
time
probe
temp
Set
manual
upper
timed
lower
timed
Manual/Timed
Control
Digital Clock
(Select Models)
off
b
ake
conv.
bake
tru.
convec.
m
ed
broil
low
broil
h
igh
broil
c
onv.
broil
self-
clean
conv.
roast
O
FF
400
2
00
300
500
BROIL
CLEAN
two-element bake
O
FF
B
AKE
T
RU
C
ONVEC
L
OW
B
ROIL
CONV.
BAKE
SELF
C
LEAN
MED
BROIL
H
I
B
ROIL
C
ONV.
B
ROIL
C
ONV.
R
OAST
Oven Settings and Functions
*Note: This is a Professional Premiere Control Panel.*Note: The PROBE function is included on the Premiere models
Setting the Clock
Digital Display
(Select Models)
The time-of-day must be set
before any other program
can be used. When your
oven is first connected to
the power in your home, the
timer display will show --:--.
To program the time-of-day:
1. Press the “CLOCK”* button. 12:00 will be displayed with the
word SET in the upper right corner.
2. Turn the “Set” knob until the correct time-of-day is displayed.
AM and PM are not indicated.
3. Press the “CLOCK” button again. The word SET will
disappear and the correct time is now set into the timer.
The time-of-day can be changed by following steps 1 through 3.
It cannot be changed while there is a Bake Hours or Start Time
cycle programmed into the timer.
Analog Display
(Premiere Models)
The time-of-day must be set before
any other program can be used.
When your oven is first connected
to the power in your home, the
digital display will show 00:00. To
program the time-of-day:
1. Push and hold the “timer” and
“bake hours” buttons at the
same time.
2. Turn the “Set” knob until correct
time is displayed on the digital clock.
3. Release “timer” and “bake hours” buttons.
The analog clock will automatically set after the digital time is set.
bake
hours
timer
start
time
probe
temp
Set


