


12
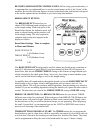
prepare the recipe you wish to make, place the bread pan into the bread maker, program
for bread select and color and then enter the number of hours and minutes between
starting time to desired finish time using the timer buttons. The UP Timer button will
scroll up in 10 minute intervals, whereas the DOWN TIMER button will scroll down in
10 minute intervals. See TIMER DELAY Section in this book for more details.
The delay start timer can be used with both Bread Settings and the Dough Setting
providing non-perishable ingredients are used. The recipes that have the symbol can
be used in the delay start mode. Active dry, fast rising or bread machine yeast can be
used with the delay start timer.
START/STOP BUTTON: Use the START/STOP button to turn the bread maker on
and off. Before starting the bread maker, you must first program the BREAD SELECT
setting and the BREAD COLOR setting plus the DELAY START TIMER if using this
feature. To start the bread maker, simply press the START/STOP button once. When
turned on, the red signal light under the word ON will glow and remains lit until the
bread maker is turned off. To turn bread maker off, press and hold the START/STOP
button down for about 3 seconds or until the red ON light goes out.
Once you have started the bread maker, the colon between the hours and minutes will
begin to flash and the minutes will begin to count down. If not using the delay start timer,
the bread maker will begin to mix the ingredients and proceed through the cycles until the
bread is done, When the process time elapses, 0:00 will appear in the display and an
audible alert will sound to let you know the bread is done. Turn the bread maker off by
holding down the START/STOP button until the red ON light goes off. Remove the
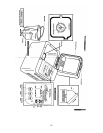
bread pan using potholders and place hot loaf of bread onto a rack to cool before slicing.
If the bread pan is not removed from the bread maker immediately after baking, the
bread maker will automatically go into a Keep Warm mode for up to 3 hours to keep the
bread warm. The red on light will remain lit during the keep warm period as a reminder.
When the bread pan is removed, turn the bread maker off by holding down the
START/STOP button until the red ON light goes off.
If in the dough mode, the bread maker will turn off automatically and the red ON light
will go out upon completion of the cycle. Remove the pan containing the dough
immediately and shape/form as desired for conventional baking. Do not leave pan
containing dough inside bread maker after it turns off as dough will continue to rise and
could overfill the pan if left inside bread maker too long. See Dough Section for more
details.
TOO HOT WARNING: If the inside of the oven chamber is too hot for making bread,
an audible alert will sound when you attempt to turn the bread maker on. If this occurs,
allow the chamber to cool by leaving the cover open for 10 to 15 minutes or until the
bread maker can be turned on without the warning going off.
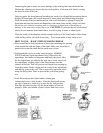
CLEAN BEFORE USING
SPECIAL NOTE: The bread pan is not immersible and should never be
washed in an automatic dishwasher.