


15
If bread is not removed immediately after the cycle is complete, the bread maker will
automatically go into Keep Warm mode for up to 3 hours. The ON light will remain lit
during this keep warm period as a reminder. When removing the bread pan during the
keep warm period, always use potholders or oven mitt, as pan will be hot. Turn bread
maker off by holding START/STOP button down until ON light goes out. Unplug cord
from outlet after use. If the bread maker is not turned off during this 3-hour keep warm
period, it will automatically shut itself off and signal light will go out. Unplug cord from
electrical outlet.
CAUTION: To avoid burn injury, do not put hands inside oven chamber or touch the
heating unit after completion of the bake cycle, as these surfaces are hot.
HOW TO USE DOUGH SETTING: The DOUGH setting will prepare dough for you
for hand shaping/forming and baking in your own oven. Use this setting when you wish
to make dinner rolls, cinnamon rolls, donuts, bread sticks or even traditional shaped
loaves of bread. The Delay Start Timer CAN be used with the DOUGH setting, however,
the Bread Color button CANNOT be used, as the dough will not be baked.
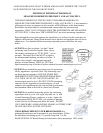
Follow these steps for using the DOUGH setting:
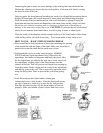
1.Place knead bar on shaft in bottom of bread pan, matching the opening of the knead bar
with the shape of the shaft. Make sure knead bar is pushed down onto shaft and the shaft
area is clean.
2.Add ingredients to pan in order listed in recipe, MAKING SURE to add any liquid
ingredients first, followed by dry ingredients, then butter or margarine and lastly the
yeast. After dry ingredients are added to the pan, tap pan several times to settle the
ingredients, then push some of the flour mixture into the corners of pan. This prevents
liquid from seeping up from the corners. Make slight well in center of flour and add the
yeast to well. This is especially important when using the Delay Start Timer to prevent
the yeast from getting wet.
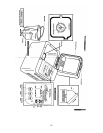
3.Lock bread pan into bread maker, turning the pan counterclockwise to lock in place. Pan
must be locked in place for the bread maker to function properly. Make sure handle of
pan is down, then close cover.
4.Plug bread maker cord into a 120 volt AC electrical outlet ONLY. Press the Bread Select
button until arrow indicator points to DOUGH on control. The process time of 1:20 (1
hour, 20 minutes) will appear in display. If you pass by the DOUGH setting, continue to
press the Bread Select button until DOUGH is reached. Program Delay Start Timer if
desired. See instructions below.
After the bread maker has been turned on, the programmed setting cannot be
changed. If you wish to change settings, hold START/STOP button down until red
ON light goes out. Then program control as desired and turn back on.
5. Press START/STOP button once to turn bread maker on. When turned on, the red light
under the word ON will glow and the colon between 1:20 or programmed time will begin