


I
4. Unlatch the two snap catches and swing the front panel
open on its hinges. If there is inadequate clearance to
swing the panel open, the front panel can also be lifted
off the hinges. The control panel cover may have to be
removed to lift the front panel off its hinges. Remove
the cover by removing the screws along the bottom
front edge. The cover then pulls straight off.
CAUTION: Always disconnect electrical power to the
machine when removing the control panel cover.
The front panel then need only be cracked open to lift
it off the hinges. Temporarrly replace the control panel
cover as power must be provided to continue the
cleaning operation.
5. With electrical power on and the service switch set to
the “normal on” positlon, proceed to:
A. Shut off the water supply to the machine.
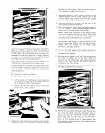
6. Lift up gently on the thickness control arm until
the water has drained out of the reservoir pan and
all ice sheets are off the freezing plates.
C Release the thrckness control and set the servrce
switch to the “clean” positlon.
6. Preheat the water system by pouring hot water into the
reservoir pan until the lower pump housing is covered.
Circulate for five minutes, Then set service switch to
“off” position to syphon out the water.
7. Set service switch to “clean” position. Slowly pour the
cleaning solution into the water reservoir pan. If the
solution foams, stop pouring until the foam subsides
and then pour the rest of the solution.
8. Allow the solution to circulate until the scale on the
freezing plate surface has dissolved.
9. When the plates are clean, place the service switch in
the “off” position. Thus allows the cleaning solution to
syphon out of the reservoir pan into the drain.
NOTE: Severe scale formation on the freezing plates
rna y require repeating the cleaning process with a fresh
quantity of solution if after 20 to 30 minutes of
orculating all the scale deposits are not removed.
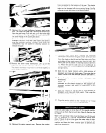
If scale deposits remain on the side flanges a stainless
steel sponge or pad dipped rn cleaning solution can be
used to scrub these surfaces. This can best be accom-
plished after the removal of the lower water
distributors. (see steps 14 & 75)
10. Turn on the water supply to the machine and set the
servrce switch to
“clean”. Allow the fresh water to
circulate for ten minutes.
11. Place the service switch in the “off” position and allow
the water to syphon off to the drain. When the
reservoir pan has refilled with water, place the service
switch in the “clean” position and allow the water to
circulate for ten more minutes.
12. Place the service switch in the “off” position and allow
the water to syphon off to the drain.
I
13. Remove the top water distributor tube. Remove the
two wing nuts which hold the distributor tube in
position on the top freezing plate. Pull out the water
pump hose from the right end of the distributor.
Pull out the rubber plug from the left end of the distri-
butor. A stiff bristled brush of approximately the
same diameter as the distributor will facilitate removal
of scale accumulation.