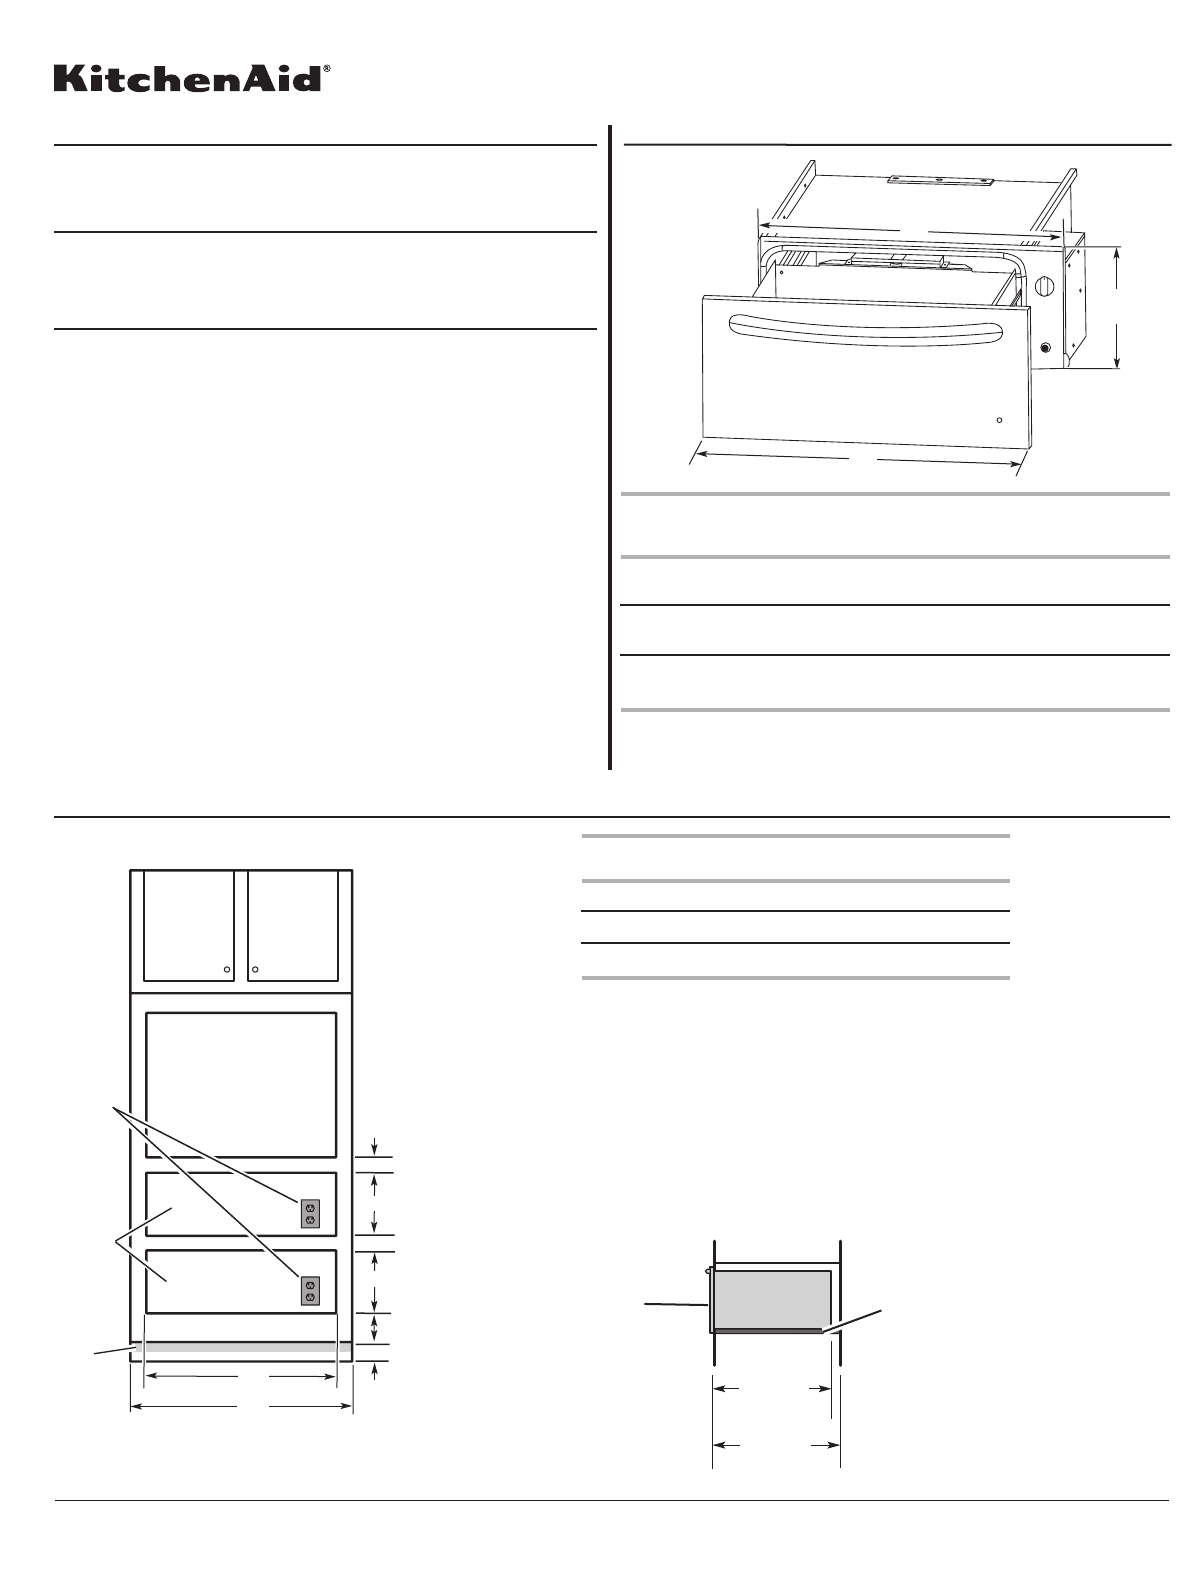
WARMING OVERALL RECESSED RECESSED
DRAWER WIDTH (A) WIDTH (B) HEIGHT (C)
SIZE
24" 23³⁄₄"22¹⁄₄"9"
(61 cm) (60.3 cm) (56.5 cm) (22.9 cm)
27" 26³⁄₄"25¹⁄₄"9"
(68.6 cm) (67.9 cm) (64.1 cm) (22.9 cm)
30" 29³⁄₄"28¹⁄₄"9"
(76.2 cm) (75.6 cm) (71.8 cm) (22.9 cm)
PRODUCT MODEL SERIES PRODUCT DIMENSIONS
CABINET OPENING DIMENSIONS
A 120 volt, 60 Hz., AC only, 15-amp fused, electrical circuit is required. A
time-delay fuse or circuit breaker is also recommended. It is recommended
that a separate circuit serving only this warming drawer be provided.
Because Whirlpool Corporation policy includes a continuous commitment to improve
our products, we reserve the right to change materials and specifications without notice.
Dimensions are for planning purposes only. For complete details, see Installation
Instructions packed with product. Specifications subject to change without notice.
Ref. W10600304A
9/11/13
24" (61 CM), 27" (68.6 CM), AND 30" (76.2 CM)
INDOOR/OUTDOOR ELECTRIC WARMING DRAWER
A
B
C
ELECTRICAL CONNECTION
LOCATION REQUIREMENTS
IMPORTANT: Observe all governing codes and ordinances.
●
Cutout dimensions that are shown must be used. Given dimensions
provide minimum clearance with warming drawer.
●
Recessed installation area must provide complete enclosure around the
recessed portion of the warming drawer.
●
Grounded electrical supply is required. See “Electrical Requirements”
section.
●
Electrical supply outlet should be located in the rear wall on the upper
right-hand side of the cutout or in an adjacent cabinet. The outlet must be
recessed. If the electrical outlet is located in an adjacent cabinet, a 1³⁄₈"
(3.5 cm) minimum diameter hole should have been drilled in the back of
the cutout or support surface to pass the power supply cord through to
the outlet.
●
Warming drawer support surface must be solid, level and flush with
bottom of cabinet cutout.
●
Warming drawers with oiled bronze, black glass, and white glass panels
are approved for indoor use only.
For best performance results make sure the warming drawer is leveled
before completing installation. There is no way to level the warming drawer
after it has been installed. If the installation is not level, the door may slide
open or not seal tightly, allowing heat to escape.
NOTE: If installing the warming drawer below another product,
refer to that product’s literature for any installation requirements.
Warming
drawer
front
Support surface must be
solid, level, flush with
bottom of cabinet cutout.
22³⁄₄"
(57.8 cm)
recessed
oven depth
24"
(61 cm)
min. cutout
depth
Cabinet Side View
Cabinet Front View
2¹/₂" (6.4 cm) min.
2¹/₂" (6.4 cm) min.
9¹/₈" (23.2 cm)
4" (10.2 cm)
B
Recommended 4¹/₄" (10.8 cm)
Minimum 1" (2.5 cm)
A
9¹/₈" (23.2 cm)
Toe
kick
Warming
drawer
cutouts
120 volt
grounded
utlet
(or located
in adjacent
abinet)
WARMING CUTOUT MIN. CABINET
DRAWER SIZE WIDTH (A) WIDTH (B)
24" (61 cm) 22¹⁄₂" (57.1 cm) 24" (61 cm)
27" (68.6 cm) 25¹⁄₂" (64.8 cm) 27" (68.6 cm)
30" (76.2 cm) 28¹⁄₂" (72.4 cm) 30" (76.2 cm)
Warming drawer can be installed as an indoor single or double installation or
installed under a single oven. Two warming drawers under a single oven are
shown.
NOTE: The warming drawer cannot be leveled after being installed.
For outdoor installation follow the cutout dimensions above. Install the outdoor
warming drawer in a permanent fixture.
Custom Wood Drawer Front
If you plan to install a custom wood panel to match your cabinets, we
recommend consulting a qualified cabinetmaker or carpenter. The back of the
wood panel must be sealed to avoid moisture damage.
KEWS105B
KEWS105S
KEWS145S
KEWS175B
KEWS175S


