


Customer Service Hotline 1-800-453-4206
Page 4
Tap Master Owners Manual
System Location
The Tap Master may be installed under a sink, or in a basement within 20’ feet of the RO sink
faucet as long as the Tap Master is not subjected to freezing temperatures. The Tap Master
should be mounted vertically where the drain line out is at the bottom. Mount the reserve tank on
a sturdy shelf, because it will weigh over thirty pounds when full.
Installing The Tap Master® Advanced Reverse Osmosis System
Tools Required
Safety glasses
Towels
Phillips screwdriver
Scissors
Medium Crescent wrench
Medium pliers (not required if using Speedfit® faucet connector)
Teflon tape
Felt tip pen or marker
Variable speed corded power drill (3/8” for the sink hole, ¼” for the remainder)
¼” metal drill bit w/ cobalt tip
½” metal drill bit w/ cobalt tip (not required if sink has a pre-drilled hole)
½” masonry drill bit (not required if sink has a pre-drilled hole, or if sink is not porcelain)
NOTE: SYSTEM MUST BE FLUSHED PRIOR TO USE - ALLOW THE TAP MASTER™ TO RUN FOR 3.5
HOURS, THEN DRAIN COMPLETELY. REPEAT. INITIAL WATER OUTPUT MAY BE DISCOLORED DUE
TO FLUSHING OF LOOSE CARBON FROM THE CARBON FILTERS. DO NOT DRINK UNTIL SYSTEM
HAS BEEN FLUSHED COMPLETELY.
READ ALL INSTRUCTIONS THOROUGHLY PRIOR TO INSTALLATION
• Drilling hole for RO sink spigot – porcelain sinks (drilling time – up to ¾ hour)
WARNING: Serious cracking and damage may occur to your sink even if instructions are followed
exactly due to age and the imperfections inherent in natural materials. Instructions may not
apply exactly to your sink. Use caution – sink may be slippery.
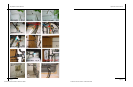
Remove base cover plate from RO sink spigot packaging. Line-up base cover plate with
other sink faucets. See Fig 1. Check underside of sink for spacing from trim, curvatures, and
other obstacles. See Fig. 15. Don’t place spigot too close to obstacles - leave yourself enough
room under the sink to use hand tools. Either right or left side of the sink is OK provided previous
conditions are met. Mark center of base cover plate with marker. See Fig 2. Place towel
underneath sink, below drilling site, to collect fillings. Always wear protective eyewear and gear
Customer Service Hotline 1-800-453-4206
Page 13
Tap Master Owners Manual
component and checking for pressure. Have a bowl and towel at hand.
No water or ice from refrigerator water center
Make sure line from Tap Master™ RO to
refrigerator has pressure. Make sure refrigerator water center and/or icemaker are turned ON,
and refrigerator is plugged in. If water center works, but icemaker does not, then defrost the
freezer as the line in may have frozen.
Hissing or flowing sounds from Tap Master™ RO
are normal during the water purification
process. Sounds should last for approximately 1 hour per gallon of water used. Sounds should
stop once the reserve tank is full.
Weak pressure at RO sink faucet & Reserve tank filling slowly
1. Make sure reserve tank is full, and has been flushed at least twice (6.5 gallons).
2. Make sure the angle-stop is wide open. (see Fig.4 on the instructions
enclosed with your tap master.)
3. Check all tubing for kinks or sharp bends - this can impede the flow of
water.
4. Check reserve tank air pressure. Air valve located on the side of the tank under a cap Use a
bicycle tire pressure gauge. Tank should have 7-7.5 psi.
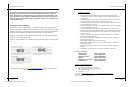
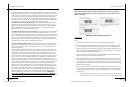
5. Check flow to the membrane housing. Turn off the water at the EZ adapter
and tank, and briefly turn on the RO faucet at the sink to relieve any
system pressure. Then pull the black tube out of the top of the black
membrane housing at the quick connect fitting. (There is only one fitting on
the top of the membrane housing, the bottom has two - one white, one grey). Point the
tube you have just disconnected into a pitcher and turn on the EZ adapter valve. The water
flow from the tube should be fairly strong.
6. If the flow to the membrane housing is strong (#5), then check flow to the reserve tank.
Turn off the water at the EZ adapter and tank, and briefly turn on the RO faucet at the sink
to relieve any system pressure. Disconnect the tube from the reserve tank ball valve. Point
the tube you have just disconnected into a pitcher and turn on the EZ adapter valve. The
water flow from the tube should be a thin, but steady trickle.
7. If the flow to the membrane housing is weak (#5), then check the water flow to the
sediment filter (red label) from the EZ adapter. Turn off the water at the EZ adapter and
tank, and briefly turn on the RO faucet at the sink to relieve any system pressure.
Disconnect the tube from the sediment filter fitting after the EZ adapter. Point the tube you
have just disconnected into a pitcher and turn on the EZ adapter valve. The flow should be
strong. If it is strong repeat this step for the next carbon filter in line. The flow should be
strong.
8. If the flow to the sediment filter is weak (#7), then disconnect the EZ adapter and check
the rubber grommets and o-ring for proper seating and to ensure the flow is unimpeded.
Discoloration of water
The first batch of water produced from your purification