


11
Defrosting
Refrigerator
Frost is automatically removed from the evaporator of the refrigerator com-
partment every time the motor compressor stops, during normal use. The
defrost water drains out through a trough into a special container at the
back of the appliance, located over the motor compressor, where it evapo-
rates.
Freezer
The freezer compartment, however, will become progressively covered with
frost. This should be removed with the special plastic scraper provided,
whenever the thickness of the frost exceeds 4 mm. During this operation it
is not necessary to switch off the power supply or to remove the foodstuffs.
However when the ice becomes very thick on the inner liner, complete
defrosting should be carried out as follows:
1. Remove the frozen food from the freezer, wrap it in several layers of new-
spaper and put it in a very cool place.
2. Switch off the appliance and pull out the plug, or turn the temperature
control knob to “0”.
3. Leave the freezer compartment door open.
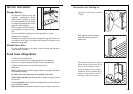
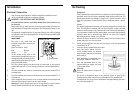
4. Insert the plastic scraper into the
recess provided under the defrost
water channel and place a collecting
basin under it.
5. Once defrosting is completed keep
the scraper handy for future use;
6. Turn the thermostat knob to the
required setting or replace the plug
in the power socket.
Warning!
Never use metal tools to scrape off
the frost
Do not use a mechanical device or any artificial means to speed up the
thawing process other than those recommended by the manufacturer.
A temperature rise of the frozen food packs, during defrosting, may shor-
ten their safe storage life.
18
Installation
Electrical Connection
Any electrical work required to install this appliance should be carried
out by a qualified electrician or competent person.
WARNING – THIS APPLIANCE MUST BE EARTHED
The manufacturer declines any liability should these safety measures not
be observed.
Before switching on, make sure the electricity supply voltage is the same as
that indicated on the appliance rating plate. The rating plate is inside, on the
left.
The appliance is supplied with a 13 amp plug fitted. In the event of having
to change the fuse in the plug supplied, a 13 amp ASTA approved (BS 1362)
fuse must be used.
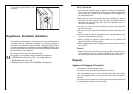
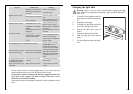
Important!
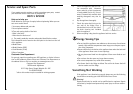
The wires in the mains lead are
coloured in accordance with the fol-
lowing code:
Green and Yellow Earth
Blue Neutral
Brown Live
As the colours of the wires in the
mains lead of this appliance may not
correspond with the coloured mark-
ings identifying the terminals in your
plug, proceed as follows:
1. The wire coloured green and yellow must be connected to the terminal
marked with the letter “E” or by the earth symbol or coloured green and yel-
low.
2. The wire coloured blue must be connected to the terminal marked “N” or
coloured black.
3. The wire coloured brown must be connected to the terminal marked “L” or
coloured red.
4. Upon completion there must be no cut, or stray strands of wire present and
the cord clamp must be secure over the outer sheath.
Warning! A cut-off plug inserted into a 13 amp socket is a serious safety
(shock) hazard. Ensure that the cut-off plug is disposed of safely.
D207
GREEN & YELLOW
13 AMP. FUSE
BROWN
CORD CLAMP
BLUE
13 AMP