INSTALLATION INSTRUCTIONS
CAUTION:
MAKE SURE POWER IS SWITCHED OFF AT
SERVICE PANEL BEFORE STARTING INSTALLATION.
SECTION 1
Preparing for Fan Installation
1. When selecting fan mounting location, the following criteria
should be considered:
a) Mounting to minimize noise generated by fan operation:
Mounting the fan as far as possible from the intake
point will minimize fan operating noise from being
transmitted back through the duct work. If the fan is to
be used as a booster for moving the air between two
rooms, a central point along the duct may be optimal.
Insulated flexible type duct work (recommended for all
bathroom exhaust applications) will result in much
quieter operation. It is recommended that a minimum
8' of insulated flexible ducting be used between any
exhaust grill and fan for low noise level.
b) Service accessibility: Fan location should allow
sufficient access for service.
SECTION 2
Installing the Fan
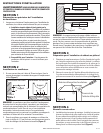
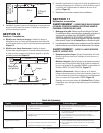
1. Using the 1" wood screws provided, attach the fan mounting
bracket to a support beam at the selected location
(Figure 1).
NOTE: Fan mounting can be at any point along the duct and in
any angle, however, vertical mounting is recommended to reduce
condensation buildup in the fan. If a horizontal installation is
necessary and condensation buildup may pose a problem, wrap
insulation around the fan to minimize buildup.
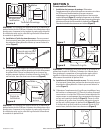
2. Attach fan to the mounting bracket with the three 7/16" sheet
metal screws provided, making sure the wiring box is
positioned for easy access
(Figure 2).
NOTE: Bracket is provided with rubber vibration isolation grommets
to prevent the transmission of sound through the structure. Be
careful not to over tighten. Also, care should be taken not to strip
the plastic housing. Screws are self tapping and do not require
pilot holes. Pilot holes no larger than 1/16" can be used to ease
the installation however.
SECTION 3
Preparing for Ceiling Housing Installation
1. Choose a location for the inlet grill that will not interfere with
a ceiling joist. The grill housing can be mounted directly to the
joist through the keyholes on the side of the housing or between
16" on center joists using the provided mounting rails.
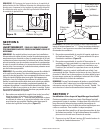
2. Remove the electrical knockout cover or one of the other
electrical knockouts on the grill housing, using a straight-
blade screw driver (Figure 3).
SECTION 4
New Construction
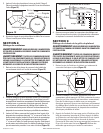
1. Mounting Rail Installation: Install the rails through the grill
housing and position next to the joist. Using the locator tabs
on the housing, line up tabs so that they are flush with the
bottom of the joist. Secure the ends of the rails with the
provided 1" screws to the joists and slide the housing into
the final position (Figure 4).
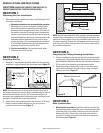
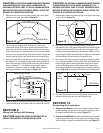
Figure 1
www.airkinglimited.com
5S7635037 New 10-06 2 of 16
or
Vertical Mounting
Bracket
Stud
Bracket
Joist
Horizontal Mounting
Bracket
Stud
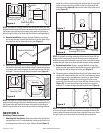
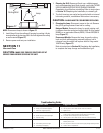
Figure 2
Fan
Screws
Figure 3
Knockout Cover
Optional Knockouts