


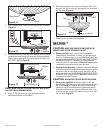

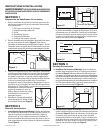


3. Plug cord from lamp holders into the appropriate receptacle
(Figure 12).
4. Line up slots in the grill with lances on inside of housing. Insert
included #8 screws through grill slots and into housing lances.
Tighten both screws until the grill fits snugly to the ceiling. DO
NOT OVER TIGHTEN (Figure 13).
CAUTION: FAILURE TO SECURE THE GRILL MAY RESULT
IN A RATTLING OR HUMMING NOISE.
5. Install 2 - 60 watt maximum, type A19 medium base
incandescent bulbs (not included).
www.airkinglimited.com
210572063 Rev. A 8-05 4 of 12
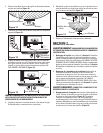
6. Reinstall the glass lens in place by sliding the hole in the
lens onto the rod from the grill and securing in place with
the lens knob (Figure 14).
7. Restore power and test your installation.
SECTION 7
Use and Care
CAUTION: MAKE SURE POWER IS SWITCHED OFF AT
SERVICE PANEL BEFORE SERVICING THE UNIT.
1. Cleaning the Grill: Refer to instructions in Section 6
Completing the Installation
, to remove grill and glass light
lens. Use a mild detergent, such as dishwashing liquid, and
dry with a soft cloth. NEVER USE ANY ABRASIVE PADS OR
SCOURING POWDERS. Completely dry all parts before
reinstalling. Refer to instructions in Section 6
Completing the
Installation
, to reinstall grill and glass light lens.
2. Cleaning the Fan Assembly: Unplug the motor cord and light
cord from receptacles and loosen the venturi screw to remove
the venturi from the unit. Wipe all parts with a dry cloth or
gently vacuum the fan. NEVER IMMERSE ELECTRICAL PARTS
IN WATER. Refer to instructions in Section 6
Completing the
Installation
, to reinstall venturi.
CAUTION: ALLOW BULB TO COOL BEFORE REPLACING.
3. Changing the Light Bulb: Disconnect power to the unit.
Remove glass light lens from grill by unscrewing knob at the
top of lens (Figure 11). Replace light bulb(s) with 60 watt
maximum, type A19 medium base incandescent bulb(s).
Reinstall the glass lens in place by sliding the hole in the
lens onto the rod from the grill and securing in place with
the lens knob (Figure 14).
Figure 11
Knob
Glass Lens
Figure 12
Grill
Lances
#8 Screws
Figure 13
Figure 14
Grill
Glass Lens
Knob
Hole
Rod
Cord
Lamp
Holders