5
Installation
When you unpack your Wine Vault, make sure the unit is in perfect conditon by inspecting the unit from all angles.
If the unit is damaged in any way, contact Amcor within 24 hours of receiving the unit.
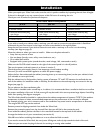
Check your unit to make sure you have all the parts:
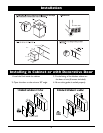
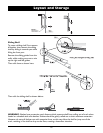
If you wish to install your cabinet under a worktop, you will need to remove the top plate which is fi xed from
underneath by two front screws in the hinges and two screws behind in the angle brackets.
Keep the two front screws if you wish to encase the unit under a worktop so as to fi x it to the existing
worktop (see diagrams page 4).
Move the cabinet to where you want to install it. Make sure the place selected is:
• Away from any source of heat
• Not too damp (laundry room, utility room, bathroom, etc.)
• On a stable level surface
• Equipped with a power point (standard socket, rated voltage, 16A, connected to earth)
Make sure the On/Off switch located on the right of the control panel is in the off position.
Take out the power cord and connect it as shown in section 3.
Check the power point supply (fuses in, fuse amperage, circuit breaker working.
You can if you wish use another appliance to check the power supply.)
Adjust the four feet underneath the cabinet (screwing them up or unscrewing them) so that your cabinet is level
(it is advisable to use a spirit level).
Slide the cabinet into its fi nal position, leaving a space of between .75" and 2.25" between the wall and the rear
wall of the cabinet, for installation under a worktop, fi x the cabinet to the worktop using two screws in the top
hinges (see page 6).
Do not obstruct the front ventilation grille.
If Wine Vault is installed under countertop or in cabinet, it is recommended that a ventilation hole be cut to allow
for proper ventillation of the unit. A fl ush mount grill may be used in this case to prevent large objects from falling
down vent opening. See diagram on page 6.
The Wine Vault should be installed in a place where the ambient temperature is between 72-78°F. If the ambient
temperature is above or below recommended temperatures, the performance of the unit may be affected.
For example, placing your unit in extreme cold or hot conditions may cause interior temperatures to fl uctuate.
The range of 40-65°F may not be reached.
Remove protective shipping materials from inside the Wine Vault.
Remove the protective paper from the charcoal fi lter that you will fi nd in the accessories pack.
From inside the cabinet, position the fi lter in the round box located in the top back of the cabinet.
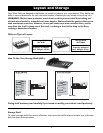
Arrange the shelves to suit your convenience (see section 6.)
Wait 48 hours before switching the cabinet on so as to allow the fl uids to settle.
If you need to move the Wine Vault, do not tip over 45 degrees, and only tip towards the back of the unit.
Make sure you can access the plug of the unit for servicing or moving when needed.
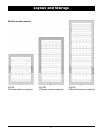
Wine Vault Parts List By Model
WV-50 WV-100 WV-150
1- Wine Vault Cabinet 1- Wine Vault Cabinet 1- Wine Vault Cabinet
3- Wooden Shelves 5- Wooden Shelves 8- Wooden Shelves
1- Metal Handle Assembly Bag
with 2 Keys
1- Metal Handle Assembly Bag
with 2 Keys
1- Metal Handle Assembly Bag
with 2 Keys
1- Carbon Filter Assembly Bag 1- Carbon Filter Assembly Bag 1- Carbon Filter Assembly Bag
1- Owners Manual 1- Owners Manual 1- Owners Manual


