


5
dampening ability of the silicone grommets. Note: Always mount the HDD
with the thicker side of the silicone grommets facing up.
5. Slide and lock the tray back into the cage.
6. Slide the cage back to the case and fasten the thumbscrew.
7. Find the right Molex or SATA connector on the power supply and connect it
to the hard drive.
8. Repeat the same procedure for the other drives.
The Lower HDD Installation
1. Remove the thumbscrew holding the lower HDD cage.
2. Pull the HDD cage from its position by pulling the ring towards you.
3. You can mount four hard drives inside the cage. They are mounted vertically
with the silicone grommets sitting at both sides.
4. Mount your hard drive into the drive cage with the special screws provided.
Don’t over-tighten the screws as this will reduce the vibration and noise
dampening ability of the silicone grommets. Note: Always mount the HDD
with the thicker side of the silicone grommets facing up.
5. Slide the cage back into the case and fasten the thumbscrew.
6. Find a Molex or SATA connector on the power supply and connect it to the
hard drive.
7. Repeat the same procedure for the other drives.
External 3.5” Drive Installation
There is one external 3.5” drive bay.
1. Carefully remove the plastic drive bay cover and metal plate covering the
drive bay.
2. Find a pair of 3.5”drive rails in the box containing the top fan spoiler.
3. Mount the drive rails onto the sides of the 3.5” device. Make sure the metal
portion is angled on the outside and facing forward.
4. Slide the device into the drive bay until it clicks into place.
5. Connect a small 4-pin connector from the power supply to the 4-pin
connector on the floppy drive.
5.25” Device Installation
There are four 5.25” drive bays that need a total of 8 drive rails.
1. Carefully remove the plastic drive bay cover and the metal plate covering the
drive bay.
2. Mount the drive rails onto the sides of the 5.25” device. Make sure the metal
portion is angled on the outside towards the outside of the case.
3. Slide the device into the drive bay until it clicks into place.
4. Mount the other devices accordingly.
5. Connect a 4-pin Molex connector from the power supply to the 4-pin
connector on each of the devices.
Cooling System
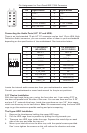
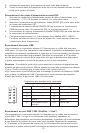
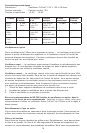
The TriCool™ fan:
The case includes three installed 120mm TriCool™ fans. The three-speed fans let
you choose between quiet performance or maximum cooling (see specifications
below). Note: The minimum voltage to start the fan is 5V. We recommend our
users to set the fan speed to High if you choose to connect the fan to a fan
control device or to the Fan-Only connector found on some Antec power supplies.