Antes de usar por primera vez:
1. Lea todas las instrucciones y precauciones importantes.
2. Retire todos los materiales de embalaje; asegúrese de que todos los artículos
recibidos estén en buenas condiciones.
3. Lave el jarro de la cafetera y todos los accesorios con agua jabonosa y una
esponja o trapo.
4. Enjuague a fondo para eliminar todo resto de jabón.
5. Limpie el cuerpo con un paño húmedo.
No use limpiadores abrasivos ni estropajos.
No sumerja la cafetera, el cable ni el enchufe en agua.
Para preparar el café:
1. Coloque la cafetera en una superficie plana, seca y firme.
2. Tenga a mano café molido grueso.
3. Retire todas las piezas internas, luego llene el jarro con agua FRÍA según la
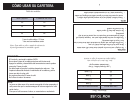
cantidad de café a preparar. Vea la tabla para medir el café en la página 5.
4. Apoye el vástago dentro del calentador en el fondo del jarro y luego coloque la
canasta de filtrado sobre el vástago (verifique que el resorte esté sobre el
vástago). Esparza la cantidad de café recomendada en la canasta (consulte la
tabla de referencia en la página 5 para ver las medidas aproximadas). No use
café para cafeteras por goteo o muy fino ya que se puede inundar la canasta.
5. Moje la canasta para evitar que las partículas pequeñas de café pasen a través.
Use una taza medidora común (de 250 ml) para medir el café. Ajuste la cantidad
de café al gusto individual. Para preparar té, siga las mismas instrucciones y use
té al granel o en saquitos en vez de café y agregue agua hasta el nivel deseado.
Coloque la tapa a la canasta de filtrado.
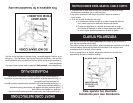
6. Vuelva a colocar la tapa de acero inoxidable y ajústela girándola hacia la
derecha hasta que las aletas se traben en las ranuras de las manijas.
7. Enchufe la cafetera. Se encenderá la luz indicadora de "Encendido" ("On") y el
café se empezará a colar.
8. Cuando el café esté listo para servir, se encenderá la luz indicadora de "Listo"
("Ready") y el café se mantendrá caliente. Antes de servir, use una agarradera
o guantes de cocina para destrabar la tapa y retire con sumo cuidado la canasta
de filtro y el vástago del receptáculo.
9. Para preparar más café, enjuague el receptáculo y las piezas con agua fría y
repita los pasos anteriores.
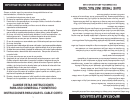
PRECAUCIÓN:
• Tenga sumo cuidado: la canasta, el vástago y la borra pueden estar muy calientes.
• Nunca abra la tapa mientras el café esté en el proceso de hervir en el jarro.
• No toque el exterior de la cafetera mientras esté en uso.
CÓMO USARLA
4
HOW TO USE
Before First Use:
1. Read the instructions and important safeguards.
2. Remove all packaging materials; make sure all your items are received in good condition.
3. Wash the inside of the coffee urn and all the accessories with warm soapy water using a
sponge or dishcloth.
4. Rinse thoroughly to remove soapy residue.
5. Wipe body clean with a damp cloth.
Do not use abrasive cleaners or scouring pads.
Do not immerse the appliance, cord or plug in water at any time.
To Make Coffee:
1. Place the appliance upright on a dry, sturdy and flat surface.
2. Set coarsely ground coffee aside. Do not use drip or finely ground coffee as flooding of
the basket may occur.
3. Remove all inside parts, then fill the urn with the appropriate amount of COLD water
depending on the amount of coffee desired. See coffee measuring chart on page 5.
4. Place stem into heating unit at the bottom of the coffee urn. Then put brew basket on stem,
making sure that the spring is on the stem. Spread the recommended amount of ground
coffee evenly into the basket. See coffee measuring chart on page 5 for approximate
measurements.
5. Wet brew basket to prevent small particles of coffee from sifting through. Use
standard measuring cup (250ml) to measure coffee. Adjust the amount of coffee
depending on individual preference. To make tea, follow the same instructions and
substitute tea or tea bags instead of coffee in basket and add water to desired level.
Replace brew basket lid.
6. Replace stainless steel lid and secure in position by turning cover clockwise until lid
locking tabs fit into the handle slots.
7. Plug in the coffee urn. The "Power" indicator light will be illuminated and the coffee
urn will start brewing coffee.
8. When coffee is ready to serve, the "Ready" indicator light will illuminate and keep
coffee warm. Before serving, use a protective hot pad or wear mitts to unlock lid and
carefully remove brew basket and stem from coffee urn.
9. To make additional coffee, rinse the coffee urn and parts with cold water and repeat steps.
CAUTION:
• Use extreme caution: the basket, stem andground coffee are very hot.
• Never open the lid while the coffee urn is in brewing process.
• Do not touch the coffee urn exterior while in use.
4


