6
? Press the hot water faucet button until water comes out, then release it.
? Plug the dispenser into the electrical outlet. Both heating and cooling indicator lights on front will
light up at first. We are ready to complete the first cycle. In order to do that, wait for the hot water
indicator light to go off first (approximately 10 minutes), then wait for the cold water indicator light
to go off (another 40 minutes, approximately).
? Unplug the dispenser from the electrical outlet. Proceed to drain the water from the faucets one at
a time until no more water remains. (Note: To facilitate this operation, use a large container).
? Then, drain any water left in the tanks by opening the drain plug located on the back, until it
drains completely.
? Proceed to close the drain cap. Also make sure both faucet buttons are released.
? Place the 5-gallon bottle of water on the water intake, allow water to stand for approximately one
minute.
? Press the water faucet buttons to insure water flows from both faucets.
? Plug dispenser into the electrical outlet.
? Now you are ready to use your water dispenser.
NOTE: Your water dispenser has been cleaned and sanitized before leaving the
factory, but in case a taste problem develops, place two tablespoons of
baking soda and add tap water. Fill water tank again and repeat basic
operations previously outlined, except turn the switch market hot “OFF” to
avoid leaving residues in hot water tank.
ATTENTION:
If you do not plan to use the water heating function for more than three days, we
recommend that you turn the hot switch to the “OFF” position.
OPERATING YOUR WATER DISPENSER
Steps To Replace Water Bottles
? Use a clean cloth to wipe off neck of bottle.
? Remove cap.
? Carefully lift bottle (approx. 40 lbs.) using your legs and not your back. Do not place hands on
opening of bottle while placing in reservoir.
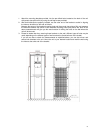
? Insert the water bottle on the water intake over reservoir opening so it settles properly on it.
? Wipe off any water which may have splashed on dispenser top.
? Cold Water Control
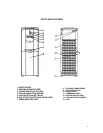
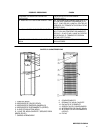
Turn the cooling switch (13) on. The green indicator (4) will be lit and the process begins. When the
water reaches the right temperature the green light goes off automatically.
? Hot Water Control
Turn heating switch (12) on, the red indicator (2) will be lit and the unit will begin to heat the water. When
?WARNING?
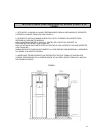
IMPROPER USE OF THE GROUNDED PLUG CAN RESULT IN THE RISK OF ELECTRICAL SHOCK. IF
THE POWER CORD IS DAMAGED, HAVE IT REPLACED BY AN AUTHORIZED AVANTI PRODUCTS
SERVICE CENTER.
When a new bottle is installed you must open the hot water faucet and remove no less than 4 full
cups of water to insure the water flows properly and the water reservoir is at the proper level.


