


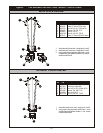

(5) Turn Gas Cock Dial to “ON” position (only for USA and Canada).
(6) Turn the thermostat knob. The indicator light near the thermostat will illuminate and the burners
will come on.
(7) Turn the Timer Knob and set a time of 2 minutes. At the end of 2 minutes, you should
hear the
buzzer. Turn the timer knob to “0”, to stop the buzzer.
(8) Open the oven doors. Oven lights will go on and burners and fan will go off.
(9) Turn Selector Switch to “Cool Down” position. The fan will run to cool down the oven.
(10) Turn Selector Switch to
“0” position.
(11) Close the oven doors.
NOTE: OVEN STARTS HEATING AS SOON AS THE SET TEMPERATURE IS HIGHER THAN THE
OVEN TEMPERATURE WITH THE OVEN DOORS CLOSED AND THE SELECTOR SWITCH NOT IN “0”
POSITION.
THERMOSTAT INDICATOR LIGHT GOES OUT WHEN OVEN REACHES SET TEMPERATURE AND
COMES ON WHEN OVEN
IS HEATING UP.
IN THE EVENT OF POWER FAILURE, THE OVEN WILL NOT OPERATE. RESTORATION OF POWER
AFTER ANY DURATION, WILL RETURN UNIT TO NORMAL OPERATION.
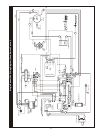
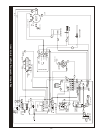
J. PROGRAMMING MENUS (for units with digital controls):
Refer to C&H - 3 Plus Controller Operating/Programming Instructions Manual.
II. OPERATING INSTRUCTIONS
A. GENERAL INSTRUCTIONS:
(1) This equipment has an Electronic Temperature Control and Electronic Hot Surface Direct
Ignition System.
(2) Due to increased efficiency of this oven, the temperature of standard recipes may be reduced
50°F (30°C).
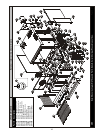
(3) Always load each shelf evenly. Space pans away from each other and from sides and back
of
oven to allow maximum air flow between them.
(4) Large tempered glass windows and interior lights allow a close check on the product, making it
unnecessary to frequently open the doors. Products cook faster in a convection oven as
compared to a conventional oven. Depending on the product and the
type of pans used, time
saving may run from 20 percent to as high as 50 percent.
B. OPERATION SEQUENCE ROTARY CONTROL:
Cook only rotary control:
(1) Close the oven doors.
(2) Turn Selector Switch to “HI” or “LO” position. The indicator light near the Selector Switch will be
illuminated.
(3) Turn
the thermostat knob to the desired cooking temperature.
(4) Upon reaching the set temperature, the indicator light near the thermostat will go out.
(5) Load the oven with product to be cooked.
(6) Remove the product from the oven when done.
Timed cooking rotary control:
(1) Close the oven doors.
(2) Turn Selector
Switch to “HI” or “LO” position. The indicator light near the Selector Switch will be
illuminated.
(3) Turn the thermostat knob to the desired cooking temperature.
(4) Upon reaching the set temperature, the indicator light near the thermostat will go out.
(5) Load the oven with product to be cooked.
(6) Turn
the timer knob to the desired bake time and timer will start counting down.
6