


3. INSTALLATION
Place the conveyor oven and parts as close to the area of final installation before uncrating. Your conveyor
oven is packed sitting on its bottom. Leave it this way until unpacked. The pallet may be left under the
conveyor oven for convenience in further handling. Unpack carefully to avoid damage to the unit. If
concealed damage is discovered, follow the instructions detailed in Section 1 above.
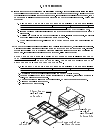
A. Legs are shipped unattached. Make sure each leg is attached and tightened before placing the
conveyor oven in place. Each leg is adjustable to accommodate variations in the mounting surface.
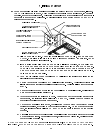
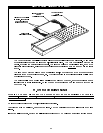
B. Using sufficient help (2 or more people), lift the conveyor oven upward and place on the countertop
surface. Lift the conveyor oven by gripping the bottom of the unit. THE FOLLOWING ITEMS ARE
NOT TO BE USED AS LIFTING "HANDLES": Side-mounted control boxes (2), removable front door
(with handles), the conveyor belt assembly, the rear fan housing assembly.
C.
See Section 6a, b for further instructions.
D. Position the conveyor oven in its final location, maintaining the minimum clearances specified in
Section 2 above.
DO NOT LIFT EXCESSIVE WEIGHT
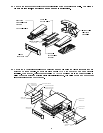
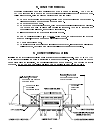
THE CONVEYOR BELT ASSEMBLY IS MOUNTED BACKWARDS FOR SHIPPING. THE
CONVEYOR BELT ASSEMBLY MUST BE REMOVED AND REVERSED PRIOR TO OPERATION.
I. INSTALLATION INSTRUCTIONS
1. RECEIVING
2. LOCATION AND MINIMUM CLEARANCES
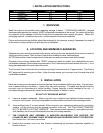
VH1620E 6.4 1 or 3
VHVA1620E 6.4 1 or 3
VH1828E 12.4 1 or 3
VHVA1828E 12.4 1 or 3
Read the notice on the outside carton regarding damage in transit. "CONCEALED DAMAGE", damage
discovered after opening the crate(s), MUST be reported immediately to the carrier. The carrier will perform
an inspection of the damage and furnish forms for the consignee's claim against the carrier. Retain ALL
packaging material - including outer carton, until the inspection has been completed.
Proper and secure storage facilities should be arranged for the conveyor oven(s) if necessary to protect it
from outdoor or damp conditions at all times prior to installation.
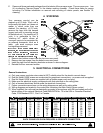
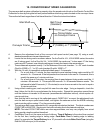
Adequate air space must be provided for the proper venting of the rear exhaust air and provision made for
venting of cooking vapors. The Conveyor Oven must be installed in a well-ventilated area.
Attached rear rubber bumpers must not be removed and can contact a rear wall if present.
Conveyor Ovens can be installed with "ZERO" clearances (back and sides) from combustible and non-
combustible materials. (Rear rubber bumpers are the “Zero” clearance points on the back of the unit.) S e e
rating plate attached to the control box door panel.
The Conveyor Oven is intended for countertop mounting if mounted on the 4" legs provided. The Oven is
NOT approved for mounting on any floor. Keep the area around your conveyor oven free and clear of all
combustible materials.
NOTE:
MODELS COVERED TOTAL KW PHASE