


! !
IMPORTANT SAFETY INFORMATION: AT THE END OF THE MEAL SERVICE, IF
THERE IS UNSPENT WOOD REMAINING IN THE LOG HOLDERS, BE SURE TO
EMPTY IT INTO A SEALABLE METAL CONTAINER, DOUSE WITH WATER, STIR
EMBERS, DOUSE AGAIN, THEN COVER WITH AN AIRTIGHT LID!!!
7
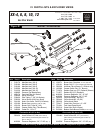
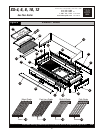
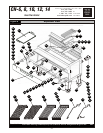
(e) COOKING TOOLS:
Bakers Pride has designed a number of tools to help you operate more efficiently including a special
spatula that is very effective for fish and hamburgers. Other tools are available. Contact the factory
for full details
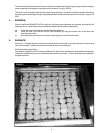
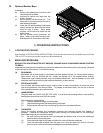
(f) OPERATIONAL GUIDELINES FOR CHAR BROILER NATURAL WOOD SMOKE ESSENCE
Wood Smoke assist char broiling is more of an art than a science due to the many variables that affect
wood ignition, rate of combustion, as well as personal preference.
In order to obtain the optimal results and flavor transfer the wood should smolder, not flame. Place
wood in the log holders and follow the procedures recommended below and then adjust as required:
1) Preheat char broiler on maximum heat for ½ hour before adjusting for your various
temperature zones.
2) Fill log holders to approximately ¾ of capacity using dry or presoaked wood.
a) When the char broiler's burners are set to maximum flame, the wood will begin
smoking. While several factors will affect the rate of combustion of the wood, such
as moisture content of the wood, size of the wood, type of wood, elevation above sea
level, you can generally expect smoldering to begin in approximately 35-50 minutes.
However, the flavor transfer or ability to impart a smoky flavor into your food product
will occur sooner, approximately 15 minutes, or as soon as the aroma of burning
wood is evident.
3) As the wood incinerates and begins to turn to ash, it will lose its ability to impart a smoke
flavor. Periodically check the condition of the wood and replenish before it is completely
burned. This will ensure uninterrupted smoking capabilities throughout your service period.
4) If the wood flares up because of the dripping grease or oil, spray water generously, directly on
the burning wood.
5) If the wood tends to over flare, either pre-soak wood in water, or use a combination of dry and
pre-soaked wood as required to balance ignition and flare.
6) The amount of wood needed to complete the meal service will vary greatly depending on the
size of the wood pieces and the moisture content.
3. HELPFUL HINTS:
(a) Do not press the juice out of the meat because that will cause a dry product.
(b) Allow the meat to sit covered on a heated platter for 2 to 5 minutes after broiling before
cutting. This will allow the juices to “settle” and the product will be more moist.
(c) Do not use forks or other sharp objects which poke holes in the meat. Do not cut the meat as it cooks
(d) Thick pieces of meat require a longer broiling time with less flare-up. Reduce flare-up trimming
excess fat for a longer broil time without burning.
(e) Keep the unit clean. Food caught between the grates will not allow hot air to rise around the product.
This will result in uneven heating and increase cook time.
4. MAINTENANCE:
(a) SERVICE:
Shut off the main gas supply before attempting any maintenance on the unit. If required, contact
your Dealer, the Factory, or a local Service Company to obtain qualified maintenance and repairs.
(b) CARE AND CLEANING OF TOP GRATES:
The top grates should be cleaned using a stiff wire brush. If this is done daily, the accumulation of