


Manual 2100-319F
Page 10 of 10
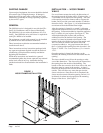
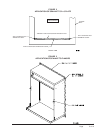
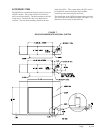
ATTATCH BASE
ASSEMBLY TO SLEEVE
MIS-1848
SEAL BETWEEN SLEEVE &
BRACKET WITH SEALANT
AS SHOWN
SEAL CORNER OF
BRACKET WITH SEALANT
AS SHOWN
FIGURE 8
ATTACHING BASE ASSEMBLY TO SLEEVE
SHOWING CAULKING
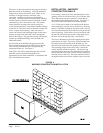
ATTACHMENT OF WALL SLEEVE TO
QT
EC
UNIT
All Wall Sleeve Models covered in this manual are
equipped with two different methods to attach the QT
EC
Model being applied.
The first method is with brackets supplied with the QT
EC
unit. These brackets are screwed to the sleeve side with
six screws per side. This method can be used if adequate
clearance is available on each side of the unit to drive
the screws. If this method is used, the studs attached to
the wall sleeve must me removed and discarded.
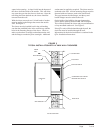
The second method is for installation where there is not
adequate clearance to drive the screws into the cabinet
sides. The attachment can be made from inside the unit.
There are two threaded studs extending from the room
side of the sleeve to matching holes in the unit rear
panel, and are secured with a 5/16" nut on each side.
See Figure 3.
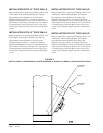
To use this method, discard the two side mounting
brackets. Remove the nuts and washers from the
threaded studs and retain for use later. Remove the
lower cabinet door and locate the mating holes in the
rear of the cabinet. It may be necessary to clear the
holes of gasket material.
Roll unit into place making sure the unit is aligned from
side to side and that studs have entered the holes in the
cabinet back. Push unit back until the rubber seal on the
rear of the cabinet touches the flange on the wall sleeve.
Replace the washers and nuts previously removed from
the studs. Tighten nuts until there is some compression
of the gasket. Replace the lower cabinet panel.