


6
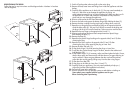
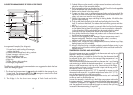
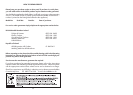
REPOSITIONING THE DOOR
Follow the step by step instructions and the diagram below. Numbers in brackets
refer to diagrams.
7
1. Switch off at the socket outlet and pull out the mains plug.
2. Remove all food, loose items and fittings from inside the appliance and door
shelves.
3. Carefully tilt the appliance on its back side. (1) (You may need somebody to
help you.) Take care not to damage the appliance by laying on
some protective material (e.g. its original packaging). Make sure that you tilt
the appliance on its back side, otherwise compressor oil may block the
pipes and you may damage the appliance.
4. Unscrew and remove the LHS front feet and bolt (2).
5. Unscrew the bolts and remove the bottom hinge while holding the door (3).
6. Remove the door carefully from the top hinge by sliding down wards (4).
7. Reposition top hinge bushing and blanking plug on the opposite side and
stand the door safely (5). You may find it easier to remove the bushing and
the plug with the tip of a small screwdriver. Take care not to mark the door.
8. Reposition the top hinge on the opposite side (6 and 11).
9. Unscrew and remove the frozen food compartment door plastic hinge
while holding the door (7).
10. Remove the door (8).
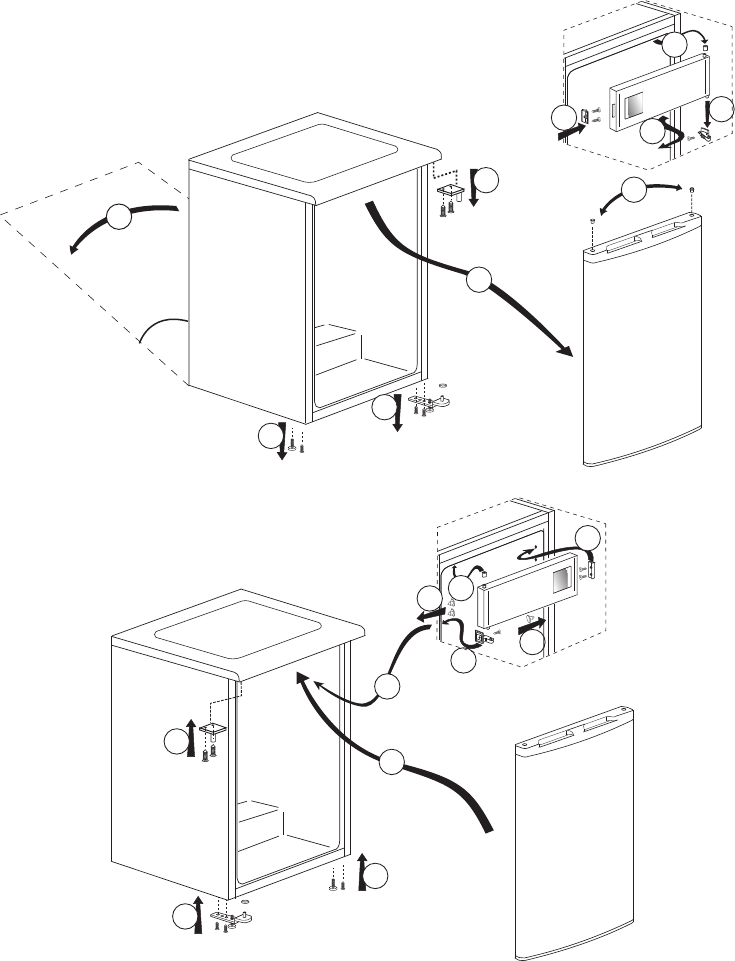
11. Reposition the plastic hinge bushing on the opposite side (9 and 12) after
removing the plug.
12. Reposition the door catch on the opposite side (10 and 15) after
removing the plug, while removing the plug on inner liner.
13. Reverse the door and refit (13).
14. Fit the plastic hinge (14) while removing the plugs on inner liner.
15. To refit the door, locate the top hinge in the door, attach to the cabinet and
hold the door (18).
16. Fit the bottom hinge (19). If necessary adjust and then tighten the bolts. Ensure,
that the door opens and closes easily and that there are no gaps allowing air
into the cabinet. If there are gaps between the door seal and the cabinet,
adjust the door seal by gently pulling away from the door using fingers.
17. Fit the other front feet (20).
18. Fit the plugs on the holes on inner liner (16 and 17).
19. Carefully stand your appliance. (You may need somebody to help you.)
Adjust the front feet (See Installation Instructions)
20. Put back all, loose items and fittings.
21. Wait for at least 4 hours to allow the system to settle before switching on.
Spare plastic parts supplied with the appliance are for your
future use during door repositioning.
1
60°
17
14
7
20
16
15
8
6
2
3
4
5
12
13
18
11
19
9
10