Belshaw Bros., Inc. • 1750 22
nd
Ave. S. • Seattle, WA 98144 • Phone 206-322-5474 • Fax 206-322-5425
A-4 MN-1141EN 718LCG, 724CG, and 734CG Gas Fryers
Step 5: Check Normal
Operation
1. Set the fryer’s thermostat above
200°F/93°C.
2. Watch to see whether the pilot lights
smoothly when the gas reaches the pilot
burner.
3. Watch to see whether the main burner lights
smoothly without flashback.
4. Watch to see whether the main burner
operates smoothly without floating, lifting,
flame rollout, or heat buildup.
5. If the gas line has been disturbed, perform a
gas leak test, as follows:
a. Paint the gas control gasket edges and all
pipe connections downstream of the gas
control, including pilot tubing
connections, with a rich solution of soap
and water. Bubbles in the solution
indicate gas leaks.
b. If there are leaks, tighten the joints or
screws, or replace the component.
c. Test again for leaks.
d. Repeat this procedure until no leaks
exist.
6. Set the thermostat below 200°F/93°C.
Watch to see whether the main burner flame
and the pilot flame go out.
Troubleshooting—General
The following service procedures are provided as
a general guide. For electrical troubleshooting
refer to the diagrams included with this manual,
or to the wiring schematic on the inside of the
fryer door. Keep the following things in mind:
• On lockout and retry models, meter
readings between gas control and
ignition module must be taken within the
trial for ignition period. Once the
ignition module shuts off, lockout
models must be reset by setting the
thermostat below 200°F/93°C for at least
one minute before continuing. On retry
models, wait for retry or reset at the
thermostat.
• If any component does not function
properly, make sure it is correctly
installed and wired before replacing it.
• The ignition module cannot be repaired.
If it malfunctions, it must be replaced.
• Only trained, experienced service
technicians should service intermittent
pilot systems.
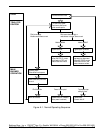
As the first step in troubleshooting, perform the
checkout procedure. Then check the block
diagram. If you think there is an ignition
problem, see “Troubleshooting the Ignition
System” below to isolate and correct the
problem.
Following troubleshooting, perform the checkout
procedure again to be sure system is operating
normally.
Troubleshooting the
Ignition System
Step 1: Check Ignition Cable
1. Make sure the ignition cable does not run in
contact with any metal surfaces.
2. Make sure the ignition cable is no more than
36”/0.9 m long.
3. Make sure the connections to the ignition
module and to the igniter-sensor are clean
and tight.
4. Make sure the ignition cable provides good
electrical continuity.
Step 2: Check Ignition System
Grounding
Nuisance shutdowns are often caused by a poor
or erratic ground.


