8 • X13 & X13A OWNER/OPERATOR MANUAL
Loading product
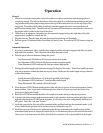
1. Make sure the index knob is fully closed. Pull the pusher to the top and let it
drop behind the table. Set the product onto the table with the side of the
product securely against the front edge of the product table and place the
pusher behind the product. Turn the slicer on and rotate the thickness control
knob to set the proper thickness. When pushing the product table, always
use the product table handle.
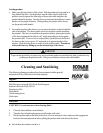
2. For smaller products like salami, you can rotate the pusher so that it holds the
side of the product. The fence can be used for even more control in holding
the product. The fence is attached to the product table by placing the bottom
of the fence underneath the table at a 45° angle and pushing it down against
the product table. To move it next to the product, push down on the back of
the fence so that it rises up to a 45° angle and set it against the edge of the
product. Push the fence down to secure it to the product table. You can not
release the fence by lifting up on the bottom edge of the fence.
WARNING
To prevent the possibility of serious cuts, never push the product toward the knife with your hands or by
pushing on the pusher handle. Only put your hands on the product table handle.
Cleaning and Sanitizing
The following cleaning procedures have been prepared with the grateful
cooperation of Kay Chemical, an Ecolab company.
Supplies:
Dish Detergent such as KAY® Pot & Pan Detergent
Sanitizer such as KAYQUAT® II
Nonabrasive Pad
Nylon Brush
Cut-Resistant gloves
Cloth wipes
Procedure:
CAUTION: Use extreme care when cleaning blade.
1. Close the slicer thickness control knob.
2. Turn the slicer off and unplug power cord from the wall outlet.
3. Pull the product table to the front of the slicer. If it is an automatic slicer, make sure the engagement
knob is in the manual position before pulling the product table to the front of the slicer.


