


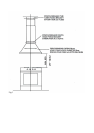

Electrlc connectlon
Attention:The appliance is provided with a supply cord and plug, the appliances must be positioned so that the plug is
accessible.
Attention: ifthere are three wires in the electrical supply cable they must be connected as follows:
Green/yellow = ground -White = neutral -Black = line
Important: the hood manufacturerwill not be responsible forany damage or loss caused by failure to observe
these instructions. Important: a damaged power supply cord must be replaced by the service.
Operating instructions
The cooker hood should be switched on either before or at the same as cooking or frying commences. The grease and
carbon filters are more effective if the fan is not switched off immediately after cooking or frying is completed, but only
after a period of some 20-30 minutes. Before using the cooker hood please ensure that all plastic films like on metal
grease filter an stainless steel ducting are removed.
User instructions
Working instruction of the cooker hood
User Instructions
The cooker hood is equipped
of the following functions:
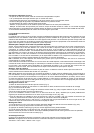
the symbol
shows the ignition key for the oven light (ON / OFF)
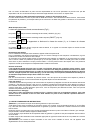
the symbol
shows the key switch ON/OFF of the motor aspirant
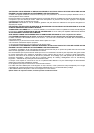
the symbols
shows the keys of the speeds of the motor. They increase and they decrease the
speed of the motor (there are 4 levels of possible speeds)
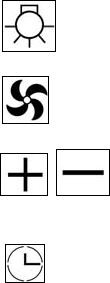
the symbols
shows the key timer: the timer will run if the timer is pushed and will switch off the cooker
hood after 15 minutes.
Lamp Replacement
When the tubolar neon lamps need to be replaced this must only be done by a competent electrician because especiale
tool is required. To changes low energy neon lamps and incandescent bulbs please work from outside of the hood
means to pull off the lamp diffuser. If it has a halogen lamp look out not to touch it with your hands when you replace it.
Use a dry and not greasy protection (for example a cloth) in order to avoid a direct contact with skin which could make
the lamp break. Never use lamps with a wattage higher than the one shown on the label inside the hood.
Safety rules
Do not do any flambe cooking underneath the hood. When frying, never leave the pan alone because the cooking oil
could flare up. Clean all the surfaces frequently to avoid danger of fire. This can be done with a cloth or/and with a brush
drenched with denatured alcohol or with any other similar substances, except for the button area (pict. 3) and lamp
diffuser. It is also important to remove and clean or substitute frequently the filter installed in the hood. This appliance is
not intended for use by small children or infirm persons without supervision. Young children should be supervised to
ensure that they do not play with the appliance.
Maintenance
NOTE: Prior to any maintenance, switch off and disconnect from electrical supply.
1) Under normal cooking conditions the grease filter should be cleaned every 10-15 days in hot water, to which a suitable
detergent has been added. For reasons of efficiency and safety regular cleaning is advised. The grease filter may be
subject to a small amount of shrinkage initially.
2) The outer casing of the Cooker Hood should be cleaned with a damp cloth.
3) Once a year, (more frequently with heavy usage), cali a serviceman to clean the fan and air ducts to prevent build-up
of flammable fat deposits.
Grease fllter
This absorbs vapor-suspended grease particles and protects the kitchen and furniyure from greasy residues. The filter
should be washed every 10 to 15 days (in normaI operating conditions). Dip the filter into a de-greaser solution or put it
in the dish washer.
Make sure not to damage the filter, which is made of several layers ofthin alloy, by hitting or crushing it. The aluminium
filter will may change colour, that will have no influence of the efficiency of the filter, may it will improve it.
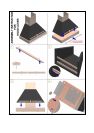
Replacing or cleaning the filters
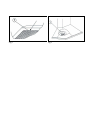
To remove the aluminuim grease filter (pict.1). grab the opening tongue at the filter, pull it in your direction and move the
filter downwards. To reinstall it operate reversed.
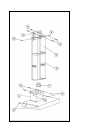
Frame replacement or cleaning (only for cooker hoods with frame)
It is sufficient to remove the 2 screws located in the inner of the hood (pict. 4). Draw the two frame corners with equal