Size: 19.685" x 17.5"
Este producto puede variar ligeramente del que aparece ilustrado.
Cómo usar
Su juego de batidora Black & Decker
®
está diseñado para licuar, mezclar, batir y picar
ingredientes para comidas y bebidas. Este producto está destinado para uso doméstico en
interiores únicamente.
Antes de usar su batidora de inmersión:
Retire todo el embalaje del juego de batidora. Limpie el electrodoméstico con un paño seco
antes de usarlo.
Asegúrese de que el electrodoméstico esté apagado antes de conectarlo o desconectarlo de
la fuente de energía.
Asegúrese de que la clasificación eléctrica de la placa base corresponda con el voltaje de la
corriente de su casa.
Cómo usar los accesorios
• Use el accesorio de licuado para licuar líquidos o hacer puré de elementos sólidos.
• Use el accesorio de batido para mezclar y batir líquidos y mezclas.
• Use el tazón del picador para picar verduras, nueces, frutas secas, etc.
Cómo colocar y quitar un accesorio
• Para instalar un accesorio, colóquelo en el electrodoméstico.
• Presione el accesorio hasta que tranque en su sitio.
• Para retirar el accesorio, mantenga apretado el botón de liberación y quítelo del
electrodoméstico.
Cómo armar el picador
• Sosteniendo el vástago central de plástico de la cuchilla para picar con cuidado, coloque
la cuchilla sobre el vástago central del tazón. Gire la cuchilla levemente para que calce
adecuadamente en el vástago.
• Coloque los ingredientes en el tazón, sin superar la marca de llenado máximo (“Max”)
del tazón del picador.
• Coloque la tapa en el tazón.
• Asegure la tapa girándola hacia la derecha.
• Coloque el artefacto en la tapa del picador.
• Empuje el artefacto hasta que tranque en su sitio.
• Para retirar el accesorio, mantenga apretado el botón de liberación y quite el artefacto
del ensamble del picador.
• Para retirar la tapa del tazón, gire la tapa hacia la izquierda y quítela.
Para licuar:
• Coloque los ingredientes en la jarra medidora o en un recipiente adecuado.
• Con un movimiento hacia arriba y hacia abajo, presione las cuchillas contra los
ingredientes hasta lograr la consistencia deseada.
• Cuando licue ingredientes líquidos use movimientos cortos para evitar derrames.
• Mantener sumergida la cuchilla ayudará a evitar derrames.
• Debe tener mucho cuidado al licuar ingredientes calientes.
• No use la espiga de plástico de la licuadora para ingredientes extremadamente calientes,
ya que esto deformará la espiga.
Para batir:
• Coloque los ingredientes en la jarra medidora o en un recipiente adecuado.
• Bata los ingredientes hasta lograr los resultados deseados.
• Mantener sumergido el batidor ayudará a evitar derrames.
• Debe tener mucho cuidado al batir ingredientes calientes.
Para picar:
• Coloque los ingredientes en el tazón para picar, hasta el nivel máximo de llenado.
• Arme el tazón y colóquelo en el electrodoméstico.
• Pique los ingredientes hasta lograr la consistencia correcta.
• No use el picador por más de un minuto continuamente. Mantenga un intervalo de
alrededor de cinco minutos entre un ciclo y otro.
Consulte la siguiente tabla para procesar estos alimentos de forma adecuada.
How to Use
Your Black & Decker
®
blender set has been designed for blending, whisking, beating,
whipping and chopping food and beverage ingredients. This product is intended for indoor
household use only.
Before using your blender:
Remove all the packaging from the set. Wipe the appliance with a dry cloth before using.
Make sure that the appliance is switched off before connecting to or disconnecting from
the power supply.
Ensure that the voltage rating on the baseplate corresponds to the mains voltage at your
home.
How to use attachments
• Use the blending attachment for blending liquids or mashing solids.
• Use the whisking attachment for mixing, beating, whipping and creaming liquids and
mixtures.
• Use the chopper bowl for chopping vegetables, nuts, dried fruits etc.
Fitting and removing an attachment
• To fit an attachment, place it onto the appliance.
• Press the attachment until it locks in place.
• To remove the attachment, keep the release button pressed and take it off the
appliance.
How to assemble the chopper bowl
• Holding the central plastic shaft of chopper blade carefully place the blade over the
central shaft in the bowl. Rotate the blade slightly for a proper fit on the shaft.
• Put the ingredients into the bowl, not exceeding the "Max" mark on the chopper bowl.
• Place the lid onto the bowl.
• Fix the lid by turning it clockwise.
• Place the appliance onto the chopper lid.
• Push the appliance until it locks in place.
• To remove the attachment, keep the release button pressed and take the appliance off
the chopper assembly.
• To remove the lid from the bowl, turn the lid counterclockwise and take it off.
Blending
• Place the ingredients into the measuring jug or a suitable container.
• Using the stabbing motion, push the blades into the ingredients until the desired
consistency is reached.
• When blending liquids or fluid ingredients, use short pulses to prevent spillage.
• Keeping the blade submerged will help to prevent spillage.
• Extra care should be taken while blending hot ingredients.
• Do not use your plastic stem blender for extremely hot ingredients, as this will deform
the stem.
Whipping
• Place the ingredients into the measuring jug or a suitable container.
• Whip the ingredients until the desired results are achieved.
• Keeping the whipping accessory submerged will help to prevent spillage.
• Extra care should be taken while whipping hot ingredients.
Chopping
• Place the ingredients into the chopper bowl, up to the max level.
• Assemble the bowl and fit it to the appliance
• Chop the ingredients until the correct consistency is reached.
• Do not use the chopper for more than a minute during continuous usage. Keep an
interval of near five minutes between two consecutive cycles.
Refer to the table for appropriate processing.
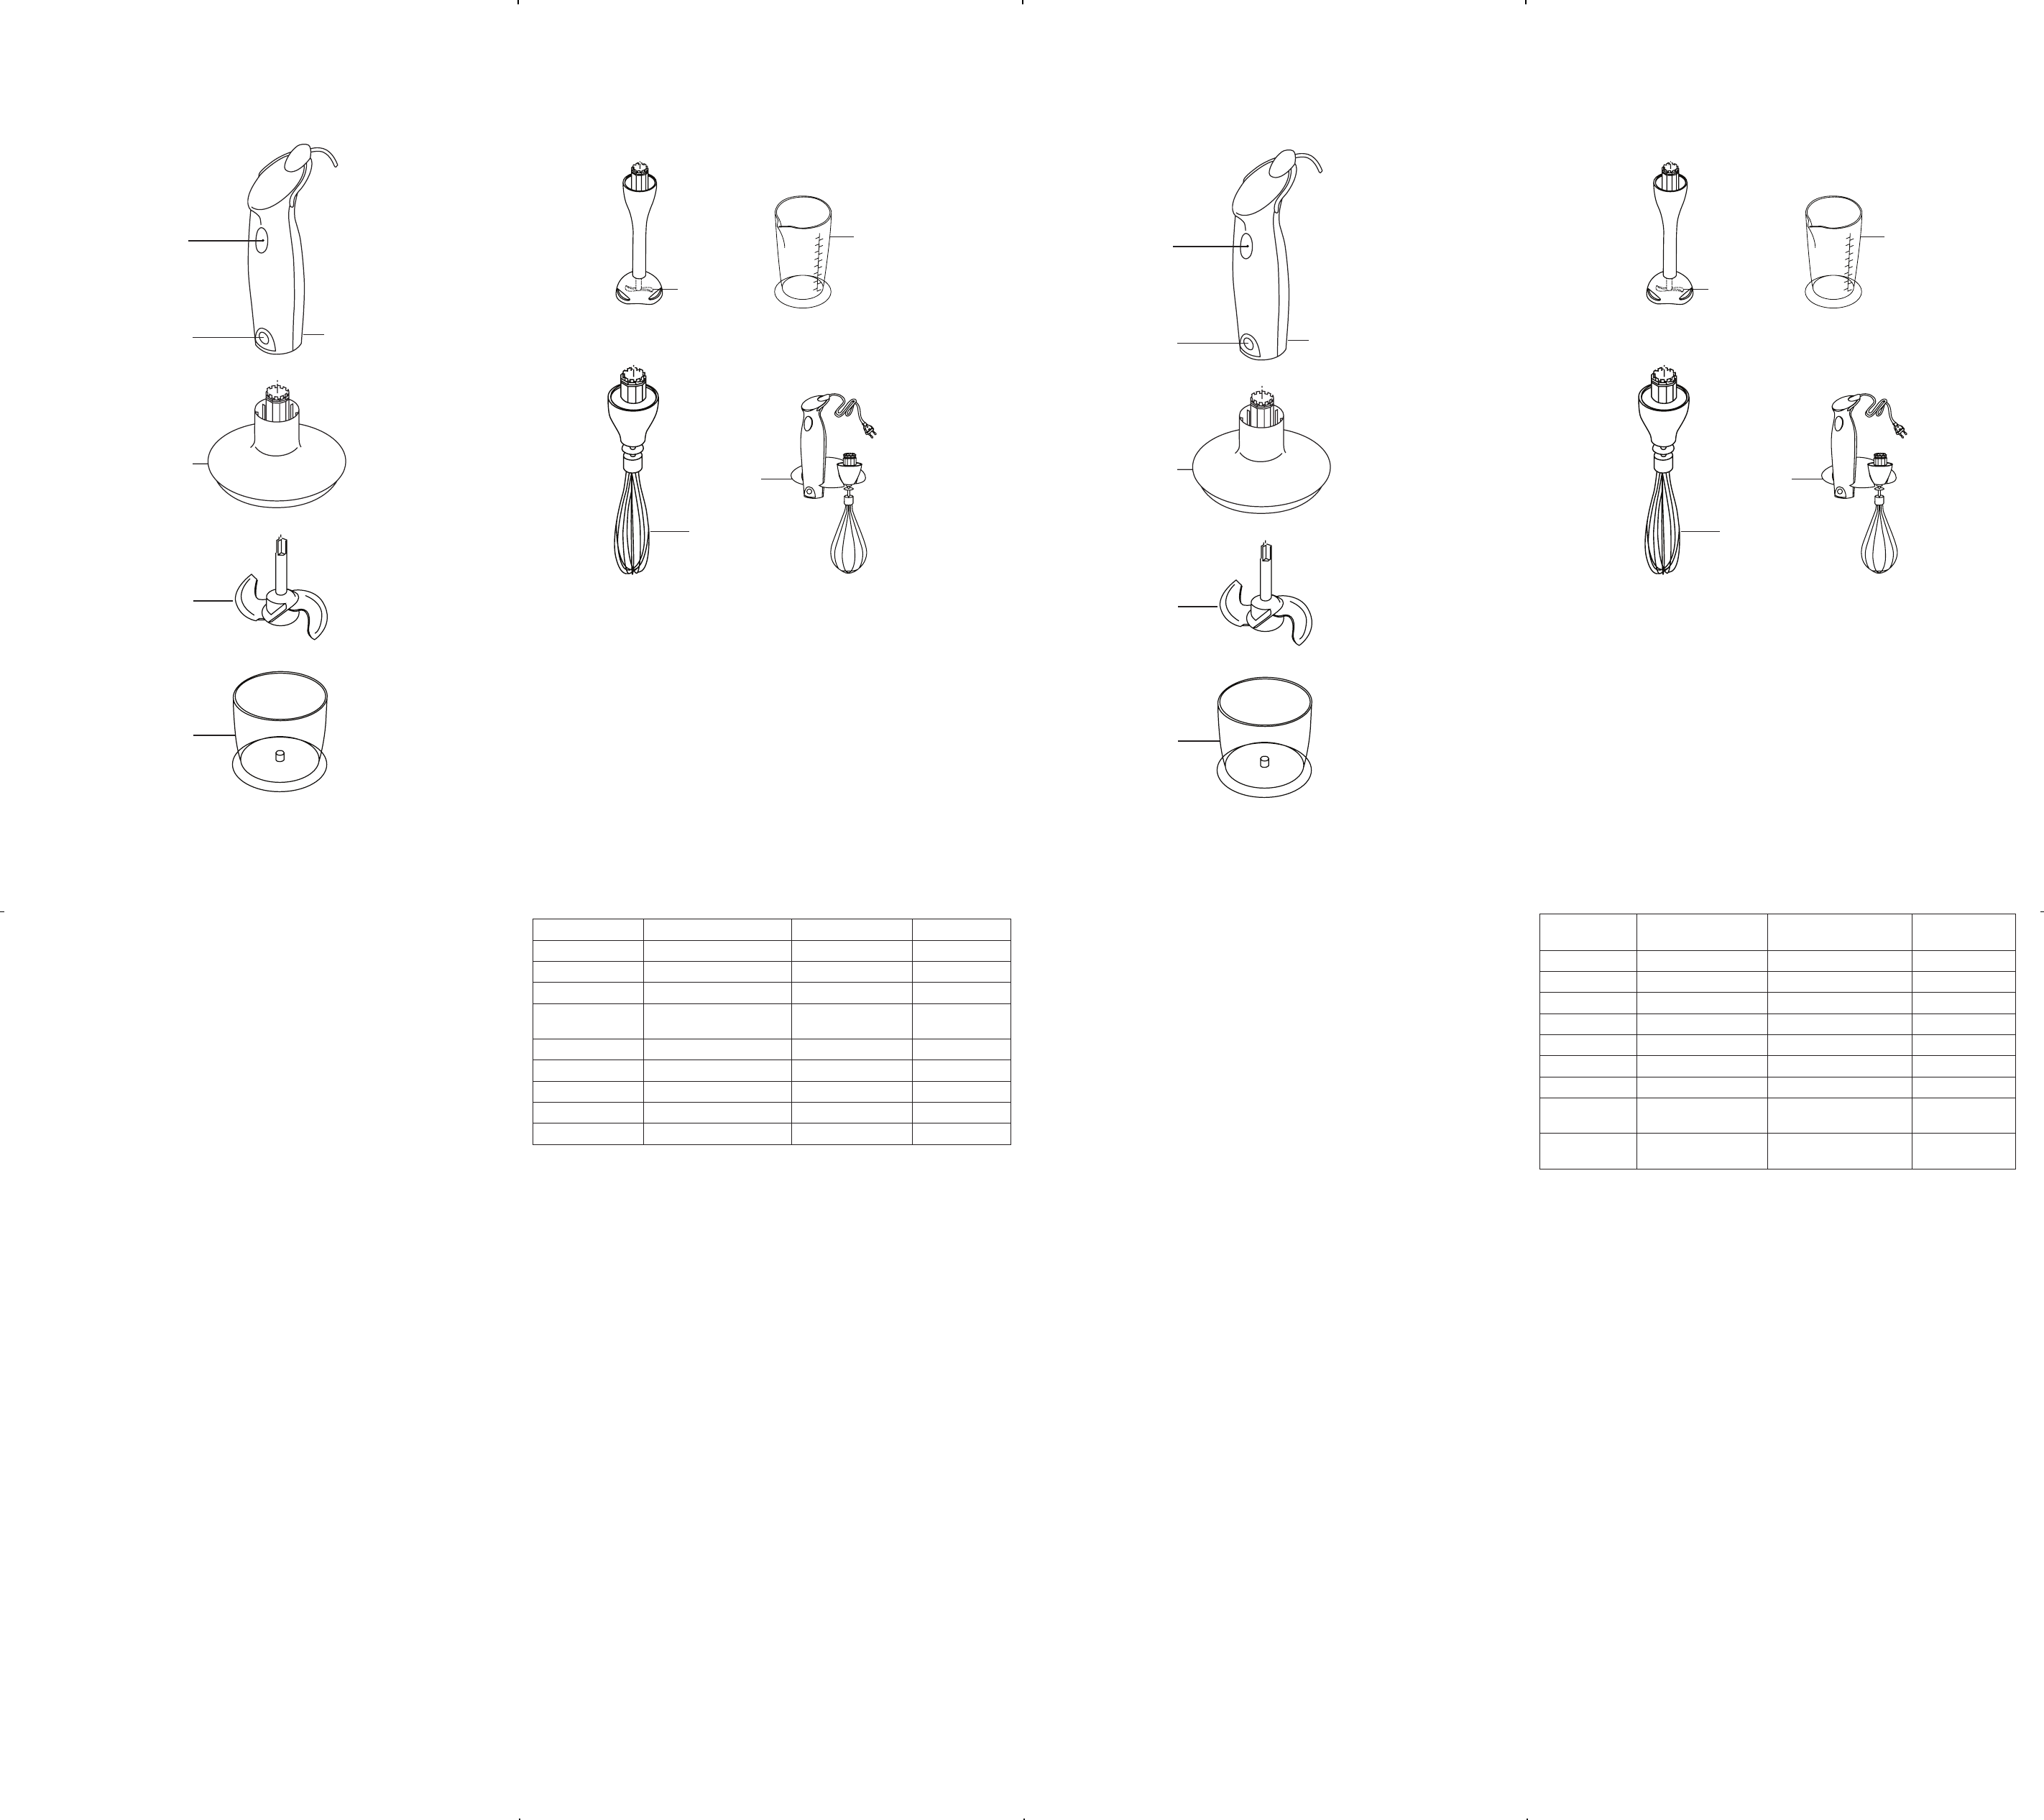
1. Interruptor de pulso
2. Botón de liberación
3. Tapa del picador
4. Cuchilla de acero inoxidable para el picador
5. Taza del picador
6. Cuchilla multiuso de acero inoxidable
7. Taza de medir/mezclar
8. Accesorio para batir
9. Soporte para montaje de pared
1. Pulse speed switch
2. Release button
3. Chopper lid
4. Chopper stainless steel blade
5. Chopper bowl
6. All-purpose stainless steel blade
7. Measuring/mixing cup
8. Whisking attachment
9. Wall mounting bracket
Cantidad máxima Preparación Tiempo(s)
Carne 300g (cubos de < 2cm) En cubos 15-25
Queso duro 200g (cubos de < 1cm) En cubos 20-25
Cebollas 100g En cuartos 5-10
Papilla para
bebés
170g Cocine y corte en
cubos
10-20
Nueces 350g Retire la cáscara 8-15
Ajo 20 dientes Corte en trozos 10-20
Pan seco 150g Corte en trozos 10-20
Perejil 1 ramito Quite los tallos 1-20
Zanahoria 200g Corte en trozos 10-20
Almacenamiento:
Puede guardar su electrodoméstico y una de las varillas de licuado en el soporte de pared
proporcionado con el aparato.
¡Advertencia!
No use el electrodoméstico de forma continua durante más de 1 minuto. Luego de usar
el electrodoméstico de forma continua durante 1 minuto, déjelo enfriar por lo menos 5
minutos antes de ponerlo en funcionamiento otra vez.
Cuidado y limpieza
Este aparato viene permanentemente lubricado de fábrica y no requiere lubricación
suplementaria. No contiene piezas reparables por el consumidor. Para cualquier
tipo de servicio, uno debe de acudir al personal calificado.
Cómo cuidar su batidora de inmersión
Antes de la limpieza y el mantenimiento, apague el electrodoméstico y
desenchúfelo. Lave las cuchillas, la jarra medidora y los accesorios con agua tibia
y jabón, y seque bien. Tenga cuidado porque las cuchillas son afiladas. Limpie la
unidad del motor con un paño húmedo. No use ningún limpiador abrasivo o con
solventes. No intente afilar las cuchillas ya que esto podría dañarlas.
Qué hacer y qué evitar
1. No toque las piezas en movimiento.
2. Siempre permita que el motor se detenga antes de acercarse a las cuchillas o
cambiar algún accesorio.
3. Mantenga los dedos, el cabello largo, la ropa suelta y el cable de alimentación
lejos de las piezas en movimiento.
4. Manipule la cuchilla con cuidado, ya que es filosa.
5. Nunca tire del cable de corriente para desconectarlo del tomacorriente.
6. Mantenga el cable de alimentación de corriente lejos del calor, del aceite y de
bordes filosos.
7. No coloque el electrodoméstico sobre o cerca de fuentes de calor o en un
horno caliente.
8. No use el electrodoméstico en exteriores. Siempre proteja la unidad del motor
del agua o la humedad excesiva.
9. Use el electrodoméstico solo con las manos secas.
10. Si el cable de corriente se daña durante el uso, desconecte el electrodoméstico
de la fuente de energía inmediatamente. No toque el cable de corriente antes
de desconectarlo de la fuente de energía.
11. Cuando no esté en uso, el electrodoméstico debe ser guardado en un lugar
seco. Los niños no deben tener acceso a los electrodomésticos guardados.
12. Nunca sumerja la espiga de plástico en líquidos calientes/hirviendo.
Storage
You can store your appliance and one of the blending sticks on the wall mounting bracket
provided along with the appliance.
Warning: Do not operate the appliance continuously for more than 1 minute. After
operating the appliance continuously for 1 minute, let it cool down for at least 5 minutes
before operating it.
Care and Cleaning
This appliance is permanently lubricated and will not require additional lubrication.
It contains no user serviceable parts. Refer service to qualified service personnel.
How to care for your blender set
Before cleaning and maintenance, switch the appliance off and unplug it. Wash the
blades, measuring jug and accessories in warm soapy water and dry well. Be careful
as the blades are sharp. Wipe the motor unit with a damp cloth. Do not use any
abrasive or solvent-based cleaner. Do not attempt to sharpen the blades as this could
damage them.
Some Do’s and Dont's:
1. Do not touch moving parts.
2. Always allow motor to stop before approaching the blades or changing any
accessories.
3. Keep your fingers, long hair, loose clothes and power cord away from moving
parts.
4. Handle the blade with care as it is sharp.
5. Never pull the power cord to disconnect the plug from the wall socket.
6. Keep the power cord away from heat, oil and sharp edges.
7. Do not place the appliance on or near heat source or in a heated oven.
8. Do not use the appliance outdoors. Always protect the motor unit from water or
excessive humidity.
9. Operate the appliance only with dry hands.
10. If the power cord is damaged during use, disconnect the appliance from the
power supply immediately. Do not touch the power cord before disconnecting
from the power supply.
11. When not in use, the appliance should be stored in a dry place. Children should
not have access to stored appliances.
12. Never immerse your plastic stem in hot, boiling liquid.
Maximum Qty Preparation Time(s)
Meat 300g(<2cm cubes) dice 15-25
Hard cheese 200g(<1cm cubes) dice 20-25
Onions 100g quarter 5-10
Baby Food 170g Cook and dice 10-20
Nuts 350g Remove shell 8-15
Garlic 20 pieces Cut into pieces 10-20
Dry Bread 150g Cut into pieces 10-20
Parsley 1 spri Remove stalks 1-20
Carrot 200 Cut into pieces 10-20
8
9
6
5
0
1
0
0
15
0
20
0
2
50
3
0
0
3
5
0
4
0
0
4
50
50
0
55
0
6
0
0
6
5
0
7
0
0
7
5
0
80
0
m
l
7
8
9
6
5
0
1
0
0
15
0
20
0
2
50
3
0
0
3
5
0
4
0
0
4
50
50
0
55
0
6
0
0
6
5
0
7
0
0
7
5
0
80
0
m
l
7
Product may vary slightly from what is illustrated.


