


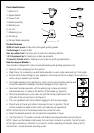


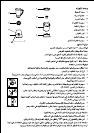


Parts Identification
1. Motor Unit
2. Speed Switch
3. Power Cord
4. Blade Assembly
5. Blending Jar
6. Jar Lid
7. Measuring cup
8. Grinder jar
9. Grinder Blade assembly
Product Features
350W of motor power to take care of toughest grinding needs
Cord storage to reduce clutter
Non slip rubber feet for a firmer grip of product on standing platform.
1.5 lt transparent jar for meeting your daily requirements
70 gms Dry Grinder unit for meeting all your small dry grinding requirements.
How to use your Blender :-
Your blender is designed for indoor household blending and grinding operations only.
• Remove all the packaging from the product.
• Wash the jar, lid, measuring cup and blade assembly in warm sudsy water and dry it thoroughly.
• Ensure that the rated voltage on your appliance is the same as the line voltage in the socket you
will be using to operate your blender.
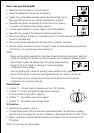
• Your blade assembly has a sealing ring, which can be removed while cleaning and
should be replaced immediately to prevent damage and loss. (figure A)
• Now take the blade assembly with the sealing ring in place and rotate it
anticlockwise lock it in place at the bottom of the blender jar. (figure B)
• Place the assembled jar on the main unit with the handle positioned on the
right side of the unit as shown in the figure C.
• Put your ingredients into the jar before plugging it into the power supply.
• Place the lid on the jar and rotate it clockwise to lock it in position. The lid
will also operate the safety switch which will make the unit operational.
NOTE: Unless the lid is in the locked position the unit will not work.
• Select the desired speed to mix and blend the ingredients in the jar.
• Turn the Knob to "0" position and wait until blades have stopped before removing the jar.
NOTE : Never run the blender continuously for more than 2 minutes in a stretch. Turn off as soon
as the right consistency is reached. If you want to continue operating the blender, allow a rest of
not less than 1 minute between operating cycles.
Fig. A
Fig. B
Fig. C
1
6
7
8
9
4
5
2
3