


English
-5-
English
• When not in use, the appliance should be
stored in a dry place. children should not
have access to stored appliances.
Inspection and repairs
• Before use, check the appliance for
damaged or defective parts. Check for
breakage of parts, damage to switches
and any other conditions that may affect
its operation.
• Do not use the appliance if any part is
damaged or defective.
• Have any damaged or defective parts
repaired or replaced by an authorized
repair agent.
• Before use, check the power supply cord
for signs of damaged, ageing and wear.
• Do not use the appliance if the power
supply cord or main plug is damaged or
defective.
• If the supply cord is damaged, it must be
replaced by the manufacturer or its
service agent or a similarly qualified
person in order to avoid a hazard.
• Do not cut the power supply cord and do
not attempt to repair it yourself.
• Never attempt to remove or replace any
parts other than those specified in this
manual.
• Do not attempt to repair the appliance.
Take it to your nearest Black & Decker -
owned or authorized Services Centre for
repair.
Double Insulation
This appliance is double insulated;
therefore no earth wire is required.
Always check that the power supply
corresponds to the voltage on the rating
plate.
Additional Safety Instructions for
Blenders
• Do not immerse the appliance, cord set
or plug in liquids
• Always leave sufficient space around the
appliance for ventilation.
• Keep loose clothing, hair, jewellery, etc.
away from moving parts.
• Do not use the unit if you have wet hands
or bare feet.
• Care is needed when handling cutting
blades, especially when removing the
blades, emptying, and during cleaning.
• Switch off the appliance before changing
accessories or approaching parts which
move in use.
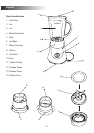
Assembly
This appliance requires some assembly to
complete the required task. Please refer to
the relevant section for particular assembly
details. All parts should be cleaned before
use. see "Cleaning" for details.
Use
As a Blender
Place the appliance on a clean, flat work
surface.
Assemble the jar (3) by first placing the
sealing ring (5) on the blade assembly (4).
Position the blade assembly in the jar base
(6). Fit the jar base (6) into the jar (3),
rotating it in an anti-clockwise direction until
tight.
Warning! Do not over-tighten.
Place the assembled jar on the motor
housing (7) and rotate it in a clockwise
direction until it locks in position.
To unlock rotate it in anticlockwise direction
until it unlocks in position.
Add the ingredients to the jar then fit the lid
(2) and filter cap (1). The filter cap must be
rotated clockwise to lock it in place.