


8
7
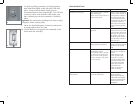
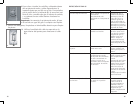
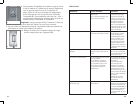
TROUBLESHOOTING
PROBLEM POSSIBLE CAUSE SOLUTION
Grinder stops working. The ground coffee container
has disengaged.
There are too many beans in
the grinding bowl.
Make sure the discharge
chute is clean and free of
coffee grinds; a buildup
of coffee grounds will
cause the ground coffee
container to slip forward.
Unplug the appliance
and remove some of the
beans from the grinding
bowl.
Coffee tastes rancid. Grinder has buildup of coffee
grounds.
Oil in the coffee beans
will become rancid if left
in the grinder. Make sure
there are no beans left in
the grinder. Clean the
discharge chute and the
ground coffee container
after each use..
Coffee tastes like nuts or spices. Grinder has been used for
other grinding operations.
Grinder will share
avors; purchase another
grinder for spices and
nuts.
Grinder will not start. Grinder cover is not
completely closed.
The ground coffee container
is not properly placed. The
cover is not on the ground
coffee container. The outlet
is not working.
Grinder cover snaps into
place when completely
closed.
Make sure the cover
on the ground coffee
container is in place;
push the ground coffee
container securely back
in the base so that the
front is ush with the
base of the base.
Check to make sure
outlet is working.
The ground neness selector is
not working.
The grinding blade is not
correctly positioned.
Remove the grinding
blade and clean
following directions in
CARE AND CLEANING.
Reattach grinding blade
making sure it is fully
integrated.
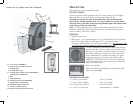
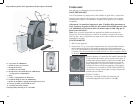
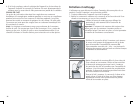
8. To replace grinding assembly, set inside grinding
bowl and twist slightly to the left until it falls into
place. Grasp lock and release knob and turn
counterclockwise to lock assembly (F). You will hear
a series of clicks as the selection dial rotates, and
then a distinct pop once the assembly is locked in
place.
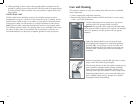
Important: Do not immerse grinding bowl, base or plug
in liquid or under running water.
9. Never use harsh detergents or abrasive cleansers or
scouring pads to clean any part.
10. Use the built-in cord wrap on the underside of the
unit to store the cord (G).
G
F