8
9
ENGLISH
SNEAK-A-CUP
®
FEATURE
Remove the carafe and brewing is paused. The carafe must be placed back on the carafe
plate within 30 seconds to prevent overflow. Brewing begins again.
DELAYED BREWING
• Follow steps 1 through 4 under BREWING COFFEE.
• Make sure clock has been set to correct time of day or follow the directions in SETTING
THE CLOCK.
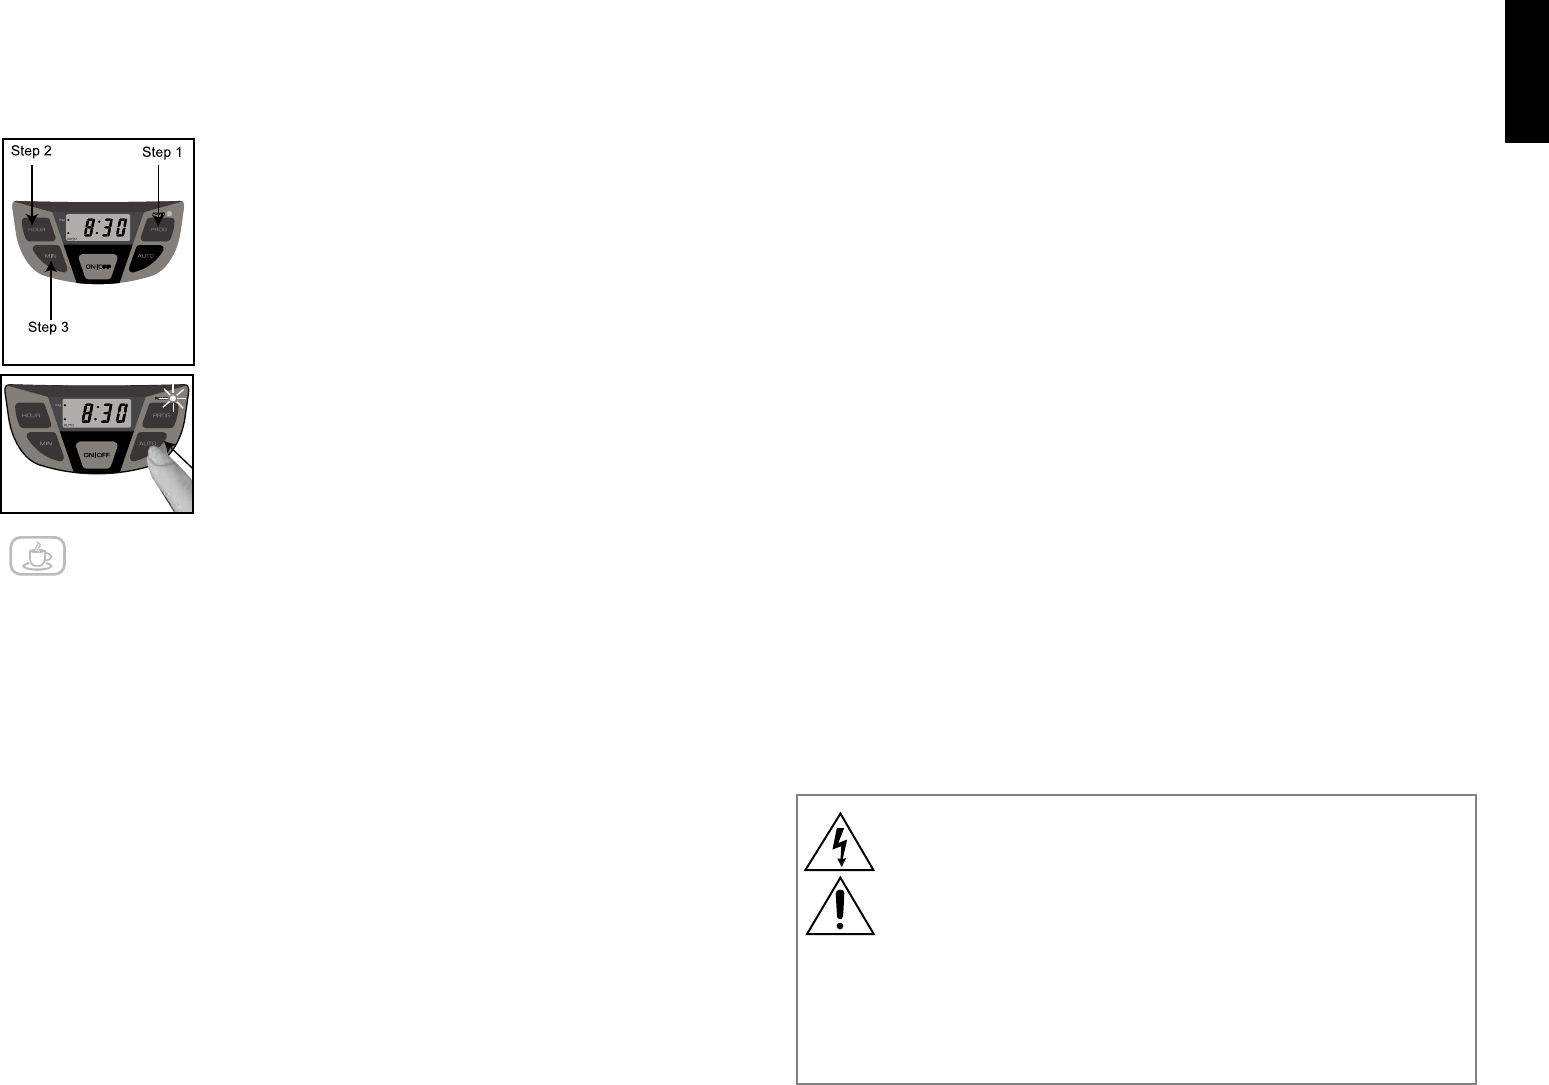
1. Press the PROG button (Step 1). The AUTO light will flash
several times. The clock displays 12:00.
Note: If the coffeemaker has not been unplugged, the last
delayed brewing time will appear on the display.
To set the auto brew time: Within 5 seconds press HOUR button
(Step 2), then the MIN button (Step 3) to choose the time you
would like the coffee to start brewing (for example, 8:30 AM) (L).
2. Press the AUTO button to set delayed brewing. The AUTO light
at the bottom left of the display stops blinking. The display will
change to the time of day (M).
3. To check the set auto time: Press PROG button. Press AUTO
button to return to AUTO BREW.
4. To cancel delayed brewing: Press the ON/OFF button. All lights
turn off. The time of day will still show on the display.
COFFEE BREWING TIPS
• Coffee gets stronger as it brews; stir coffee before serving to have each cup taste the
same.
• Not sure how much coffee to use? Try 1 heaping scoop of medium grind coffee for each
cup.
• Never reuse paper coffee filters! They will make the coffee taste stale; they may also tear
and spill grinds into the brewed coffee.
• Store coffee grounds in a tightly sealed container in a dark place. It is best to grind coffee
just before it is brewed.
• For added flavor: whip some heavy cream with 1 or 2 tablespoons of hazel nut, chocolate
or almond liqueur. Use to top off each cup of coffee.
• Rinse both the carafe and the filter basket with warm water immediately after each use to
maintain good coffee flavor.
• For iced coffee make coffee ice cubes from left over coffee and use to chill the coffee.
Care and Cleaning
This product contains no user serviceable parts. Refer service to qualified service
personnel.
CLEANING
Make sure your coffeemaker is unplugged and cool.
1. Open the coffeemaker cover. Remove the filter basket. Throw away the used paper
filter and coffee grounds.
2. Wash the filter basket and carafe in the dishwasher (top-rack) or by hand in hot,
soapy water.
3. Wipe the outside of the coffeemaker, control panel and carafe plate with a soft,
damp cloth.
Note: Do not use abrasive cleansers or scouring pads. Never immerse the coffeemaker
in water.
4. To clean the inside of the cover, open the cover and leave in the open position; wipe
surfaces with a damp cloth.
CLEANING WITH VINEGAR
Note: With regular use, minerals and hard water can clog your coffeemaker. A full
cleaning with vinegar is recommended once a month.
1. Pour white vinegar into the water reservoir up to the 3-cup mark on the water
window. Add cold water up to the 8-cup mark.
2. Put a paper filter in the filter basket and close the cover. Set the empty carafe on the
carafe plate.
3. Turn on the coffeemaker. Let half the cleaning mixture brew into the carafe (until the
level is around 4). Turn off the coffeemaker and let it soak for at least 15 minutes.
4. Turn on the coffeemaker again and brew the remaining cleaning mixture into the
carafe. Turn off the coffeemaker; empty carafe and discard the paper filter.
5. Fill the reservoir with cold water to the 8-cup line; replace carafe on carafe plate
and then turn on the coffeemaker for a complete brewing cycle to flush out the
remaining cleaning mixture. You may want to repeat this step to completely remove
the vinegar smell/taste.
6. Wash the filter basket and carafe as shown in CLEANING.
L
(M)
M
The lightning symbol refers to “dangerous voltage”; the exclamation symbol
refers to maintenance instructions. See below.
Warning: To reduce the risk of fire or electric shock, do not remove the cover
of the coffeemaker. There are no user-serviceable parts inside. Repair should
be done by authorized service personnel only.
WARNING
RISK OF FIRE OR ELECTRIC SHOCK. DO NOT OPEN.


